background image

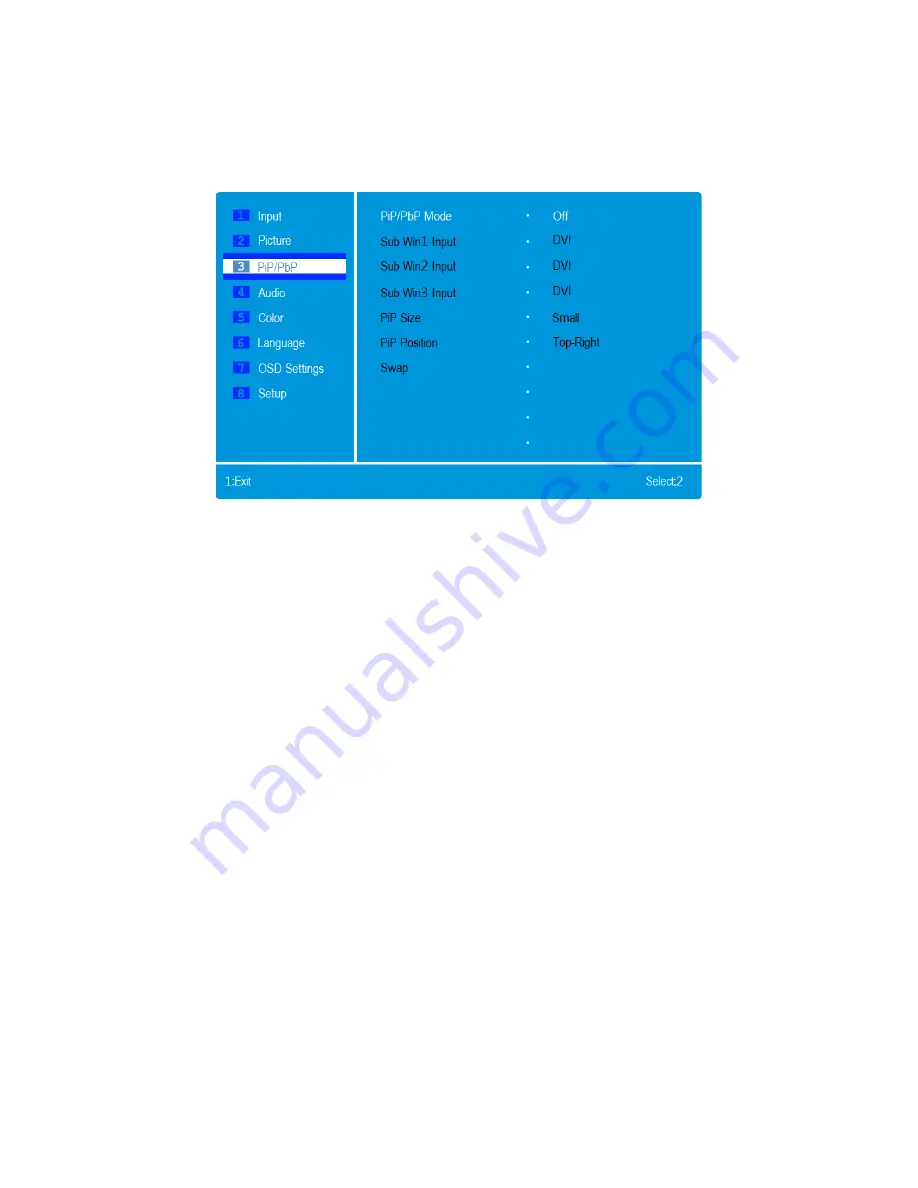
PiP/PbP Menu 

This monitor has five video inputs and can simultaneously display up to four images using the 
Picture-in-Picture (PiP) and Picture-by-Picture (PbP) modes. 


PiP/PbP Mode:

 Selects the Picture-in-Picture or Picture-by-Picture mode to be used. PiP 

displays the content from Input 2 in a window laid over main input image. PbP displays the 
content of up to four inputs. The available options are: Off, PiP, PbP (2 images), PbP3 (3 
images), and PbP4 (4 images). 

Input 2:

 Selects which video input to use as the second image when set to PiP or PbP mode. 

The possible options are DVI, HDMI 1-MHL, HDMI 2-MHL, DisplayPort 1, and DisplayPort 2. 

Input 3:

 Selects which video input to use as the third image when set to PbP3 or PbP4 mode. 

The possible options are DVI, HDMI 1-MHL, HDMI 2-MHL, DisplayPort 1, and DisplayPort 2. 

Input 4:

 Selects which video input to use as the fourth image when set to PbP 4 mode. The 

possible options are DVI, HDMI 1-MHL, HDMI 2-MHL, DisplayPort 1, and DisplayPort 2. 

PiP Size:

 Adjusts the size of the PiP window. The possible options are Small, Medium, and 

Large. 

PiP Position:

 Adjusts the location of the PiP window. The possible options are Top-Right, 

Top-Left, Bottom-Right, and Bottom-Left. 

Swap:

When using PiP or PbP modes, selecting the Swap entry switches the display positions 

of the Main Input and Input 2. The Swap entry is not available in PbP3 and PbP4 modes. 


13 

Содержание 12156

Страница 1: ......

Страница 2: ...STAND BASE 7 VIEWING ANGLE ADJUSTMENT 9 MAIN INPUT SELECTION 9 ON SCREEN DISPLAY OSD MENU 10 Basic Menu Operation 10 Input Menu 11 Picture Menu 12 PiP PbP Menu 13 Audio Menu 14 Color Menu 15 Language Menu 16 OSD Settings Menu 17 Setup Menu 18 TECHNICAL SUPPORT 18 WARRANTY 18 TROUBLESHOOTING 19 SPECIFICATIONS 20 2 ...
Страница 3: ...MA 5 15 three prong grounded plug Do not use a cheater plug or otherwise bypass the grounding pin The power supply for this monitor accepts a wide range input voltages from 100 to 240 VAC 50 or 60 Hz with a current at least 1 75A Ensure that your power source is within these limits If not consult a professional electrician or your power company for a resolution Unplug the monitor if it will go unu...
Страница 4: ...r tilt and swivel plus rotation for easy portrait landscape orientation changes Built in stereo speakers with 2 watts channel amplifier 100 x 100 VESA mounting pattern PACKAGE CONTENTS Please take an inventory of the package contents to ensure you have all the items listed below If anything is missing or damaged please contact Monoprice Customer Service for a replacement 1x 28 UHD LED monitor 1x A...
Страница 5: ...DMI connection however the HDMI source must support the 4K feature as defined in the HDMI version 1 4 specification and you must use a High Speed HDMI cable not included DisplayPort Note This monitor supports the full 4K resolution 3840x2160 60Hz at the full 60Hz refresh rate however the DisplayPort source and cable must comply with the DisplayPort version 1 2 specification cable not included DVI ...

Страница 6: ...played pressing the UP button moves the selection highlight up If the OSD menu is not displayed this button has no effect 5 SELECT If the OSD menu is displayed pressing the SELECT button either selects the currently highlighted menu option or opens the currently highlighted menu entry for editing If the OSD menu is not displayed pressing the SELECT button opens the INPUT SELECTION menu and selects...

Страница 7: ... output of your computer to the audio input on the monitor 4 Plug the DC power connector on the AC power adapter into the DC IN port on the back of the monitor 5 Plug the included AC power cord into the AC power adapter Plug the other end into a nearby power outlet MONITOR STAND BASE To install the stand perform the following steps 1 Place a blanket or towel on a flat surface such as a table or th...

Страница 8: ... that the monitor can be attached to a desk or wall mount To remove the stand perform the following steps 1 Place a blanket or towel on a flat surface such as a table or the floor 2 Place the monitor face down on the blanket or towel 3 Remove the four M4x8screws attaching the stand to the back of the monitor 4 Follow the mounting instructions for your wall desk mount to attach the monitor to the m...

Страница 9: ...d move it as desired Use soft cloth gloves or a soft dry cloth to grasp the monitor without touching the screen MAIN INPUT SELECTION To change the main input perform the following steps 1 Press the SELECT button to display the Input Selection menu 2 Use the UP or DOWN buttons to move the highlight to the desired input 3 Press the SELECT button to select the highlighted input 9 ...

Страница 10: ... UP When the OSD menu is displayed pressing the UP button moves the selection highlight up SELECT When the OSD menu is displayed pressing the SELECT button either selects the currently highlighted menu option or opens the currently highlighted menu entry for editing If the OSD menu is not displayed pressing the SELECT button opens the INPUT SELECTION menu and selects the currently highlighted vide...

Страница 11: ...Input Menu Selects the main input source You can select DVI Dual Link DVI D HDMI 1 MHL HDMI 2 MHL DisplayPort 1 or DisplayPort 2 11 ...

Страница 12: ...ttings to improve fast moving images The available options are Off Fast Faster and Fastest DCR DCR stands for Dynamic Contrast Ratio which is a circuit that increases the effective picture contrast by changing the light intensity of the LED backlighting DCR tends to cause too much contrast fluctuation when dealing with swiftly moving images and is usually better suited to applications use than for...

Страница 13: ... HDMI 2 MHL DisplayPort 1 and DisplayPort 2 Input 3 Selects which video input to use as the third image when set to PbP3 or PbP4 mode The possible options are DVI HDMI 1 MHL HDMI 2 MHL DisplayPort 1 and DisplayPort 2 Input 4 Selects which video input to use as the fourth image when set to PbP 4 mode The possible options are DVI HDMI 1 MHL HDMI 2 MHL DisplayPort 1 and DisplayPort 2 PiP Size Adjusts...

Страница 14: ...e Sets the volume level The adjustment range is 0 to 100 Mute Toggles audio mute On or Off Audio Source Selects the audio source The possible options are Line In HDMI 1 MHL HDMI 2 MHL DisplayPort 1 and DisplayPort 2 14 ...

Страница 15: ... displayed image using one of three preset values The possible options are Warm Normal Cool and sRGB User Defined Allows you to independently adjust the individual red green and blue intensity values The adjustment range is 0 to 100 for each color 15 ...

Страница 16: ...his menu allows you to set the language to be used in the OSD The possible options are English German Spanish French Italian Dutch Russian Swedish Turkish Simplified Chinese Traditional Chinese Japanese and Korean 16 ...

Страница 17: ...of the OSD menu The adjustment range is 0 to 100 Transparency Adjusts how transparent or opaque the OSD menu will appear on screen The possible options are Off 1 2 3 and 4 OSD Time Out Sets the amount of time in seconds that the OSD menu will display without any input before it automatically closes The possible options are 5s 10s 20s 30s and 60s 17 ...

Страница 18: ...s available through the online chat button on our website www monoprice com during regular business hours 7 days a week You can also get assistance through email by sending a message to tech monoprice com WARRANTY MONOPRICE will replace defective monitors with a new monitor if the RMA is issued within thirty 30 days of the original date of purchase as shown on the original invoice Monitors identif...

Страница 19: ...ay is blank A Press a key on the keyboard to ensure the computer is not asleep or that a screen saver is active Verify that the proper input is selected Verify that the display cable is securely attached to both the display and the video source Replace the cable with another of the same type to verify that it is not faulty Q One of the primary colors red green or blue is missing A Replace the vide...

Страница 20: ...TRS Line In Horizontal Frequency HFR 30 135 kHz Vertical Frequency VFR 60 75Hz Pixel Clock Frequency 594 MHz PNP Standard VESA DDC2BTM Power Consumption Operation 65W Standby 1W Monitor Input Power 12 VDC 5 42A AC Adapter Input Power 100 240 VAC 50 60Hz Operating Temperature 32 122 F 0 50 C Storage Temperature 4 140 F 20 60 C Operating Humidity 10 85 non condensing VESA Mount Size 100 x 100 Dimens...

Отзывы: