background image

16

Automatic Icemaker

Stainless Steel Refrigerator

Automatic
icemaker

The icemaker will produce seven cubes 
per cycle—approximately 100–130 cubes 
in a 24-hour period, depending on freezer
compartment temperature, room temperature,
number of door openings and other use
conditions.

If the refrigerator is operated before the water
connection is made to the icemaker, set the
power switch in the 

O

(off) position.

When the refrigerator has been connected 
to the water supply, set the power switch to 
the 

(on) position.

The icemaker will fill with water when it 
cools to 15°F (–10°C). A newly-installed
refrigerator may take 12 to 24 hours to begin
making ice cubes.

Throw away the first few batches of ice to allow
the water line to clear.

Be sure nothing interferes with the sweep 
of the feeler arm.

When the bin fills to the level of the feeler 
arm, the icemaker will stop producing ice. It is
normal for several cubes to be joined together.

If ice is not used frequently, old ice cubes will
become cloudy, taste stale and shrink. 

If ice cubes get stuck in the icemaker, the green
power light will blink. To correct this, set the
power switch to 

O

(off) and remove the cubes.

Set the power switch to 

(on) to restart the

icemaker. After the icemaker has been turned
on again, there will be a delay of about 
45 minutes before the icemaker resumes
operation.

NOTE:

In homes with lower-than-average water

pressure, you may hear the icemaker cycle multiple
times when making one batch of ice.

A newly-installed refrigerator may take 12 to 24 hours to begin making ice.

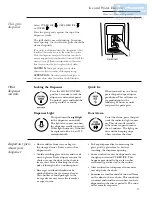
Pull the upper freezer shelf

straight out to access the

icemaker. Always be sure to

replace the shelf. The shelf

can be used for storage.

Icemaker

Feeler Arm

Power
Switch

Green Power
Light

Ice Drawer

Shelf

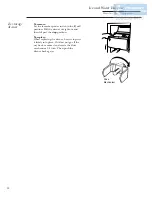
Ice storage
drawer

To access ice, 

pull the drawer forward.

To remove the drawer,

pull it straight out and

lift it past the 

stop

location.

Ice Drawer

Содержание Side-by-Side Stainless Steel Free-Standing

Страница 1: ...Monogram Owner s Manual monogram com Free Standing Side by Side Stainless Steel Refrigerator ...

Страница 2: ...1 Model and Serial Numbers 3 Performance Data Sheet 27 Problem Solver 22 26 Product Registration 3 29 30 Safety Instructions 4 7 State of California Water Treatment Device Certificate 28 Warranty Back Cover Care and Cleaning Cleaning Outside and Inside 19 Light Bulb Replacement 21 Moving 20 Vacation 20 Operating Instructions Automatic Icemaker 16 Additional Features 14 Crispers and Pans 15 CustomC...

Страница 3: ... If you need service To obtain service see the Consumer Services page in the back of this manual We re proud of our service and want you to be pleased If for some reason you are not happy with the service you receive here are steps to follow for further help For customers in the USA FIRST contact the people who serviced your appliance Explain why you are not pleased In most cases this will solve t...

Страница 4: ...en are in the area Unplug your refrigerator before cleaning and making repairs NOTE We strongly recommend that any servicing be performed by a qualified individual Before replacing a burned out light bulb the refrigerator should be unplugged in order to avoid contact with a live wire filament A burned out light bulb may break when being replaced NOTE Turning control to OFF does not remove power to...

Страница 5: ...nchez votre réfrigérateur avant de le nettoyer et de le réparer REMARQUE Nous vous recommandons vivement de confier toute réparation à un technicien qualifié Avant de remplacer une ampoule grillée le réfrigérateur doit être débranché afin d éviter tout contact avec un fil sous tension Une ampoule grillée peut se briser pendant l opération REMARQUE Lorsque vous placez la commande sur 0 éteint l ali...

Страница 6: ... strongly recommend against the use of an adapter plug However if you must use an adapter where local codes permit a temporary connection may be made to a properly grounded 2 prong wall outlet by use of a UL listed adapter available at most local hardware stores The larger slot in the adapter must be aligned with the larger slot in the wall outlet to provide proper polarity in the connection of th...

Страница 7: ...accordement temporaire si les codes locaux le permettent dans une prise de courant à 2 alvéoles adéquatement mise à la terre en utilisant une fiche d adaptation homologuée UL en vente dans la plupart des quincailleries La fente la plus longue de la fiche doit être alignée avec la fente la plus longue de la prise murale afin d assurer la polarité appropriée pour le branchement du cordon d alimentat...

Страница 8: ... 6 F and 6 F Once the desired temperature has been set the temperature display will return to the actual fresh food and freezer temperatures after 5 seconds Several adjustments may be required Each time you adjust controls allow 24 hours for the refrigerator to reach the temperature you have set To turn the cooling system off tap the WARMER pad for either the fresh food compartment or the freezer ...

Страница 9: ...s complete the pan will reset to the MEAT setting 30 F to help preserve thawed items until they are used The displayed actual temperature of the CustomCool pan may vary slightly from the SET temperature based on usage and operating environment NOTE For food safety reasons it is recommended that foods be wrapped in plastic wrap when using ExpressThaw This will help contain meat juices and improve t...

Страница 10: ...ou should hear the plate click into place Disassembling the Chill Thaw tray 0 5 Lbs 4 hours Hamburger Patties 0 5 lb Individually Wrapped Filet Mignon 0 5 lb 1 5 Lbs 8 hours Chicken Breasts 1 5 lbs Ground Beef 1 5 lbs Steak 1 5 lbs 3 0 Lbs 12 hours Chicken Breasts 3 0 lbs Ground Beef 3 0 lbs Steak 3 0 lbs 15 Minutes 1 Beverage Can 12 oz 2 Small Juice Boxes 6 8 oz each 30 Minutes 2 to 6 Beverage Ca...

Страница 11: ...ush it up into the holder 4 Slowly turn it to the right until the filter cartridge stops DO NOT OVERTIGHTEN As you turn the cartridge it will automatically raise itself into position Cartridge will rotate about 1 4 turn 5 Run water from the dispenser for 3 minutes about one and a half gallons to clear the system and prevent sputtering 6 Press and hold the RESET WATER FILTER pad on the dispenser fo...

Страница 12: ...ed on the door shelf Place a finger on either side of the snugger near the rear and move it back and forth to fit your needs Slide out spillproof shelf The slide out spillproof shelf allows you to reach items stored behind others The special edges are designed to help prevent spills from dripping to lower shelves To remove Slide the shelf out until it reaches the stop then press down on the tab an...

Страница 13: ...r baskets To remove push the basket all the way to the back of the freezer Lift up until the back pins are disengaged Lift the entire basket up and pull out Make sure you push the baskets all the way back in before you close the door Slide out freezer shelves To remove slide out to the stop position lift the front past the stop position and slide out Make sure you push the shelves all the way back...

Страница 14: ...oor will remain open to allow you to load and unload food more easily When the door is only partially open it will automatically close The resistance you feel at the stop position will be reduced as the door is loaded with food The beverage rack is designed to hold a bottle on its side It can be attached to any slide out shelf To install 1 Line up the large part of the slots on the top of the rack...

Страница 15: ...om the freezer compartment to flow to the pan The variable temperature control regulates the air flow from the Climate Keeper Set the control to the coldest setting to store fresh meats Set the control to cold to convert the pan to normal refrigerator temperature and provide extra vegetable storage space The cold air duct is turned off Variable settings between these extremes can be selected C O L...

Страница 16: ...cemaker will stop producing ice It is normal for several cubes to be joined together If ice is not used frequently old ice cubes will become cloudy taste stale and shrink If ice cubes get stuck in the icemaker the green power light will blink To correct this set the power switch to O off and remove the cubes Set the power switch to l on to restart the icemaker After the icemaker has been turned on...

Страница 17: ... this pad to speed up ice production This will increase ice production for the following 48 hours or until you press the pad again Door Alarm To set the alarm press this pad until the indicator light comes on This alarm will sound if either door is open for more than 3 minutes The light goes out and the beeping stops when you close the door Spill Shelf Other dispenser controls Do not add ice from ...

Страница 18: ...wer switch to the 0 off position Pull the drawer straight out and then lift past the stop position To replace When replacing the drawer be sure to press it firmly into place If it does not go all the way back remove it and rotate the drive mechanism 1 4 turn Then push the drawer back again Drive Mechanism ...

Страница 19: ... through GE Parts and Accessories 800 626 2002 Order part number WX10X15 Do not use appliance wax or polish on the stainless steel Cleaning the inside To help prevent odors leave an open box of baking soda in the fresh food and freezer compartments Unplug the refrigerator before cleaning If this is not practical wring excess moisture out of sponge or cloth when cleaning around switches lights or c...

Страница 20: ...d unplug the refrigerator Clean the interior with a baking soda solution of one tablespoon 15 ml of baking soda to one quart 1 liter of water Leave the doors open Set the icemaker power switch to the 0 off position and shut off the water supply to the refrigerator If the temperature can drop below freezing have a qualified servicer drain the water supply system to prevent serious property damage d...

Страница 21: ...g straight out 3 Lift the light shield up and pull it out 4 After replacing the bulb with an appliance bulb of the same or lower wattage replace the shield and the knob 5 Plug the refrigerator back in Freezer compartment Setting the controls to OFF does not remove power to the light circuit 1 Unplug the refrigerator 2 Remove the shelf just above the light shield The shelf will be easier to remove ...

Страница 22: ...zer cooling coils sounds like boiling water or a gurgling noise Cracking or popping of cooling coils caused by expansion and contraction during defrost and refrigeration following defrost Water dripping as it melts from the evaporator and flows to the drain pan during the defrost cycle Icemaker The icemaker water valve will buzz when the icemaker fills with water If the power switch is in the l on...

Страница 23: ...et at the coldest setting See Temperature Controls FRESH FOOD Temperature controls not set cold enough OR FREEZER See Temperature Controls COMPARTMENT Warm weather or frequent door openings TOO WARM Door left open for long time Package may be holding door open FROST OR ICE Door left open or package holding door open CRYSTALS ON Too frequent or too long door openings FROZEN FOOD Frost within packag...

Страница 24: ... used for a long time Dispense water TASTE ODOR until all water in the system has been replenished WATER IN FIRST Normal when refrigerator is first installed Allow 24 hours for the GLASS IS WARM refrigerator to completely cool down Water dispenser has not been used for a long time Dispense water until all water in the system has been replenished Water system has been drained Allow several hours fo...

Страница 25: ...carries moisture into refrigerator when doors are opened INTERIOR LIGHT No power at outlet DOES NOT WORK Light bulb needs replacing See Care and Cleaning WATER ON KITCHEN Ice cubes jammed in chute Poke ice through with a wooden spoon FLOOR OR BOTTOM OF FREEZER HOT AIR FROM Normal air flow cooling motor In the refrigeration process it is BOTTOM OF normal that heat be expelled in the area under the ...

Страница 26: ...cle is in process Allow 24 hours for the system to stabilize SELECTTEMP Fresh food compartment temperature control is set at the warmest FEATURE IS setting This is normal In order to minimize energy usage the NOT WORKING SELECTTEMP feature is disabled when the fresh food compartment temperature control is set at the warmest setting DOORS ARE Unlevel floor Adjust rollers then align doors by adjusti...

Страница 27: ...si 2 8 8 2 bar non shock Temperature 33 100 F 0 6 38 C Flow rate 0 5 gpm 1 9 lpm General Installation Operation Maintenance Requirements Flush new cartridge at full flow for 3 minutes to purge out trapped air Replace cartridge when flow becomes too slow Special Notices Installation instructions parts and service availability and standard warranty are included with the product when shipped This dri...

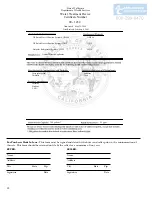
Страница 28: ...tpoint Refrigerator Systems HWF HWF General Electric Appliances Cysts protozoan Turbidity Asbestos Lead Atrazine Lindane 2 4 D 300 gallons 0 5 gpm For Purchases Made In Iowa This form must be signed and dated by the buyer and seller prior to the consummation of this sale This form should be retained on file by the seller for a minimum of two years BUYER SELLER Name Name Address Address City State ...

Страница 29: ...General Electric Company Warranty Registration Department P O Box 32150 Louisville KY 40232 2150 Place 1st Class Letter Stamp Here GE Appliances Consumer Product Ownership Registration Important Mail Today ...

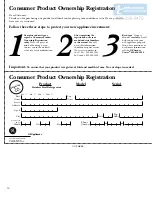
Страница 30: ...l need this information should you require service Our service number in the U S A 800 444 1845 In Canada 888 880 3030 3 Read your Owner s Manual carefully It will help you operate your new appliance properly If you have questions or need more information call the GE Answer Center 800 626 2000 Important To ensure that your product is registered fold and mail this form No envelope is needed Consume...

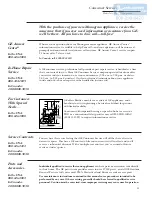
Страница 31: ...n Canada 1 888 880 3030 You can have the secure feeling that GE Consumer Service will still be there after your warranty expires Purchase a GE contract while your warranty is still in effect and you ll receive a substantial discount With a multiple year contract you re assured of future service at today s prices Parts and Accessories In the USA 800 626 2002 In Canada 1 888 880 3030 Individuals qua...

Страница 32: ...e need service during warranty period or beyond in the U S A call 800 444 1845 In Canada 888 880 3030 Some states provinces do not allow the exclusion or limitation of incidental or consequential damages so the above limitation or exclusion may not apply to you This warranty gives you specific legal rights and you may also have other rights which vary from state to state province to province To kn...

Отзывы: