


REMOTE CONTROL OPERATION
(Refer to Appendix C, pages 19-20)
1. POWER - puts T into standby or power on mode.
2. MUTE button - Turns audio off or on. The mute function will automatically
unlock if any adjusts are made related to audio(i.e., volume, bass, etc.)
3. PIC/PAGE
∆∇
– Increase or decrease Color or Contrast, Change Hue (Tint), or
shift horizontal position of the picture in the TV mode.
PIC/PAGE
∆∇
– Increase or decrease Color or Contrast, Change Hue (Tint) of the
picture in the Video (Composite) and S-Video modes
4. PIC-STD button – Recall Factory preset values for Color, Contrast and Hue,
Horizontal Position (simultaneously).
5. TV/CATV button – selects the mode. TV, CATV, VGA1, VGA2.
6. SLEEP– to set sleep timer. Each press will increase the sleep timer in 10-minute
intervals up to 120 minutes (then back to 00). When the sleep count reaches the
last 5 minutes the timer display will show up every minute for 3 seconds. During
the la st minute it will display every 10 seconds.
7. PC/TV/AV- Steps through the video input modes.
8. MENU – brings up adjustments depending on the mode The T is in. (Refer to
appendix A).
9. SEL+/SEL- highlights the menu item to be adjusted.
10. VOL-/VOL+ decrease or increase the selected menu item. If the OSD is not
invoked, VOL-/VOL+ control the audio level directly.
11. AUTO button – Automatically scans all channels for a signal, then sets them into
preset memory.
12. ADD/ERASE button – allows the user manual addition of a channel or erasing a
channel from preset memory.
13. DISP Button – Display the current input mode of the T.
14. MTS button – Switches to bilingual audio.
15. SYSTEM button – Changes the video system in TV, Video, and SVHS. System
types are NTSC, PAL, PAL-M, PAN-N, and SECAM.
16. FINE TUNING – Allows for fine-tuning of channels.
17. JUMP (CR-440) or LAST(PGS-T)– Returns to the previous channel.
18. CH
∆
/ CH
∇
– Steps through the channels.
19. Numeric keys 0 to 9 – allows direct channel selection.
20. FIELD button – (useable only when CCD is on)
21. LANG button – Language Selection (1 or 2).
22. CAP/TXT button –Closed-Caption foreground/background display style
(Accessible only when CCD is on)
23. CCD button – Closed Caption, yellow means OFF, Green is ON
24. VIDEO - Direct selection of Composite video input (CR-440)
25. S-VHS- Direct selection of S-Video input (CR-440)
26. VGA-1- Direct selection of VGA1 (rear) PC or HDTV input (CR-440)
27. VGA-2- Direct selection of VGA2 (front) PC or HDTV input (CR-440)
28. TV- Direct selection of TV (internal tuner) (CR-440)
8
FUNCTIO NS
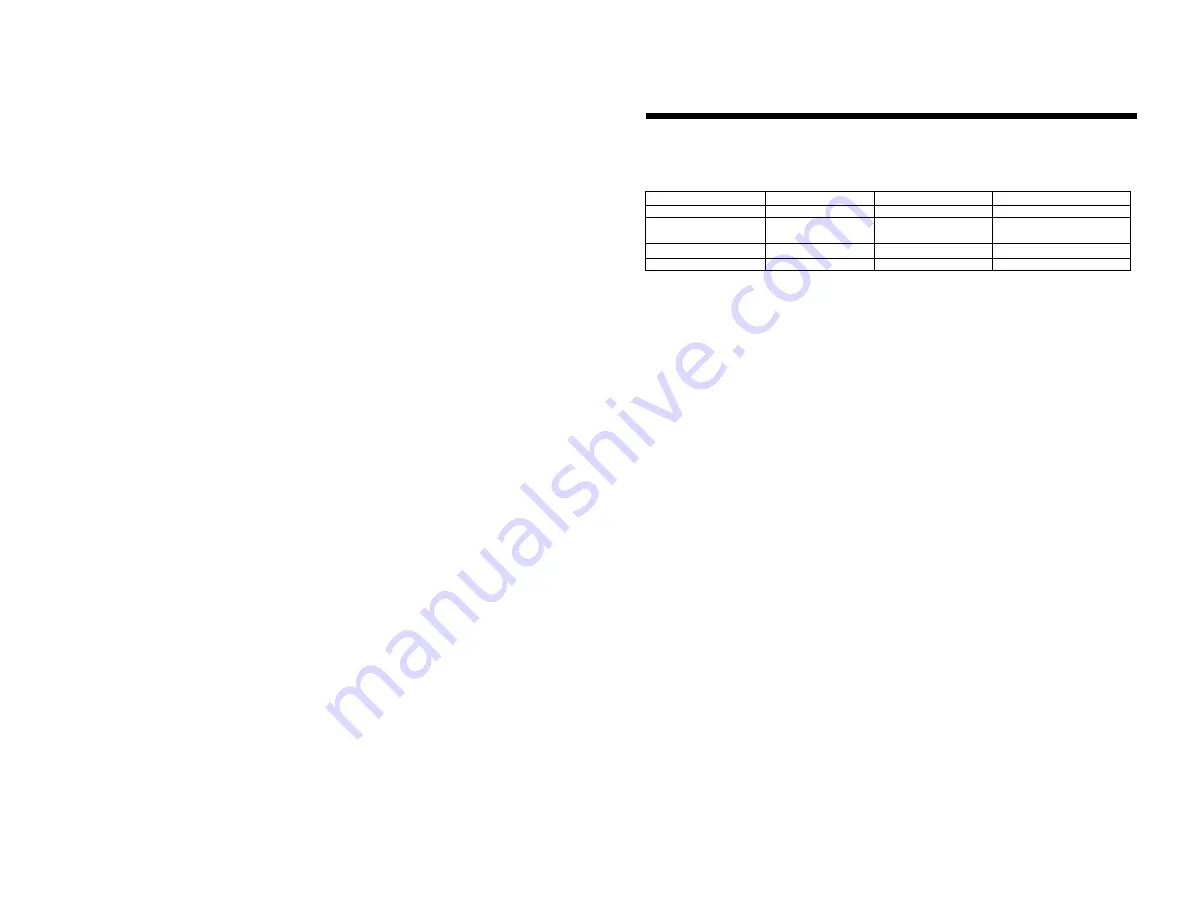
1.Indicators:
a. Power LED shows power on/off and power saving status.
b. Stereo LED is lit when the TV program being received is in stereo.
c. SAP LED is lit when the program is broadcast in Sub-audio.(2
nd
language)
Power LED
Stereo LED
SAP LED
Normal on
Green
Stereo On (Red)
Main Audio Off
Stand by
Amber
Mono Off
Sub Audio On
(Yellow)
Suspend/Active off
Red
Main power off
Off
2.Power Switch:
Controls the power of the monitor. The monitor may power-on directly or
may go to power saving mode after AC power switch is pressed. (
See 4c Options)
.
3.Panel Keys:
There are 8 panel keys
(See Appendix D)
a. Power key: Serves a similar function as the power switch. When you switch off the
power through this key, the monitor goes into an “active off state”. Th e monitor can be
returned to an active on state by pressing the power key on the front control panel or
through the power key located on the remote.
b. TV/PC/AV select: The order being: TV / PC / VIDEO (Composite) / S-video/.
c. Menu key: This key invokes the On-Screen Display (OSD) menus
(See Appendix A
).
These menus and sub-menus may be entered or exited by using the same key. The OSD
will disappear if left idle for 12 seconds. The OSD menu can be controlled from the front
panel or by the remote control.
d. VOL+/-: Serves dual functions as described below:
l
When the OSD menu/sub-menu is not invoked, VOL+/ - controls audio level.
l
Enter key: In menu/sub-menu, the VOL+/VOL- keys become the select, or execute keys.
These controls include entering sub-menus, executing of a function and enable/disable a
function.
l
+/- key: When the magnitude bar appears for functional adjustment,VOL+/VOL- keys
are now +/- keys. They are used to change the magnitude of a certain functions.
e. SEL+/SEL -: To select an item in the main menu or sub-menu.
N o t e
: when you are
adjusting a function under the magnitude bar, you may also adjust other items in the same
group to by pressing the up/down keys. Press MENU to return to the previous menu level
or exit if at the top menu level.
f. CH+/CH-: Steps tuner channels forward or backward.
g. TV/CATV: Select TV or CATV pair as inputs. This is because in the TV/AV mode, the
VGA 1/ VGA 2 key serves as TV/CATV key.
VGA 2 (front) connector is designed for 2
nd
computer use.
*NOTE - If VGA 2 or VGA 1 connector does not have input signal for several seconds, the
monitor LED will turn from green to yellow. The monitor is then in the “standby” mode
until a signal is received. This function only applies at POWER-ON
.
*
It is normal to observe a delay in the image appearing after changing the input mode on the
monitor. Unlike a common Television set, which displays a picture immediately upon changing
the channel, the T is a multifrequency Receiver/Monitor which utilizes input detection and
selection circuitry. It is also normal to hear the clicking of a relay, especially when selecting or
leaving the VGA (PC) mode.
9


