


Installation and Operations Manual • 9
REV. 20 MAY 2011
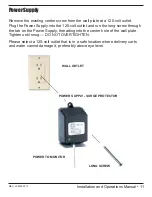
Choosing A Power Outlet
Locate the nearest INDOOR 120 volt power outlet. The power outlet should not be located
near the floor. These outlets are exposed to high traffic, delivery vehicles, and excessive
moisture (damage to power supply and surge protector many occur). Make sure the power
outlet of choice has 24 hour constant power and is not shut off during different hours of the
day.
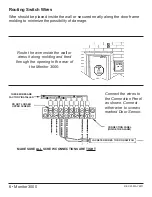
Routing the Wires
Routing and installing the wire should always be done in the most secure and
inconspicuous way possible. In new construction and whenever else possible the wire
should be routed behind the walls or in the attic. If the wires cannot be routed through the
walls or in the attic and surface wiring is required, use wire molding or conduit to secure
and protect these wires.
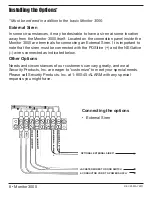
Connecting the Wires
Insert the wires through the hole in the rear of The Monitor. Connect the wire marked
positive to the first screw on the far left marked 12V positive. Connect the wire marked
negative to the second screw from the left marked negative.
CAUTION- The wires marked positive and negative must be hooked up correctly.
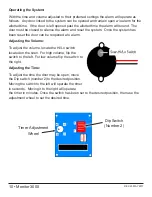
Powering and Testing the System Continued:
Once you have power to the system do the following to arm and activate the system: First
move the system enable toggle switch, located on the circuit board, to the down (ON)
position (this will arm the system.) Close and lock the alarm box door. The system is now
operational.
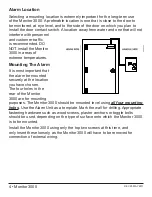
Note: The Monitor 3000 alarm box is armed and must be closed and locked to operate
correctly. If the door is left open, the alarm will sound.
Know your Fire Safety Laws ...
THE MONITOR 3000
IS INTENDED TO BE INSTALLED
ON DOORS COMPLYING WITH
LOCAL, STATE, AND FEDERAL FIRE SAFETY LAWS.


