10
5. Remove the batteries at the places intended for that purpose; not in the containers for household waste. Do
not throw the product in fire. The batteries may explode or leak.
6. Never shorten the batteries terminals.
7. Use batteries of a similar or equivalent type only.
8. Do not charge non-rechargeable batteries.
9. Remove the rechargeable batteries from the product before charging.
10. If you use removable rechargeable batteries, they must be recharged under adult supervision only.
ADJUSTMENT OF THE HEIGHT OF THE SEAT
USE
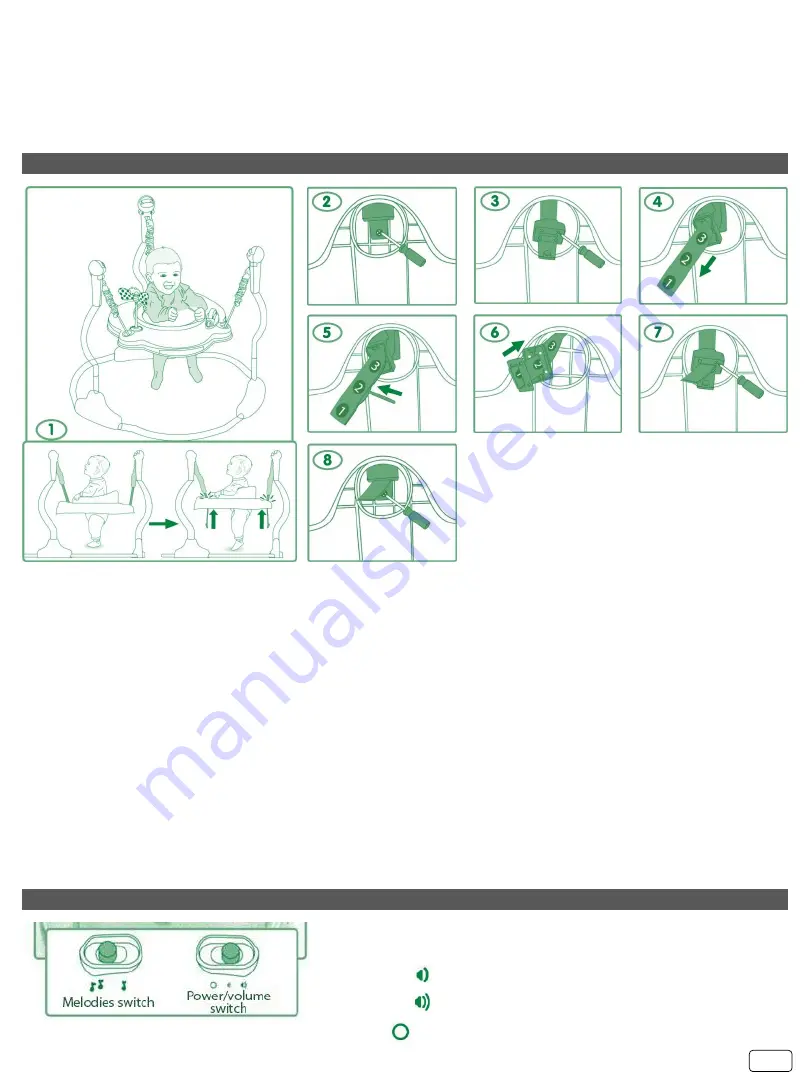
1.Place the child on the seat. Check the distance between the legs of your baby and the floor. The toes of your
child must touch the floor (without jumping). If the entire leg of your child touches the floor or if the toes do not
touch the floor at all, adjust the height in any of the three positions (first position for a short child and third
position for a high child).
2.To adjust the seat in the correct height, first you must take the child out of the jumper. Turn the bottom part of
the seat base towards you. Using a screwdriver remove the screw from the holder of the belt. See Figure 2.
3.Pull the holder towards you and remove the four screws (there may be 2 screws only) from the lid holding the
belt. See Figure 3.
4.Pull the belt towards you and place it in the desired position
– 1/2/3. See Figure 4.
5.Take the metal part holding the belt in its previous position and place it in the opening of the new position. See
Figure 5.
6.Make sure the metal piece is placed in the correct position before fixing the belt holder in place. See Figure 6.
7.Place the holder back into the opening in the base of the seat. Using the 4 small screws fix its lid. See Figure
7.
8.After that fix the holder in place using the big screw and a screwdriver. See Figure 8.
9.Repeat the steps above in order to attach the other two straps at the respective height.
IMPORTANT!
Make
sure that all three strap are adjusted at the same height before using the product.
1. Depending on your
preferences slide the power/volume
adjustment button to mode:
• Low volume.
•High volume.
•ON/ OFF
Содержание 63569
Страница 2: ...BG 2 1 2 3 6 11 300 81 4 5 6 7 8 20 9 10 3 1 5V LR6 11 12 13 EN71...
Страница 3: ...3...
Страница 5: ...5 1 OFF 2 1 2 2 3 2 3 4 1 2 3 4 5 5 6 6 7 7 8 8 9...
Страница 6: ...6 1 2 3 4 1 02 936 07 90 Web www moni bg...
Страница 8: ...8 ASSEMBLY...


