background image

G100 DESKTOP COMPUTER USER GUIDE  7 

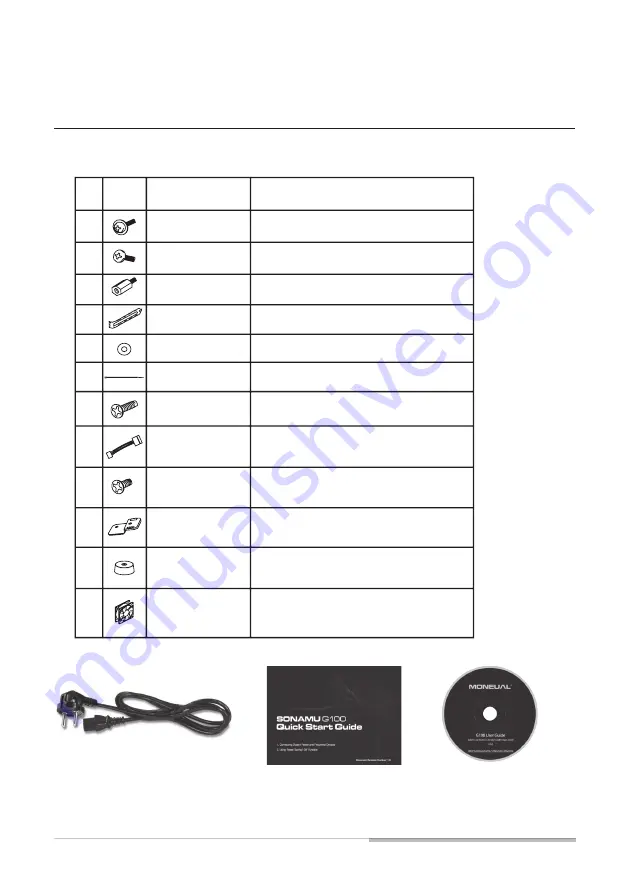
Components List

No.

1

2

3

4

5

6

7

8

9

10

11

8

22

9

4

1

1

1

Securing ODD

Securing Power supply, HDD, 
Main-board and Expansion slot

Supporting Main-board

Isolation between bolt and 
mainboard

Securing Fan

Mainboard speaker

Figure

Q'ty

Parts name / Uded for (English)

1

1

12

Cooling Fan 

Optional parts

3

Management Cable

Covering Expansion slot

Securing power supply bracket

Power supply bracket

Case supporter

0 or 4

Part List

Power Cord

Quick Guide

User Guide CD

Содержание G100 Series

Страница 1: ...e Please read this safety notice carefully before using the product Version 1 0 Applicable Models G100 Series PC Case Copyright ⓒ 2010 MONEUAL Inc All rights reserved The MONEUAL MONCASO MiNEW RYDIS SONAMU are trademarks or registered trademarks of MONEUAL Inc in the Republic of Korea and or other counties ...

Страница 2: ......

Страница 3: ...n definition general information or reference Some devices and software packages described in this Guide may be unavailable or disagree depending on vendor s specification The contents of this Guide may not match your computer environment The images and pictures used in this Guide including the cover sheet may not agree with actual product No operation and technical service other than the Windows ...

Страница 4: ...cation is subject to change without prior notice to improve performance and functionality Dimension Compatible Motherboards Compatible Power Supply Units Compatible Graphics Cards 5 25 B ay 3 5 B ay Expansion Slots Cooling Fan Hole Front I O Ports ETC 136 W x 358 H x 428 D mm micro ATX micro ATX Standard ATX 1 bays 1 bay External 2 bays Internal 4 slots 2 x 60mm Rear 3 in 1 card reader x1 Headphon...

Страница 5: ...G100 DESKTOP COMPUTER USER GUIDE 5 Safety Instructions 6 Components List 7 Front Rear I O ports and switches 8 How to assemble your computer 10 Table of Contents ...

Страница 6: ...herals to be connected to the product Incorrect wiring may cause damage to the product and its peripherals 6 Do not block the air ventilation holes on the lateral sides and the rear side Parts may be damaged due to overheating of the product 7 When using the product after finishing assembly place the product on a flat and dry surface 8 When using the product after finishing assembly maintain a cle...

Страница 7: ...and Expansion slot Supporting Main board Isolation between bolt and mainboard Securing Fan Mainboard speaker Figure Q ty Parts name Uded for English 1 1 12 Cooling Fan Optional parts 3 Management Cable Covering Expansion slot Securing power supply bracket Power supply bracket Case supporter 0 or 4 Part List Power Cord Quick Guide User Guide CD ...

Страница 8: ...er power off The data will be lost if you turn off the switch before power off Optical drive eject button Panel open button Power button Zero switch USB port Connect USB peripherals Connect earphone headphone etc Connect a mike for voice recording video chatting etc Insert SD SDHC or MMC card Headphone jack MIC jack 3 in 1 card reader It is recommended to use the USB ports on the rear side to conn...

Страница 9: ... up to 1750 W If the power supported by the power strip is less than 1750 W connect electronic instruments within the capacity supported by the power strip Power strip is sold separately Power saving socket Main power socket Connect a power strip Connect the power cord of the mainframe G100 2 Rear view ...

Страница 10: ...he figure check the mounting direction of the motherboard and the case and mount the motherboard by aligning it to the setscrew positions Tighten the setscrews at each setscrew position Caution Pay attention not to drop the driver and tools on the motherboard while you are tightening setscrews This may cause damage to the motherboard Check the setscrew positions Side cover After removing the both ...

Страница 11: ...cation is common to all vendors but the shape of slot may look a little different from vendor to vendor Thoroughly insert the graphic card as shown in the figure Tighten the screws and adjust the bracket of the graphic card as shown in the figure Installation of the graphic card has been complete G100 3 Graphic card installation ...

Страница 12: ...emble your computer G100 4 HDD ODD Installation As shown in the figure mount the CD DVD drive and the hard disk on the drive bay rack and tighten the setscrews Install the drive bay rack with ODD and HDD installed and tighten the setscrews Tighten the setscrews ...

Страница 13: ... GUIDE 13 How to assemble your computer G100 As shown in the figure connect the power connector and data connector of the CD DVD driver and the hard disk Connect the CD DVD drive connector ODD Connect the hard disk connector HDD ...

Страница 14: ... as shown in the figure it would not be connected in a wrong direction Check the shape of the connector port and connect it exactly Connect the ECO board as shown in the figure referring to the description of connector JUSB1 2 pin array and cables colors Caution Make sure to connect the cable after checking the and positions of each pin The motherboard may be damaged if the and positions are rever...

Страница 15: ... figure referring to the description of connector JUSB1 JUSB2 pin array and cables colors Caution Make sure to connect the cable after checking the and positions of each pin The motherboard may be damaged if the and positions are reversed The position and the direction of the connector may differ depending on product specification and vendor Front USB connector JUSB1 JUSB2 1 2 9 10 GND USB1 USB0 G...

Страница 16: ...e positions shown in the figure below Caution Make sure to connect the cable after checking the and positions of each pin The motherboard may be damaged if the and positions are reversed The position and the direction of the connector may differ depending on product specification and vendor Front audio connector Key no pin PRESENCE GND MIC_JD LINE out_JD LINE out_R FRONT_JD MIC_L LINE out_L F_AUDI...

Страница 17: ...assemble your computer G100 Assemble the cables in the sequence order of the front panel removal in Page 10 See P10 Mount the bezel while checking the position of hook Mount the two side covers and tighten the four hand screws 6 Cable Connection ...

Страница 18: ...18 G100 DESKTOP COMPUTER USER GUIDE ...

Страница 19: ...ghts reserved The MONEUAL MONCASO MiNEW RYDIS SONAMU are trademarks or registered trademarks of Moneual Inc in the Republic of Korea and or other countries Customer service 1588 8178 Service hours Weekdays 09 00 18 00 Weekend 09 00 12 00 ...

Отзывы: