background image

3

2

C

AUTIONARY

 I

NFORMATION

1. Read these instructions entirely before beginning any part of the installation.  Save these instructions for

any future repairs.

2. Use these instructions as a guide during the installation of the fireplace.

3. Be sure these instructions become the property of and are reviewed by all future users of this fireplace to

encourage proper operation and maintenance.

4. All the parts used with this fireplace system must be installed in accordance with these installation instructions.

Failure to do so may be hazardous and will void the warranty.

5. This fireplace and accessories should not be altered in any way that is not specifically recommended in

this manual.

6. Refer to your local building code for local requirements pertaining to installation of factory-built fireplaces.

Monessen Hearth Systems fireplaces are intended for installation and use according to standard NFPA
211 of the National Fire Protection Association.

7. This fireplace must not be installed with a masonry flue.

8. This fireplace and chimney should not be used for venting a wood or coal burning heater or fireplace insert.

WARNING:


DO


NOT


INSTALL


A


SEPARATE


SOLID


FUEL


INSERT


OR


GAS


FIREPLACE


INSERT


IN


THIS


FIREPLACE


AND


CHIMNEY

SYSTEM


WITHOUT


WRITTEN


AUTHORIZATION


FROM

 M

ONESSEN

 H

EARTH

 S

YSTEMS

.

9. Do not pack required air spaces with combustible material or insulation not specifically recommended for

use in such areas.

I

NTENDED

 P

RODUCT

  U

SAGE

This fireplace is intended for supplemental heating only and is not intended for use as a primary heating
system.

This fireplace is designed to sit directly on a combustible floor.  The fireplace must be installed with clearances
to combustible building materials as specified by this manual.  Only parts manufactured by Monessen Hearth
Systems and labeled for use with this fireplace should be used in the installation of the fireplace except for
special roof flashings that may be fabricated locally.  The use of improper parts in the installation can be
hazardous and voids the warranty offered by Monessen Hearth Systems.

This fireplace is designed to burn solid wood fuel (wood), UL- classified processed solid fuel fire logs, or a
certified decorative gas appliance may be installed in the fireplace as described later by this instruction manual.

This fireplace is not designed to burn coal, unplumbed liquid fuels, unplumbed gaseous fuels or household
refuse.  Any attempt to burn these fuels in the fireplace can be hazardous.

NOTICE: 

THIS


FIREPLACE


IS


NOT


DESIGNED


FOR


INSTALLATION


IN


MANUFACTURED


HOMES


WITHOUT


A


VENTED


ATTIC


SPACE

.  

THE

FIREPLACE


MAY


BE


INSTALLED


IN


MANUFACTURED


HOMES


WHICH


HAVE


A


VENTED


ATTIC


SPACE


IF


THE


FIREPLACE


IS


EQUIPPED


WITH

MGD36B 

OR

 MGD36PB 

GLASS


DOORS

AN

 AK6 

OUTSIDE


COMBUSTION


AIR


KIT

 (

INSTEAD


OF


THE

 AK4 

OUTSIDE


COMBUSTION

AIR


KIT


OFFERED


FOR


RESIDENTIAL


TYPE


HOMES


AS


DESCRIBED


LATER


BY


THIS


INSTRUCTION


MANUAL

), 

A

  SVTR 

FIRESTOP

THIMBLE

AND


THE


MINIMUM


INSTALLED


HEIGHT


FROM


FLOOR


TO


FLUE


OUTLET


IS

16 

FEET

SEE


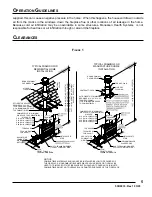
FIGURE

 1.

CAUTION: 

DO


NOT


USE


A


FIREPLACE


INSERT


OR


OTHER


PRODUCT


NOT


SPECIFIED


FOR


USE


WITH


THIS


FIREPLACE

.

WARNING: 

IMPROPER


INSTALLATION


OR


USE


OF


THIS


FIREPLACE


WILL


VOID


ITS


WARRANTY


AND


CAN


CAUSE

:

1.  Damage to the fireplace from overheating.
2.  Hazardous temperatures to develop on combustible materials adjacent to the fireplace or chimney.
3.  The emission of smoke, sparks or hazardous gases into the dwelling.
4.  Leakage of rain water into the dwelling.

53D9033. Rev 1 03/03

Содержание DELUXE RADIANT WOOD BURNING FIREPLACE SWB400I

Страница 1: ...nstalled in residential and manufactured type homes as explained by this instruction manual The SWB400I installs with S series chimney system components and is designed to utilize the MGD36 series of glass doors The SWB400I can be converted to a louvered circulating unit by utilizing the MLK36 louver kit and can utilize the FA2 fan once the fireplace has been converted to a louvered circulating un...

Страница 2: ...intain this or any other factory built fireplace properly can result in a house fire or other occurences that could cause deaths injuries and property damages It is very important that the persons installing and or supervising the installation of this fireplace have appropriate skills in using the tools and techniques required and reading and comprehension skills sufficient to read and follow thes...

Страница 3: ... fireplace must be installed with clearances to combustible building materials as specified by this manual Only parts manufactured by Monessen Hearth Systems and labeled for use with this fireplace should be used in the installation of the fireplace except for special roof flashings that may be fabricated locally The use of improper parts in the installation can be hazardous and voids the warranty...

Страница 4: ... evenings it is best to operate the fireplace with the doors closed to prevent excessive room air from being drawn up the chimney When the doors are open the mesh screens should be closed to help keep burning embers from popping out of the firebox Glass doors are mandatory on fireplaces installed in manufactured homes WARNING Fireplaces equipped with glass doors should be operated only with the gl...

Страница 5: ...ES A 14 1 2 X 14 1 2 TO COMBUSTIBLES FRAMED OPENING OPTIONAL COMBUSTIBLE MATERIALS SHOULD NOT BE INSTALLED BELOW TOP SPACERS OF THE FIREPLACE NONCOMBUSTIBLE MATERIALS SUCH AS BRICK OR TILE MAY BE USED TO TRIM FACE OF THE FIREPLACE BUT SHOULD NOT COVER ANY AIR INLETS COMBUSTIBLES MUST NOT OVERLAP BLACK PAINTED SURFACES OF THE FIREPLACE NOTICE 16 FT MIN HEIGHT NO OFFSETS 16 FT MIN HEIGHT 2 30 ELBOWS...

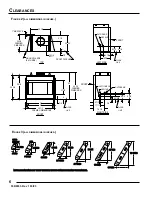
Страница 6: ...3 6 S 3 6 S 3 6 S 4 8 S 4 8 S 1 8 S 1 8 S 3 6 S 3 6 39 5 16 76 11 16 FIGURE 2 ALL DIMENSIONS IN INCHES 53D9033 Rev 1 03 03 3 4 8 21 7 8 NAILING FLANGE EACH SIDE DIMENSION FRAMING 25 3 4 FRONT FACE LINE TOP 10 1 4 REF 1 2 25 1 4 9 1 2 23 1 8 1 AIR SPACE 11 1 2 RIGHT SIDE 15 7 8 FRONT 9 1 2 3 4 GAS LINE JUNCTION BOX LINE FLOOR 9 1 4 4 3 4 8 3 4 OUTSIDE AIR GAS LINE LEFT SIDE 11 1 2 15 7 8 FLOOR LINE...

Страница 7: ...red spacing to combustible walls and some suggested fireplace locations When selecting a location choose one that is away from frequently opened doors central heat outlets or returns or other places where air movements may disturb the airflow around the fireplace Air turbulence near the fireplace may cause smoke to spill out of the fireplace opening FIGURE 5 17 5 16 72 5 8 17 5 16 58 3 4 22 MIN 20...

Страница 8: ... for the chimney to pass through If the chimney is to pass through living or storage spaces be sure there is adequate space to enclose the chimney to avoid personal contact with or damage to the chimney If the fireplace is to be installed on an outside wall the surrounding walls chase should be constructed and insulated as shown by Figure 6 Failure to insulate the fireplace form outside temperatur...

Страница 9: ...C SPACE ATTIC SPACE 3 FT MIN HEIGHT AND 2 FT MIN ABOVE ANY POINT WITHIN 10 FEET OF CHIMNEY 2 MIN CLEARANCE TO COMBUSTIBLES TYPICAL ALL AROUND 3 FT MIN HEIGHT AND 2 FT MIN ABOVE ANY POINT WITHIN 10 FEET OF CHIMNEY STORM COLLAR INCLUDED WITH CAP SCS CHIMNEY SUPPORT REQUIRED EVERY 30 FEET OF INSTALLATION HEIGHT PREFERRED LOCATION FIRST FLOOR AREA FLUE OUTLET HEIGHT SECOND FLOOR AREA THIRD FLOOR AREA ...

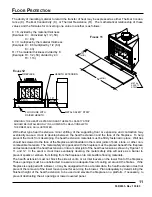
Страница 10: ...OT BLOCK ANY LOUVERED OPENINGS PLATFORM PLATFORM MAY EXTEND UNDER HEARTH EXTENSION IF DESIRED FLOOR PROTECTION If this fireplace is installed on a combustible floor the floor area 16 inches in front of and 8 inches either side of the fireplace opening must be protected by an insulating noncombustible hearth extension This hearth extension may be either minimum 6 inch thick stone or brick as shown ...

Страница 11: ...ith the fireplace must be placed beneath the fireplace and extended under the hearth extension or into a mortar joint of the hearth extension as shown by Figures 10 11 and 12 In the event a crack does eventually develop the metal safety strip will serve as a barrier to prevent sparks or embers from falling from the fireplace onto combustible flooring materials The hearth extension must not block t...

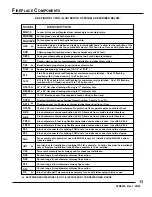
Страница 12: ... CAP SC ROUND MLK36 LOUVER KIT CF8 S48 S36 S18 S12 FLEX PIPE UNINSULATED FP4U OR FP6U DUCT CONNECTOR 403 OR 603 ASSEMBLY FA2 FAN FLASHING 612 OR 1212 GLASS DOOR KIT MGD36B OR MGD36PB SPACER SF FIRESTOP EXTENSION KIT H1652 HEARTH SUPPORT CHIMNEY SCS SE30 30 ELBOW AIR ASSEMBLY THIMBLE SVTR FIRESTOP ...

Страница 13: ...ED BY CORRESPONDING FIGURE S18 S8 S12 R4884 SVTR H1652 FP4U AK4 403 FA2 CF8 S48 S36 JB1 SF30 louvered panel 36 x 72 flat chase flashing with single 11 diameter hole Chimney support required when chimney height exceeds 30 feet 36 inch glass door kit with polished brass trim 36 inch glass door kit with black trim required with SC round cap on 0 to 6 12 pitch roof 0 to 6 12 variable pitch roof flashi...

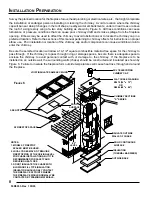
Страница 14: ... the flanges located on each side of the fireplace Install chimney and other fireplace components as needed 4 Enclose the fireplace and add trimming 5 Install hearth extension or equivalent NOTE Some local codes may require electrically grounding the fireplace and chimney CHIMNEY INSTALLATION In order to assure safe and satisfactory performance of the fireplace it is very important to properly ins...

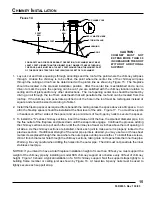
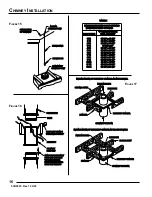
Страница 15: ...ue the process adding the chimney sections on top of each other until the chimney is at least six inches above the roof opening on all sides As the chimney sections are installed check each joint to make sure it is properly locked to the previous section If additional strength of the outer pipe joints is desired you may use two or three sheet metal screws placed through the area where the outer pi...

Страница 16: ...12 1 12 2 12 2 12 3 12 3 12 4 12 4 12 5 12 5 12 6 12 6 12 7 12 7 12 8 12 8 12 9 12 9 12 10 12 10 12 11 12 11 12 12 12 12 12 INSTALLATION OF FIRESTOP SPACER AT FLOOR LEVELS INSTALLATION OF FIRESTOP SPACER AT FLOOR LEVELS INSTALLATION OF FIRESTOP SPACER AT ATTIC LEVEL INSTALLATION OF FIRESTOP SPACER AT ATTIC LEVEL FLUE PIPE FLUE PIPE FLUE PIPE FLUE PIPE FIRESTOP SPACER FIRESTOP SPACER FLOOR JOIST FL...

Страница 17: ...d 6 feet when unsupported or 20 feet if the chimney is supported at six foot intervals with support such as metal support straps 6 When enclosing the elbows and inclined portions of the chimney enclosing materials must be installed vertically to maintain the required two inch minimum air space clearance to the chimney at the extremities of the offset It is recommended that enclosing material not f...

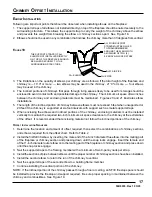
Страница 18: ...RTICAL CHIMNEY VERTICAL CHIMNEY ENCLOSURE ENCLOSURE CHIMNEY MUST BE ENCLOSED CHIMNEY MUST BE ENCLOSED C L VERTICAL CHIMNEY VERTICAL CHIMNEY ENCLOSURE ENCLOSURE SUPPORT STRAPS SUPPORT STRAPS NOT TO PENETRATE NOT TO PENETRATE FIRESTOP FIRESTOP DIAGONAL CHIMNEY ENCLOSURE RISE DIAGONAL CHIMNEY ENCLOSURE ACCEPTABLE FASTEN ALL SUPPORT FASTEN ALL SUPPORT STRAPS SECURELY STRAPS SECURELY VERTICAL CHIMNEY E...

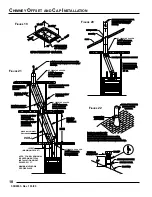
Страница 19: ...minimum clearances are maintained 5 Nail the flashing securely in place with eight nails 6 Seal the crack between the top of the flashing and the chimney with mastic Leave some excess mastic at this area to be used in step eight NOTE Use pliers and wear gloves when performing step seven to minimize the danger of cutting your hands on the edge of the storm collar 7 Place the storm collar around the...

Страница 20: ... 69 71 1 2 75 77 1 2 80 1 2 83 1 2 86 1 2 89 92 1 2 95 98 1 2 101 104 107 110 112 1 2 116 118 1 2 122 17 26 1 2 31 3 4 36 41 1 4 47 1 4 50 3 4 57 3 4 62 67 3 4 72 1 2 77 1 2 82 88 92 1 4 98 1 2 102 3 4 107 3 4 113 1 4 118 1 4 122 1 2 128 3 4 133 139 1 4 143 1 2 148 1 2 154 159 163 1 4 169 1 2 173 3 4 180 184 1 4 189 1 4 194 3 4 199 3 4 204 210 1 4 214 1 2 220 3 4 ELBOW SET 1 1 1 1 1 1 1 1 1 1 1 1 ...

Страница 21: ...ng pipe of the chimney until the flange on the telescope section rest on the flange of the chase cover Note All telescoping sections should extend a minimum of three inches inside the mating chimney pipes 4 Install the SCL or SQ8 chimney cap by placing the cap into the matching duct telescope and flue telescope of the last chimney section as shown by Figure 23 Lower the cap until the brackets on t...

Страница 22: ...sh the insulation back into place and over 2 APPROX INSTALLATION OF DUCT CONNECTOR FIGURE 26 SECURE AIR DUCT TO TERMINATION CAP WITH CLAMPS OR DUCT TIES AIR DUCT TERMINATION CAP NAIL HOLES TO TERMINATION CAP SECURING OUTSIDE AIR DUCT HOLE CUT IN WALL FIGURE 25 O UTSIDE SECURE THE OUTSIDE AIR DUCT TO THE STARTING COLLAR WITH CLAMPS OR DUCT TIES STARTING COLLAR AIR DUCT STARTING COLLAR STEP 1 SECURE...

Страница 23: ...n from the crawl space under a house when an adequate supply of air is provided by open ventilation 5 Do not take combustion air from attic space or garage space CONCRETE SLAB CONCRETE SLAB INSTALLATION INSTALLATION OPTIONAL OUTSIDE OPTIONAL OUTSIDE AIR RUNS AIR RUNS INLET GRILLE INLET GRILLE IN SOFFIT IN SOFFIT OVERHANG OVERHANG 8 MAX 8 MAX FIRESTOP SPACER FIRESTOP SPACER CAUTION DO NOT TAKE CAUT...

Страница 24: ...d type temporarily push the insulation back from the end of the duct approximately two inches before securing the end of the duct onto the starting collar 6 Route the air duct through the hole cut in the wall and use the duct clamps or ducts ties provided to secure it to the termination cap as shown by Figure 25 7 Mount the Termination Cap with TOP upward to prevent cold air from entering through ...

Страница 25: ...ribe the operation of the fireplace and appliance to the people who will be operating them and leave all instruction manuals with the operator of the appliance NOTICE Before installing the gas appliance in the fireplace remove the factory installed woodburning grate from the fireplace Remove the grate s rear leg retainer clips to free the grate for removal The following instructions only apply to ...

Страница 26: ...per operation of the fireplace Blocking the fireplace with framing and attaching the base to the supporting floor will reduce the possibility of such a crack developing CAUTION Do not allow any trim materials to extend closer than 3 8 inch to the vertical edges of the firebox opening if you plan to equip the fireplace with glass doors Wall ties should be fastened to the face of the fireplace with ...

Страница 27: ...LWAYS MAINTAIN THE OF CHASE ALWAYS MAINTAIN THE PROPER CLEARANCE PROPER CLEARANCE 1 AIR SPACE TO SIDES 1 AIR SPACE TO SIDES AND REAR OF FIREBOX AND REAR OF FIREBOX USE ONLY NONCOMBUSTIBLE USE ONLY NONCOMBUSTIBLE MATERIALS BELOW TOP MATERIALS BELOW TOP OF SPACERS OF SPACERS OUTSIDE AIR INLET OUTSIDE AIR INLET SAFETY STRIP SAFETY STRIP HEARTH EXTENSION HEARTH EXTENSION TOP EDGE OF FIREPLACE OPENING ...

Страница 28: ...INSTALLATION This fireplace has been tested and listed for use with Model MGD36B or MGD36PB glass doors For installa tion of the Model MGD36B or MGD36PB glass doors see the instructions provided with the doors FAN ASSEMBLY The SWB400I fireplace may be equipped with an FA2 fan IF the fireplace is also equipped with optional MLK36 Louver Kit See Figure 13 If the fireplace is to be equipped with the ...

Страница 29: ...dry The sizes you buy are dictated by the size of your fireplace Purchase logs that will fit when laid across your grate and ask that the larger heavier logs be split Kindling should be short easily split lengths of softwood lumber yard or mill scraps or twigs and branches gathered from your yard HOW TO BUILD A BETTER FIRE The first three fires should be of moderate size to allow the fireplace to ...

Страница 30: ...glass doors close them DO NOT LEAVE CHILDREN OR PHYSICALLY OR MENTALLY HANDICAPPED OR SENILE PERSONS ALONE WITH A BURNING FIREPLACE You ll need a minimum of three logs preferably four to make a good fire Add kindling and new logs as needed to rekindle a dying fire New logs should be added at the rear grate after raking the coals toward the front DO NOT OVERFIRE THE FIREPLACE Overfire conditions ma...

Страница 31: ...reosote buildup has occurred If creosote has accumulated it should be removed to reduce the risk of a chimney fire The chimney cap can be removed for inspection maintenance and cleaning by removing three screws from the support legs and lifting upward When the fireplace is first in use inspect the chimney frequently and clean the chimney any time an accumulation is observed on the flue walls The f...

Страница 32: ...ce to prevent excessive heat loss from the fireplace 5 Do trim the face of the fireplace only with noncombustible materials 6 Do attach the noncombustible face trim material firmly to the face of the fireplace 7 Do block in or fasten the fireplace to prevent the possibility of the fireplace shifting out of position 8 Do connect the air circulation blower to a properly grounded and fused electrical...

Страница 33: ...ammable liquids gases or pressurized containers near the fireplace 17 Don t neglect to instruct all responsible persons in the proper and safe operation of the fireplace 18 Don t fail to instruct all persons especially children and elderly persons concerning the hazards of improper operation and unauthorized tampering with the fireplace 19 Don t use this fireplace to burn paper cardboard or other ...

Страница 34: ... 1 1 1 1 10 FIREBRICK RIGHT SIDE PARTS DIAGRAM AND LIST All repair part orders should be placed through your local dealer To ensure prompt and accurate service please provide the following information when placing a repair part order Model number of your Appliance Part Name Part Number and Quantity of parts needed See Figure 34 53D9033 Rev 1 03 03 SWB400I FIREPLACE Technical Service Department 281...

Страница 35: ...35 THIS PAGE INTENTIONALLY LEFT BLANK 53D9033 Rev 1 03 03 ...

Страница 36: ...eramic and castable parts that do not affect safe operation We do not warrant this fireplace to be in compliance with your local building code Building codes vary greatly throughout the country and you should determine whether your local building code contains restrictions on the use of this fireplace before you purchase it Blowers or fans which are warranted separately Heat loss due to the passag...

Страница 37: ...cannot locate your dealer call or write Monessen Hearth Systems as indicated below 2 If you do not receive satisfactory service from the dealer within a reasonable time write Monessen Hearth Systems and include the date you purchased your fireplace or component its serial number and details of the problem you are having Technical Service Department 2813 W Mall Drive Unit B Florence Alabama 35630 T...

Страница 38: ...38 THIS PAGE INTENTIONALLY LEFT BLANK 53D9033 Rev 1 03 03 ...

Страница 39: ...39 THIS PAGE INTENTIONALLY LEFT BLANK 53D9033 Rev 1 03 03 ...

Страница 40: ...53D9033 Rev 1 03 03 ATTENTION APPLIANCE INSTALLER PLEASE RETURN THIS INSTRUCTION MANUAL TO THE CONSUMER ...

Отзывы: