background image

Monark Ergomedic 828 E

 9

Ser
vice


1

2

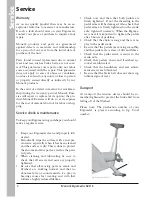
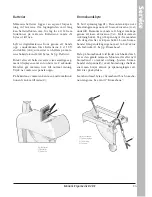
Fig: Batteries
1) Batteries
2) km/mile

Batteries

The  batteries  are  in  a  separate  package  at  deli-

very. The batteries may need to be replaced upon 

assembly.  To  replace  the  batteries  at  any  time, 

take the meter out of the housing by bending up 

in the lower end with a coin or similar. The bat-

teries, 2 x 1.5V size AA(R6), which are placed in 

the holder on the backside of the meter, can then 

easily be changed. See 

fig: Batteries.

After the batteries has been replaced all segments 

in the display are visible and a buzzer will sound 

for two seconds. After 2 seconds the meter turns 

to main display again and normal function. Put 

the meter into the housing again.

Note: On the backside of the meter is a switch to 

change meter function from km to mile or mile 

to km(2).

1

2

3

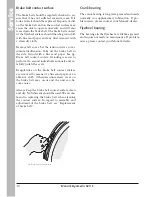
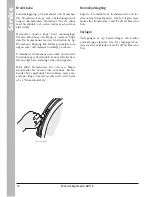
Fig: Brake belt
1) Tension lever
2) Lock washer
3) Clip

Replacement of brake belt

Remove the tension lever(1). Dismantle the front 

cover over the pendulum weight by detaching the 

4 screws underneath. Remove the left or the right 

frame  cover  by  undoing  the  mounting  screws 

(5pcs).  Put  the  crank  in  a  backward  position. 

Move the cover somewhat out in the front end 

and then pull it backwards to remove it. Loosen 

the  brake  belt  from  the  pendulum  at  the  screw 

and  lock washer(2). See 

fig: Brake belt.


Take it apart at the spring and clip(3) and remove 

it from the bike. Attach the new brake belt and 

assemble  the  bike  in  reverse  order.  Adjust  the 

brake belt so that the resistance increases as soon 

as the tension device is turned a little. 

When  replacing  the  brake  belt  it  is  recommen-

ded to clean the brake surface. See section ”Brake 

belt contact surface”. 

Содержание 828E

Страница 1: ...Manual English Svensk Monark 828 E Ergomedic 828 E...

Страница 2: ......

Страница 3: ...Chain 1 2 x 1 8 11 Scale zero adjustment 12 Calibration 12 Freewheel sprocket 13 Spare parts 14 Inneh llsf rteckning 17 Monark Exercise AB 18 Produktinformation 19 Funktionsbeskrivning 20 Belastnings...

Страница 4: ...been living proof of precision reliability strength and service That is one of the reasons why we are now the word lead er in cycle ergometers and the market leader in Scandinavia in transport cycles...

Страница 5: ...or decreasing the speed or pedal rpm Features Large well balanced flywheel 22kg 48 lbs Pendulum scale easy to calibrate Adjustable seat height Adjustable handlebar with quick release lever Stable fram...

Страница 6: ...ot is straight above the pedal axle with the pedal is in its lo west position To adjust the seat height loosen the lever on the seat tube See fig Adjustments The handlebar setting shall give a comfort...

Страница 7: ...ter values for Time Distance and Calories can be set to zero by pressing the RESET button for more than 2 seconds To get correct readings for calories and watts the kp value on the electronic meter ha...

Страница 8: ...tative especially when it has been cleaned and the surface is dry This is done to protect the chrome and zinc parts as well as the pain ted parts When cleaning and lubricating be sure to check that al...

Страница 9: ...ter is a switch to change meter function from km to mile or mile to km 2 1 2 3 Fig Brake belt 1 Tension lever 2 Lock washer 3 Clip Replacement of brake belt Remove the tension lever 1 Dismantle the fr...

Страница 10: ...ontact of the flywheel surface should then be ground off with fine sand paper and any dust removed with a clean dry cloth Remove left cover Set the tension device to mi nimum load tension Take off the...

Страница 11: ...To adjust the chain the hub nuts should be loosened Loosening or tightening the nuts on the chain adjusters will then move the hub and axle forward or backward Adjust according to above recommendatio...

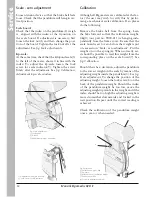
Страница 12: ...means of the adjusting weight inside the pendelum 3 See fig Scale adjustment To change the position of the adjusting weight loosen the lock screw 8 on the back of the pendelum weight Should the index...

Страница 13: ...e freewheel side Place the special remover part No 9100 14 in the adapter and place the spacer and axle nut outside See fig Special remover NOTE Do not tighten the axle nut completely It must be possi...

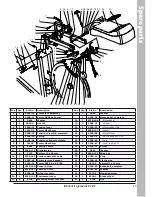
Страница 14: ...F M8x16 mm 26 1 9300 61 Frame cover left 8 1 9300 55 Chain 1 2 x 1 8 116 l 27 1 9300 60 Frame cover right 9 1 9326 164 Magnet 28 4 5673 9 Mounting screw LKT TT 5x12mm 10 2 8523 2 Dust cover 29 10 9306...

Страница 15: ...eight lever 7 1 9100 20 Spring 24 2 19001 6 Ball bearing 6001 2Z 8 1 9100 26 Tension cylinder complete 25 1 9300 86 Axle 9 1 14358 Screw M8x40 mm 26 1 9300 87 Lock ring SgA 12 10 1 5844 Locking nut M8...

Страница 16: ...Notes...

Страница 17: ...1 8 11 Scale zero adjustment 12 Calibration 12 Freewheel sprocket 13 Spare parts 14 Inneh llsf rteckning 17 Monark Exercise AB 18 Produktinformation 19 Funktionsbeskrivning 20 Belastningsreglering 20...

Страница 18: ...is p exakthet p litlighet h llfasthet och service Det r en av anledningar till att vi idag r v rldsledande p Ergometercyklar och marknadsledande i Skandinavien p Transportcyklar Vi tillverkar utveckla...

Страница 19: ...s in vilket ger avl sning av kalorif rbrukning CAL Produktinformation Fakta Stort v lbalanserat sv nghjul p ca 22 kg L ttkalibrerad pendelv g H j och s nkbar sadel och styre Stabil ram Pulverlackerad...

Страница 20: ...sitter bekv mt L mplig h jd kan vara att ha kn et l tt b jt n r fotbladet r mitt ver pedalaxeln samtidigt som pedalen r i bottenl ge Vid justering av sadelh j den lossa l sratten Se fig Justeringar St...

Страница 21: ...splayen Exempel Pendeln och indikeringen i f nstret st r p 2 kp Tryck p kp knappen till v nster p m taren Nedre displayf nstret visar nu kp ka i steg om 0 1 med kp knappen pil upp alt minska med RESET...

Страница 22: ...i t ex lager orsakar snabb f rslitning och d rmed kraftigt reducerad livsl ngd Kontrollera med j mna mellanrum att peda lerna fortfarande r ordentligt tdragna Om inte kommer g ngorna i veven att skada...

Страница 23: ...man ndra m tfunk tionen fr n km till miles 2 1 2 Bromsbandsbyte Ta bort sp nnreglaget 1 Demontera k pa ver belastningsram genom att lossa skruvarna 4 st undertill Demontera v nster alt h ger ramk pa...

Страница 24: ...ts bromsbana b r d slipas med fin slipduk och sedan torkas med en trasa eller dylikt Demontera v nster k pa Vrid sp nnreglaget till min belastning och kr ng av remmen Slipa d refter bromsbanan med en...

Страница 25: ...edjestr ckarna r den utsliten och skall bytas ut mot en ny Demontera v nster alt h ger ramk pa Demon tera kedjan genom att lossa kedjel set Anv nd t ng f r att ta loss l sfj dern Se fig kedjebyte Vid...

Страница 26: ...fram t s att ka libreringsvikten p 4kg 4 v rt art Nr 9000 211 h nger fritt fr n k pan Se till att m tartavlan nollst lls i det tippade l get innan vikten h ngs p se avsnitt Nollst llning av m tartavl...

Страница 27: ...e v rt art nr 9100 14 i anslutning och placera hylsa och axelmutter utanf r Se fig Avdragare OBS Axelmuttern f r ej dras t helt Anslutning frig ngskrans skall kunna lossas ett halvt varv Byt ut frig n...

Страница 28: ...9300 12 Skruv MVBF M8x16 mm 26 1 9300 61 Ramk pa v nster 8 1 9300 55 Kedja 1 2 x 1 8 116 l 27 1 9300 60 Ramk pa h ger 9 1 9326 164 Magnet 28 4 5673 9 F stskruv LKT TT 5x12 mm 10 2 8523 2 Plastknopp 29...

Страница 29: ...300 88 Lodarm 7 1 9100 20 Fj der 24 2 19001 6 Kullager 6001 2Z 8 1 9100 26 Sp nnrulle komplett 25 1 9300 86 Axel 9 1 14358 Skruv M8x40 mm 26 1 9300 87 Sp rring SgA 12 10 1 5844 L smutter M8 27 1 9339...

Страница 30: ...Anteckningar...

Страница 31: ......

Страница 32: ...780 50 Vansbro Tel 46 0 281 59 49 40 Fax 46 0 281 719 81 www monarkexercise se...

Отзывы: