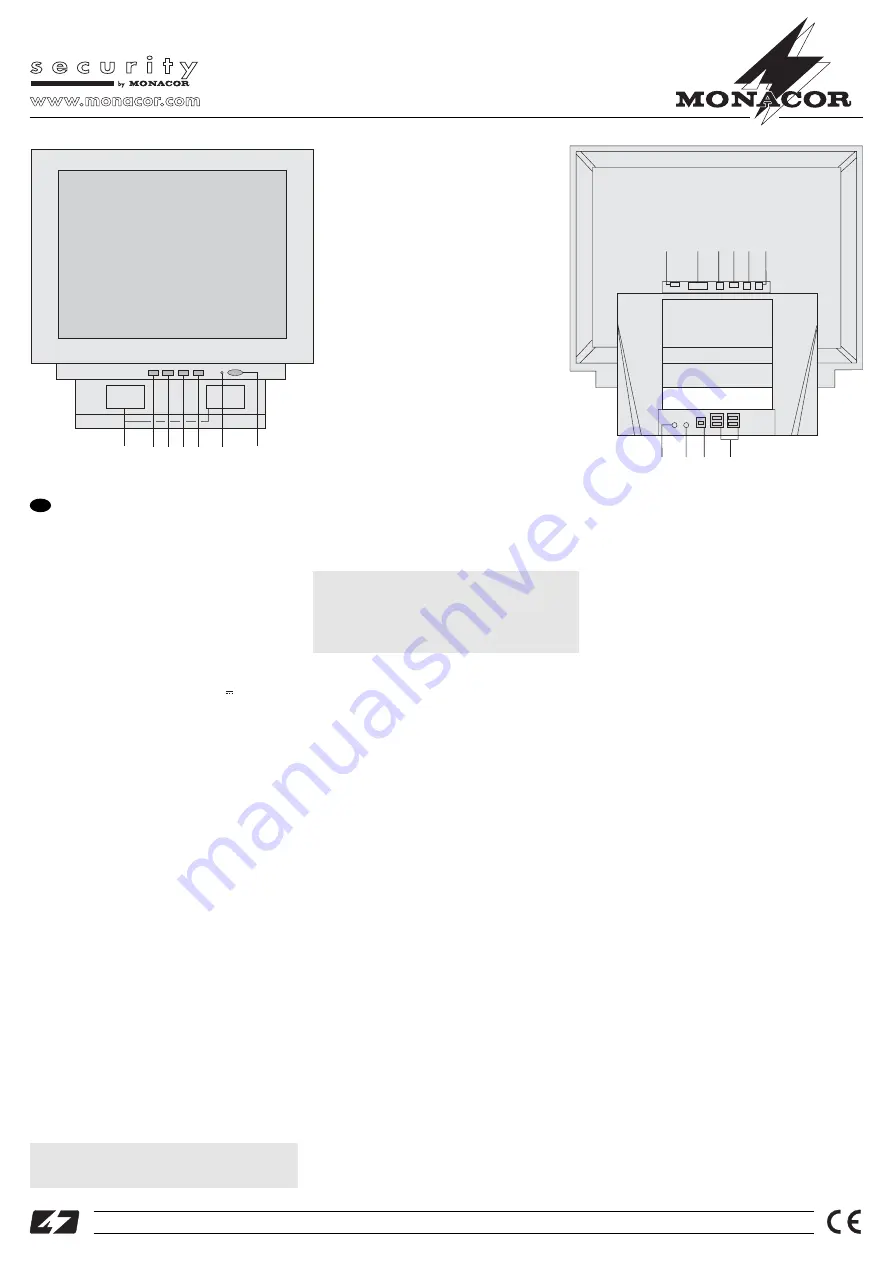
Flat Screen Colour Monitor
1 Operating Elements and Connections
1
POWER button
2
Power LED
3
Button UP for selecting functions
4
Button DOWN for selecting functions
5
Button MENU for changing the screen adjustments
6
Button SELECT for selecting the video input
7
Speakers (stereo)
8
Jack DC 12 V for power supply (12 V ) via the sup-
plied power supply unit
9
Input jack VGA INPUT for connecting a computer
(15-pole sub-D jack)
10
Output VIDEO OUTPUT for connecting another
monitor or a video recorder (phono jack)
11
Input jack VIDEO 3 for connecting an SVHS signal
source (SVHS mini DIN jack)
12
Input VIDEO 2 for connecting the video output of a
signal source (phono jack)
13
Input VIDEO 1 for connecting the video output of a
signal source (phono jack)
14
Output AUDIO OUTPUT for connecting the audio
input, e. g. of a video recorder (3.5 mm stereo jack)
15
Input AUDIO INPUT for connecting the audio out-
put of one of the signal sources (3.5 stereo mm
jack)
16
USB-HUB input for connecting the USB port of a
computer
17
Four USB outputs for connecting up to four USB
units for extending the USB port of a computer
2 Applications
This flat screen colour monitor of TFT active matrix
technology offers a picture display which is sharp,
quick, and rich in contrast. It is suitable for universal
applications, e. g. as a computer monitor, in surveillan-
ce systems, or for multimedia applications. For audio
reproduction, a built-in stereo amplifier with two small
speakers of a power of 2 x 3 W is provided.
Attention!
This monitor does not support black-and-white cam-
eras! It requires the colour signal for decoding.
3 Safety Notes
These units (power supply unit and monitor) corre-
spond to the directive for electromagnetic compatibili-
ty 89/336/EEC. The power supply unit also corre-
sponds to the low voltage directive 73/23/EEC.
Please observe the following items in any case:
●
The units are suitable for indoor use only. Protect
them against dripping water and splash water, high
air humidity, and heat (admissible ambient tempera-
ture range 0 – 40 °C).
●
Do not place any vessel filled with liquid on the
power supply unit, e. g. a drinking glass.
●
Do not operate the monitor or immediately dis-
connect the power supply unit from the mains socket
1. if there is visible damage to the monitor, the power
supply unit or the mains cable,
2. if a defect might have occurred after the unit was
dropped or suffered a similar accident,
3. if malfunctions occur.
In any case the units must be repaired by skilled per-
sonnel.
●
Never pull the mains cable for disconnecting the
mains plug from the socket!
●
No liability for any damage will be accepted if the
units are used for other purposes than originally
intended, if they are not correctly operated or
connected or not repaired in an expert way.
●
If the units are to be put out of operation definitively,
take them to a local recycling plant for a disposal
which is not harmful to the environment.
Attention!
The power supply unit is supplied with hazardous
mains voltage (230 V~). Leave servicing to skilled
personnel only. Inexpert handling may cause an
electric shock hazard. Furthermore, any guarantee
claim will expire if one of the units has been opened.
4 Connection
1) The monitor is supplied with various adapter cables
for connection. Select the suitable ones.
2) Connect each video output of the signal sources
(camera or video recorder) to the jacks VIDEO 1 to
VIDEO 3 (11 to 13). The audio output of one of
these units can be connected to the jack AUDIO
INPUT (15).
3) When connecting a computer, connect its graphic
board to the jack VGA INPUT (9) via the supplied
15-pole VGA cable.
4) In the stand, the monitor is equipped with a 4-way
USB-HUB. Thus, a connected USB port of a com-
puter is extended to a maximum of four inputs (17)
where
e. g. a USB mouse, a USB keyboard, a USB scan-
ner, etc. can be connected.
5) Connect the supplied 12 V power supply unit to the
jack DC 12 V (8). First connect the supplied mains
cable to the power supply unit, then connect it to a
mains socket (230 V~/50 Hz).
5 Operation
1) Switch on the monitor with the button POWER (1).
The power LED (2) lights up.
2) Select the video input (VIDEO 1 to 3) or the VGA
INPUT with the button SELECT (6). The name of
the video source is shortly displayed on the screen.
3) If the jack VGA INPUT (9) is selected, read operat-
ing step 4). If one of the jacks VIDEO 1 to 3 is se-
lected, adjust an optimum picture and the volume.
For this purpose, press the button MENU (5) so
many times until the corresponding function
appears on the screen.
Sequence of functions:
BRIGHTNESS
CONTRAST
SATURATION
HUE
SHARPNESS
VOLUME
TREBLE
BASS
BALANCE
RESET
EXIT
Adjust the selected function with the buttons UP (3)
and DOWN (4). As long as one of the buttons is kept
pressed, the value will change.
®
TVLCD-1500COL
Order-No. 19.7540
Copyright
©
by MONACOR
®
INTERNATIONAL GmbH & Co. KG, Bremen, Germany. All rights reserved.
02.02.01
®
➀
7
6 5 4 3
2
1
➁
14 15 16
17
8
9
10 11 12 13
®
GB


