


ELA-Deckenlautsprecher
Diese Anleitung richtet sich an Installateure, die
ausreichende Fachkenntnisse in der 100-V-Be -
schallungstechnik besitzen. Bitte lesen Sie die
Anleitung vor der Installation gründlich durch und
heben Sie sie für ein späteres Nachlesen auf.
1 Verwendungsmöglichkeiten
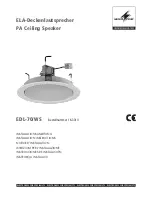
Der Lautsprecher ist für den Einbau in einer
Decke mit einer Stärke von ca. 2 –
45 mm
bestimmt und dient zur Beschallung mit Sprache
und Hintergrundmusik. Er ist speziell für den Ein-
satz in ELA-Anlagen konzipiert, die mit 100-V-
Technik arbeiten. Durch die zweiteilige Ausfüh-
rung (Halte rahmen und Lautsprecherchassis) ist
die Montage sehr einfach.
2 Hinweise für den sicheren Gebrauch
Der Lautsprecher entspricht allen relevanten
Richtlinien der EU und deshalb mit
gekenn-
zeichnet.
G
Der Lautsprecher ist nur zur Verwendung im
Innenbereich geeignet. Schützen Sie ihn vor
Tropf- und Spritzwasser, hoher Luftfeuchtig-
keit und Hitze (zulässiger Einsatztemperatur-
bereich 0 – 40 °C).
G
Verwenden Sie zum Reinigen nur ein trocke-
nes, weiches Tuch, auf keinen Fall Wasser
oder Chemikalien.
G
Wird der Lautsprecher zweckentfremdet, nicht
fachgerecht montiert, falsch angeschlossen
oder überlastet, kann keine Haftung für
daraus resultierende Sach- oder Personen-
schäden und keine Garantie für den Lautspre-
cher übernommen werden.
3 Montage
1) Den weißen Halterahmen festhalten und das
Lautsprecherchassis bis zum Anschlag rechts
herum drehen, sodass das Chassis aus dem
Rahmen genommen werden kann.
2) Die drei Haltefedern des Rahmens
zum Spannen nach oben drücken und
in die Arretierung (Pfeil) einhaken.
VORSICHT!
Beim Spannen und
Lösen der Federn besteht durch die
starke Federkraft Verletzungsgefahr.
Halten Sie Ihre Finger nicht zwischen
Rahmen und gespannter Feder!
3) In die Decke ein Loch (
∅
195 mm) sägen.
4) Den Halterahmen in das Deckenloch einset-
zen und die Federn vorsichtig aus der Arretie-
rung lösen (nicht zurückschnellen lassen),
sodass sie den Rahmen in der Decke halten.
5) Den Anschluss nach Kapitel 4 durchführen.
6) Das Lautsprecherchassis wieder in den Rah-
men einsetzen und bis zum Anschlag drehen,
damit es fest sitzt.
4 Elektrischer Anschluss
1) Vor dem elektrischen Anschluss des Laut-
sprechers die ELA-Anlage komplett ausschal-
ten, damit die 100-V-Audioleitung vom ELA-
Verstärker spannungsfrei ist!
2) Ab Werk ist der Lautsprecher auf eine Nenn-
belastbarkeit von 6 W eingestellt. Für eine
geringere Nennbelastung (Lautstärke) am
Transformator die rote Leitung vom Steck-
kontakt „6 W“ abziehen und auf den Kontakt
stecken, mit dem die gewünschte Nennbelas-
tung (3 W oder 1,5 W) erreicht wird.
3) Den Klemmenblock des Lautsprechers an die
100-V-Audioleitung anschließen. Beim An
-
schluss von mehreren Lautsprechern darauf
achten, dass die Lautsprecher alle gleich
gepolt werden (z. B. schwarzer Draht =
Minusanschluss) und dass der ELA-Verstär-
ker nicht überlastet wird.
Änderungen vorbehalten.
WARNUNG Im Betrieb liegt berührungsgefähr -
liche Spannung bis 100 V an der
Lautsprecherleitung an. Die Instal-
lation darf nur durch Fachpersonal
erfolgen.
Achten Sie auf die Belastung des ELA-Verstär-
kers durch die Lautsprecher. Eine Überlastung
kann den Verstärker beschädigen! Die Summe
der Leistungen aller angeschlossenen Laut-
sprecher darf die Verstärkerleistung nicht über-
schreiten.
Soll der Lautsprecher endgültig aus
dem Betrieb genommen werden, über-
geben Sie ihn zur umweltgerechten Ent-
sorgung einem örtlichen Recyclingbe-
trieb.
2
PA Ceiling Speaker
These instructions are intended for installers
with sufficient knowledge in 100 V technology for
PA applications. Please read the instructions
carefully prior to installation and keep them for
later reference.
1 Applications
This speaker is intended for ceiling installation
(ceiling thickness: approx. 2 – 45 mm) and is
used for reproducing speech and background
music. It is specially designed for PA systems
operating with 100 V technology. The two-part
design (holding frame and speaker) makes
installation very easy.
2 Safety Notes
The speaker corresponds to all relevant direc-
tives of the EU and is therefore marked with
.
G
The speaker is suitable for indoor use only.
Protect it against dripping water and splash
water, high air humidity and heat (admissible
ambient temperature range: 0 – 40 °C).
G
For cleaning only use a dry, soft cloth; never
use water or chemicals.
G
No guarantee claims for the speaker and no
liability for any resulting personal damage or
material damage will be accepted if the
speaker is used for other purposes than origi-
nally intended, if it is not correctly installed or
connected, or if it is overloaded.
3 Installation
1) Hold the white frame and turn the speaker
clockwise to the stop so that the speaker can
be removed from the frame.
2) To tighten the springs, push the three
retaining springs of the frame upwards
and hook each spring into its catch
(arrow).
CAUTION! When the springs are tight-
ened or released, the tension is high
and there is a risk of injury. Never put
your fingers between the frame and a
spring under tension!
3) Saw a hole (
∅
195 mm) into the ceiling.
4) Insert the holding frame into the hole in the
ceiling and carefully release each spring from
its catch (avoiding sudden rebound) so that
the springs will hold the frame in the ceiling.
5) Make the connection according to chapter 4.
6) Push the speaker into the frame, then turn the
speaker to the stop so that it is securely fas-
tened.
4 Electrical Connection
1) Completely switch off the PA system before
making the electrical connection so that the
100 V audio cable of the PA amplifier will not
carry any voltage!
2) In the factory, the speaker has been set to a
power rating of 6 W. To reduce the power rat-
ing (volume): On the transformer, disconnect
the red wire from the plug-in contact “6 W”
and connect it to the contact providing the
desired power rating (3 W or 1.5 W).
3) Connect the terminal block of the speaker to
the 100 V audio cable. When connecting mul-
tiple speakers, make sure that all speakers
have the same polarity (e. g. black wire = neg-
ative connection) and that the PA amplifier is
not overloaded.
Subject to technical modification.
WARNING During operation, there is a hazard
of contact with a voltage up to 100 V
at the speaker cable. Installation
must be made by skilled personnel
only.
Observe the load of the PA amplifier by the
speakers. An overload may damage the ampli-
fier! The total load of all speakers connected
must not exceed the amplifier power.
If the speaker is to be put out of opera-
tion definitively, take it to a local recy-
cling plant for a disposal which is not
harmful to the environment.
Ø195
103
Ø220
2.5
min.2
max.45
uçâ
cZhiJ
½
‰
hJö
eJö
cZ
J
gJö
eZeeJ
½
‰
hZhi
J
½
‰
100 V AUDIO
fJ
½
jJ
½
uçâ
Technische Daten
Specifications
EDL-70 / WS
Frequenzbereich
Frequency range
90 – 20 000 Hz
Nennbelastbarkeit
Power rating
6/3 / 1,5 W
RMS
Mittl. Schalldruck (1 W/1 m)
SPL (1 W/1 m)
97 dB
Max. Nennschalldruck
Max. rated SPL
104 dB
Lautsprechertyp
Speaker type
165
Gewicht
Weight
1,13 kg
Abmessungen siehe Zeichnung
Angaben in mm
Dimensions see drawing
Values in mm
Deutsch
English