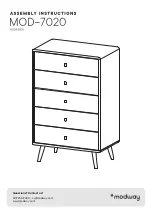
modway Transmit MOD-7020 Скачать руководство пользователя страница 3

Step 1

PAGE 3 OF 10

Step 2

x25

Cam Bolt Ø6 x 35 mm

A

x10

Wood Dowel Ø6 x 30 mm

E

HARDWARE

COMPONENTS

x5

Front Drawer

5

x5

Side Drawer Left

6

x5

Side Drawer Right

7

A

5

A

x 5

x 5

x 5

E

6

7

E

x25

Cam Lock Ø12 mm

C

HARDWARE

COMPONENTS

x5

Front Drawer

5

x5

Side Drawer Left

6

x5

Side Drawer Right

7

x5

Back Drawer

8

x5

Bottom Drawer

9

x5

Support Drawer

10

x30

Screw M 8 x 39 mm

I

10

x 5

x 5

C

6

7

5

8

9

I

I

WARNING

Children have died from furnitu

re tipover. 

To reduce the risk of furniture

 tipover: 

ALWAYS install tipover restrain

t provided.

NEVER put a TV on this produ

ct. 

NEVER allow children to stand

, climb or 

hang on drawers, door or shelv

es. 

NEVER open more than one d

rawer at a 

time.

Place heaviest items in the low

est drawer.

This is a permanent label. 

Do not remove! 

ATTENTION

Les enfants sont morts de bas

culement 

dans les meubles. Réduire les

 risques de 

renversement de meubles: 

TOUJOURS installer la retenue

 de 

renversement fournie.


NE JAMAIS installer de télévise

ur sur ce 

produit. 

Ne JAMAIS LAISSER les enfan

ts se tenir 

debout, grimper ou s'accrocher

 aux tiroirs, 

aux portes ou aux étagères. 

NE JAMAIS ouvrir plus d’un tiro

ir à la fois 


Placez les articles les plus lourd

s dans le 

tiroir le plus bas.


Ceci est une étiquette perman

ente

Ne pas enlever

Los niños han muertopor vu

elco de 

muebles. Para reducir el riesg

o de 

vuelco de muebles: 

SIEMPRE instale la restricción

 del vuelco 

provista. 

NUNCA cologue un televisor e

n este 

producto. 

NUNCA permita que los niños s

e paren, 

trepen o cuelguen en cajones, p

uertas o 

estantes. 

NUNCA abra más de un cajón a

 la vez. 

Coloque los artículos más pesa

dos en los 

cajón más bajo. 

¡No Quitar! 

ADVERTENCIA

WARNING LABEL

C

Содержание Transmit MOD-7020

Страница 1: ...Questions Contact us 609 256 9000 cs modway com www modway com...

Страница 2: ...se hand tools to assemble this item Do not use power tools Do not tighten bolts or screws completely until all hardware is lined up and inserted into the holes Do not over tighten screws and bolts to...

Страница 3: ...wer This is a permanent label Do not remove ATTENTION Les enfants sont morts de basculement dans les meubles R duire les risques de renversement de meubles TOUJOURS installer la retenue de renversemen...

Страница 4: ...Step 4 PAGE 4 OF 10 x30 Screw M 3 5 x 13 mm H x5 Screw M 4 x 22 mm N x5 Drawer Runner HARDWARE RM35A x5 Handle O RM35A x 5 x 5 H N O H x20 Wedge L x20 Screw 3 5 x 15 5 mm M HARDWARE 50 60 mm x 5 L M M...

Страница 5: ...5 HARDWARE x1 Bottom Board 2 x4 Leg COMPONENTS x20 Screw M 4 5 x 12 5 mm J x4 Mounting Plate Step 6 HARDWARE PAGE 5 OF 10 COMPONENTS x1 Top Board 1 x2 Back Board 11 x1 Support Board 12 PM1 11 12 D LB...

Страница 6: ...x1 Side Board Left 3 x1 Side Board Right 4 x2 Cam Bolt 6 x 35 mm A x8 Wood Dowel 8 x 30 mm D x30 Screw M 6 x 10 5 mm G x5 Drawer Runner Step 8 HARDWARE PAGE 6 OF 10 COMPONENTS x1 Bottom Board 2 RM35A...

Страница 7: ...p 9 Step 10 PAGE 7 OF 10 COMPONENTS x1 Bottom Board 2 x4 Cam Lock 15 mm B HARDWARE x2 Cam Lock 15 mm B HARDWARE COMPONENTS x1 Side Board Left 3 x1 Side Board Right 4 x1 Support Board 12 12 3 B 4 2 B B...

Страница 8: ...Step 11 Step 12 PAGE 8 OF 10 COMPONENTS x1 Top Board 1 x8 Cam Lock 15 mm B HARDWARE COMPONENTS x2 Back Board 11 x4 Cam Lock 15 mm B HARDWARE 11 11 B 1 B B B...

Страница 9: ...uire les risques de renversement de meubles TOUJOURS installer la retenue de renversement fournie NE JAMAIS installer de t l viseur sur ce produit Ne JAMAIS LAISSER les enfants se tenir debout grimper...

Страница 10: ...e CARING FOR YOUR ITEM Indoor use only Not contract grade Clean using a non abrasive cloth and a mild cleaner Never use harsh chemicals or integrity of the item CONNECT WITH US Tag us modway_furniture...

Страница 11: ...ed Allow 8 10 cm from each side 2 Please make a hole for wall plugs position on the wall and minimum 15 mm below bracket secured to the back of unit attach the wall plugs AA2 3 Locate the other bracke...

Отзывы: