MODSTER Mini Dasher Скачать руководство пользователя страница 26

User Manual

26

MODSTER Mini Dasher

www.modster.at

- Do not charge with reverse polarity. 

- Do not solder directly to the battery. 

- Do not modify or open battery. 

- Do not charge batteries above 4.2 volts (+/-0.05V) per cell and do not discharge below 3 volts per cell. 

- Charge batteries only with suitable lithium battery chargers with connected or built-in equalizer/balancer, never connect 

directly to a power supply. 

- Do not use the battery in locations subject to high static discharge. 

- All this can cause the battery to be damaged, explode or catch fire. 

- Never charge batteries unattended! 

- Never charge, store or keep the battery in the model or inside a car. 

Charging procedure 

Only use chargers that have been expressly approved by the manufacturer for use with lithium batteries. Lithium batteries 

can only be charged using the CC-CV charging procedure. Make sure that the charger is correctly selected. In the first char-

ging phase, the charger keeps the charging current constant. With a charging current of 1C and a discharged battery, this first 

phase takes approx. 50- 60 minutes. A battery capacity of approx. 80-90% is charged. When the end-of-charge voltage of 4.2 

volts/cell is reached, only the voltage is kept constant and the charge current drops. A further 35-40 minutes are required to 

charge the remaining capacity. If the value reaches the lower current limit of approx. 5-10% of the specified charging current, 

the charging process is switched off by the charging device. At a charge rate of 1C, this means that the entire charging pro-

cess takes approx. 90 minutes when the battery is discharged. A lower charging current of 0.3-0.5 C is recommended for the 

first charging process. This measure facilitates balancing and increases the service life of the battery. 

Voltage sensor cable 

Due to different cell temperatures during the discharge process, the individual cells gradually acquire different charge states 

and voltage levels. The total charge voltage applied is then not distributed evenly across the individual cells, which means 

that cells with a higher voltage level can be overcharged.To measure the individual cell voltage, the lithium batteries have a 

separate plug connection (voltage sensor cable), from which a cable leads to each individual cell.The black cable (Pin1) is the 

negative terminal of the first cell, Pin2 the positive terminal. The next contact in each case is the respective positive pole of the 

subsequent cell. 

Connect the voltage sensor cable to the Equalizer/Balancer connector on the charger for charging, which conveniently and 

automatically brings all cells to the same voltage value at the same time. 

In addition, the voltage of each individual cell is monitored.

Technical data: 

Rated voltage: 3.7 volts/cell 

Low charge rates protect the battery, 

high charge rates reduce the number of cycles by approx. 10%. 

End-of-charge voltage: 4.2 volts/cell (to be maintained to within 0.05 volts) 

Discharge rate / discharge current: 

Depending on battery type, e.g. a 25C battery can be discharged at a constant rate of 25C (25 times the rated capacity in Ah), 

and for a short time (for 3 seconds) up to 50C (twice the constant discharge rate). Examples: 

25C (discharge rate), means capacity value x C rate = discharge current. 

25C-battery with 1000mAh (1Ah) x 25C = 25A discharge current continuous/50A short time 

30C battery with 1000mAh (1Ah) x 30C = 30A discharge current duration/60A short-term 

45C battery with 1000mAh (1Ah) x 45C = 45A discharge current duration/90A short-term 

End of discharge voltage: 

Lithium cells should be disconnected under load, at the latest at about 3 volts /cell. If the voltage falls below the limit, the cell 

may be destroyed, explode and start to burn. 

Maximum temperatures 

Charging: +45°C, disch60°C 

Temperature behavior 

Lithium cells have a distinct temperature curve. 

At temperatures below 10...15°C the removable capacity is significantly lower than at 20...35°C. Even at higher temperatures 

(above 35...40°C) the removable capacity is noticeably lower. 

The maximum external cell temperature should not be exceeded during both charging and discharging, otherwise the cell 

will suffer permanent damage in the form of capacity loss. If exceeded for a longer period of time, it will be destroyed and may 

explode and start to burn. 

Содержание Mini Dasher

Страница 1: ...USER MANUAL BETRIEBSANLEITUNG Mini Dasher...

Страница 2: ...e of contents Safety and Cautions 3 Troubleshooting 4 Proportional RC Using Instruction 5 Introduction Tools Assembling the Electronic parts 5 Practice and Maintenance 6 7 Assembly Exploded Diagram 8...

Страница 3: ...s from model and transmitter when they are not in use Cautions when handling batteries Safety precautions Do not dismantle the battery or charger and do not cut any battery cables This may cause short...

Страница 4: ...atenna Solution Turn on both transmitter and receiver Place batteries in the transmitter properly Charge the drive battery Replace the transmitter batteries with new ones and charge the drive battery...

Страница 5: ...r will turn right Turning right angle can be adjusted by the degree of wheel twisting Pull the throttle trigger backward the car will forward Adjusting the angle of throttle trigger can adjust forward...

Страница 6: ...ng follows the command 4 Place the model car on the ground and stand behind it carefully hook the throttle lever of the remote control If the model car does not drive straight ahead turn the front whe...

Страница 7: ...e Let s practice Make R C car circuit at a wide and safe location using corner pylons seperately available empty cans or such Running fast at straight section and slow down at curved section is a basi...

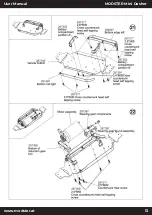
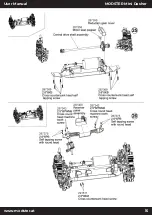
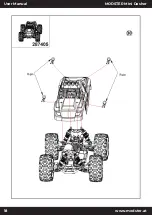
Страница 8: ...User Manual 8 MODSTER Mini Dasher www modster at Assembly Exploded Diagram...

Страница 9: ...9 User Manual MODSTER Mini Dasher www modster at...

Страница 10: ...User Manual 10 MODSTER Mini Dasher www modster at...

Страница 11: ...11 User Manual MODSTER Mini Dasher www modster at...

Страница 12: ...User Manual 12 MODSTER Mini Dasher www modster at...

Страница 13: ...13 User Manual MODSTER Mini Dasher www modster at...

Страница 14: ...User Manual 14 MODSTER Mini Dasher www modster at...

Страница 15: ...15 User Manual MODSTER Mini Dasher www modster at...

Страница 16: ...User Manual 16 MODSTER Mini Dasher www modster at...

Страница 17: ...17 User Manual MODSTER Mini Dasher www modster at...

Страница 18: ...User Manual 18 MODSTER Mini Dasher www modster at...

Страница 19: ...USB Charger 2 6PB self tapping screw with round head Front and rear arms 2 5 10 PM Cross Round head screw 3 12 PM Cross Round head screw ST2 7 PB screw assembly Front seat assembly 2 5 8 KM Cross cou...

Страница 20: ...cover group Tail Wing group Reduction gearbox hub drive hex The right tire group Left and right sides Two floor group Rocker arm of steering gear Front and rear swing arm shaft sleeve Shock absorber...

Страница 21: ...1 9 Optical axis Dog bone assembly Cross shaft assembly Steering columnassem 2 5 40 Optical axis universal shaft assembly Steering gear leverassembly Ball head group Shock absorber shafcomponent Rear...

Страница 22: ...87397 287403 287396 287398 287404 4 7 1 8 Ball bearing set Front swing arm reinforce ment Differential 2 6 5KB Countersunk head tapping screw Shock absorber plate group Rear swing arm reinforce ment R...

Страница 23: ...head machine tooth 2 6 6PB Round head self tapping screw Battery M3 flange nut 4 9 10 6 Ball head screw set Machine screw set M2 5 6 6 Round head belt screw 2 6 8KB Countersunk head tapping screw 3 20...

Страница 24: ...5 291595 291506 291518 291494 291519 Front shock mount 1 7 6 PWB5 screw group 2 6 10KB countersunk head tapping screw 1 18 R Type Pin 2 3 6 PWB6 Corss head with medium screw Cup as differential 2 6 12...

Страница 25: ...n ignite In the event of an explosion or fire never extinguish the batteries with water Only extinguish with dry extinguishing agent sand etc or smother the flames by covering The electrolyte liquid s...

Страница 26: ...which means that cells with a higher voltage level can be overcharged To measure the individual cell voltage the lithium batteries have a separate plug connection voltage sensor cable from which a cab...

Страница 27: ...ation they will thank you with a longer service life Stop operation before a noticeable loss of power becomes apparent Disconnect the battery from the load after operation to avoid further discharge M...

Страница 28: ...Sicherheit und Vorsicht 29 Problembehebung 30 Produktanweisungen 31 Werkzeug f r die Installation der Elektronik 31 Praxis und Wartung 32 33 Gew hrleistung 34 Sicherheitshinweise Akku 34 36 Konformit...

Страница 29: ...as Ladeger t nicht und schneiden Sie keine Batteriekabel durch Dies kann einen Kurzschluss und oder eine Besch digung des Produkts verursachen Laden Sie den Akku mit einem kompatiblen Ladeger t unter...

Страница 30: ...ung das Kabel den Stecker die Karosserie oder andere Teile auf Sch den Im Falle einer Besch digung darf es nicht benutzt werden bis der Schaden behoben ist Die Ladung die Batteriebox und die Batterie...

Страница 31: ...Vorw rtsgeschwindigkeit des Fahrzeugs angepasst werden W hrend das Auto vorw rts f hrt dr cken Sie den Abzug schnell nach vorne um es zu stoppen L sen Sie den Abzug damit das Auto beim Bremsen in die...

Страница 32: ...ung des Vorderrads dem Befehl folgt 4 Stellen Sie das Modellauto auf den Boden und stellen sich dahinter haken Sie den Gashebel der Fernsteuerung vorsichtig ein Wenn das Modellauto nicht geradeaus f h...

Страница 33: ...geraden Ab schnitten und langsames Fahren in Kurven ist eine grundlegende Technik zur Geschwindigkeitskontrolle die beim Fahren eines RC Autos n tzlich ist bung Wartung Wenn das Fahrzeug nicht in Gebr...

Страница 34: ...n dieses ist leicht brennbar und kann sich entz nden Im Falle einer Explosion oder Brandes die Akkus niemals mit Wasser l schen Nur mit Trockenl schmittel Sand etc l schen oder durch Abdecken die Flam...

Страница 35: ...rleichtert und die Lebensdauer des Akkus erh ht Voltage Sensor Kabel Durch unterschiedliche Zellentemperatur w hrend des Entladevorgangs erhalten die einzelnen Zellen nach und nach unter schiedliche L...

Страница 36: ...d liegt nur noch bei ca 300 Zyklen Bei hohen Entladestr men liegt die Zyk lenzahl im Bereich von 150 200 Zyklen Bei sehr hohen Entladestr men noch deutlich darunter Danach ist der Akku verbraucht und...

Страница 37: ......

Страница 38: ...USER MANUAL BETRIEBSANLEITUNG Mini Dasher...

Отзывы: