background image

12

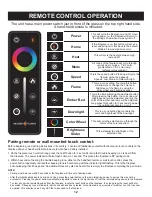
REMOTE CONTROL OPERATION

The unit has a main power switch just in front of the glass on the top right hand side. 

A hand-held remote is included.

Power

Home

Heat

Mode

Speed

Flame

Ember Bed

Downlight

Color Wheel

Brightness 

Slider

This will cycle the fireplace on and off. Upon 

cycling power on, the fireplace will return to

the settings it had when it was cycled off .

If the fireplace is on, this button will act as a 

reset and bring all colors back to the default 

Modern Flames' signature color.

This will cycle the heater between high, 

low and off .

All zones of the fireplace will cycle through 

various demo modes - 7 & 3 color

gradient/fade, 7 & 3 color jump, 

red/green/blue gradient.

This is the speed button. Pressing will cycle the 

flame & ember bed speeds.

Speeds: Low, Medium, Default & High.

This is a zone setting. Touching this button

will allow you to change the color and

brightness of the flame by using the

color wheel and brightness slider.

This is the Ember Bed light adjustment button. 

After pressing this button, the color ring and 

brightness bar will be adjusted, and only the 

color of the ember bed lamp will be adjusted. 

Long press this button for 3 seconds to adjust 

the optional accessory on or off

This will cycle the selected zone through the 

colors of the color spectrum.

This is a zone setting that controls the

color and brightness of the downlight.

This will adjust the brightness of the

selected zone.

Pairing remote or wall mounted touch control:

Before beginning, read pairing instructions in its entirety.  Locate and familiarize yourself with the manual touch controls on the 

fireplace and your hand held remote. Ensure remote has a battery installed.
1. On the fireplace touch controls, long press the on/off button for 3 seconds until a fast double beeping tone is heard from

the fireplace. The power indicator will also flash 3 times in 1 second. This places the fireplace in RF pairing mode.

2. Within 5 seconds of hearing the double beeping tone, either on the handheld remote or wall touch control, press the

power button repeatedly until another beeping tone is heard along with the indicator lights flashing. This is the fireplace

acknowledging that it has paired. An additional tone may also be heard; this is simply the fireplace completing the pair mode.

NOTE:

• Pairing must be done within 5 seconds or the fireplace will time out of pairing mode.
• After the initial double beep is heard, do not long press the power button on the remote/pairing device to pair as this may not be

successful. Pressing the power button repeatedly is required to ensure the signal is sent from the remote/pairing device to the fireplace.

• To clear any paired remotes/devices from the fireplace, locate the reset button on the fireplace, then long press the reset button for

3 seconds. A beeping tone will indicate that the codes have been cleared. Once cleared, a new remote or wall touch control can now

be paired. This will also un-pair any APP that was paired to the fireplace.

Manual Controls

The fireplace has manual controls located next to the 

toggle switch, in front of the glass on the top right 

side of the viewing area.

Power On/Off button: 

Press once, indicator light turns 

off and fireplace power turns on. All functions 

enabled. Press again, flame turns off and fireplace 

goes to standby. NOTE: Long pressing this button 

for 3 seconds places fireplace in RF pairing mode. 

Heat Button: 

Pressing heat button cycles the heater 

and blower on/off. Settings: Heater and blower 

OFF, Low Heat, and High Heat. Indicator light will 

match according to status. NOTE: On US LPM, low 

and high heat have the same heat output when 

wired for 120 V. Long Press the heater button for 5 

seconds to lock/unlock the heater.

Preset Color Button: 

Press preset color button to 

cycle through the 8 preset color options. This 

changes color of all three zones: the flame, ember 

bed and down light. Colors in order of appearance: 

MF orange-red-orange-golden 

orange-green-aqua-blue-magenta

Resetting button: 

Clears any paired remotes/devices 

from the fireplace. Once cleared you can pair a 

new remote or wall touch control. This will also 

un-pair any APP that was paired to the fireplace. 

After long pressing the reset button for 3 seconds, 

a beeping tone will be heard indicating that the 

pairing codes have been cleared. 

Buzzer Tone Change: 

Long press the on/off and 

preset color button at the same time to enter the 

beeping tone cycle mode. Continue to long press 

both buttons to cycle through the 4 tone options. 

The tone will change every 2 seconds while releas-

ing the buttons will act as the selection of the tone. 

The tones in order of appearance are; tone-1, 

tone-2, tone-3, and silent mode. 

NOTE: 

When silent mode is selected, a tone will still 

be present for performing system functions such 

as remote pairing or Wi-Fi pairing. 

Placing in Wi-Fi Paring Mode: 

-EZ Mode: 

While the fireplace is ON, long press 

the Preset Color button for 3 seconds. An audible 

beeping tone will sound and the flame light, ember 

bed light, and down light will turn to white and 

begin flashing rapidly. Fireplace is now in EZ 

pairing mode, which lasts for 2 minutes.

-AP Mode: 

While the fireplace is ON, long press 

the Preset Color button for 6 seconds. Two audible 

beeping tones will sound and then only the FLAME 

LIGHTS and nothing else will turn to white and 

begin flashing slowly. Fireplace is now in AP pairing 

mode, which lasts for 2 minutes

.

NOTE: 

Fireplace is also equipped with Bluetooth 

pairing. There is no mode setting for the Bluetooth 

as the APP will automatically detect the Bluetooth 

signal for pairing when attempting to pair fireplace 

to Bluetooth. 

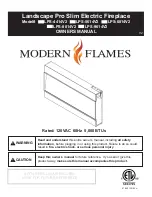
Содержание Landscape Pro Slim LPS-4414V2

Страница 1: ...y information before plugging in or using this product Failure to do so could result in fire electric shock or serious personal injury Keep this owner s manual for future reference If you sell or give this product away make sure this manual accompanies this product 07 00012 REV A WARNING CAUTION AFFIX SERIAL NUMBER LABEL HERE FOR FUTURE REFERENCE Rated 120VAC 60Hz 5 000 BTUs V2 ...

Страница 2: ...haust opening as this may cause an electric shock or fire or damage the heater 8 To prevent a possible fire do not block air intakes or exhaust in any manner 9 A heater has hot and arcing or sparking parts inside Do not use if in areas where gasoline paint or flammable vapors or liquids are used or stored 10 Use this heater only as described in this manual Any other use not recommended by the manu...

Страница 3: ...ures de ventilation ou d évacuation car cela pourrait provoquer une électrocution ou un incendie ou endommager le radiateur 8 Pour éviter un éventuel incendie ne bloquez en aucune manière les prises d air ou les sorties d air 9 Un appareil de chauffage contient des pièces chaudes et produisant des arcs ou des étincelles à l intérieur Ne pas utiliser si dans des zones où de l essence de la peinture...

Страница 4: ... 1465W BTUs 5 000 BTUs 5 000 BTUs 5 000 BTUs 5 000 BTUs 5 000 BTUs Lamps LED 12V LED 12V LED 12V LED 12V LED 12V Motor 12 VDC 12 VDC 12 VDC 12 VDC 12 VDC Stepper Motor Stepper Motor Stepper Motor Stepper Motor Stepper Motor Shipping Size 46 625 x 26 59 x 26 70 5 x 26 82 5 x 26 98 5 x 26 x 8 07 x 8 07 x 8 07 x 8 07 x 8 07 1185mm 1500mm 1790mm 2095mm 2500mm x 660mm x 660mm x 660mm x 660mm x 660mm x ...

Страница 5: ...m W x 603mm H x 141mm D 1435mm W x 613mm H x 152mm D LPS 6814V2 67 5 8 W x 13 5 8 H 68 1 16 W x 23 3 4 H x 5 3 8 D 68 1 4 W x 24 8 H x 6 D 1721mm W x 356mm H 1735mm W x 603mm H x 141mm D 1740mm W x 613mm H x 152mm D LPS 8014V2 79 5 8 W x 13 5 8 H 80 1 16 W x 23 3 4 H x 5 3 8 D 80 1 4 W x 24 8 H x 6 D 2026mm W x 356mm H 2040mm W x 603mm H x 141mm D 2045mm W x 613mm H x 152mm D LPS 9614V2 95 5 8 W x...

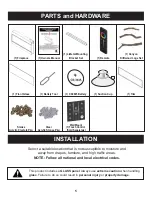
Страница 6: ...crylic Crystals Pkg Acrylic Stones Pkg Sold Separately PARTS and HARDWARE This product includes a GLASS panel Always use extreme caution when handling glass Failure to do so could result in personal injury or property damage INSTALLATION Select a suitable location that is not susceptible to moisture and away from drapes furniture and high traffic areas NOTE Follow all national and local electrical...

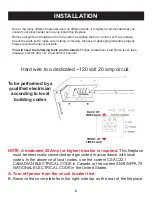
Страница 7: ...nder level tape measure electric drill 1 4 wood drill bit hammer To be performed by a qualified electrician according to local building codes Hard wire to a dedicated 120 volt 20 amp circuit NOTE A dedicated 20 Amp or higher breaker is required This fireplace must be electrically connected and grounded in accordance with local codes In the absence of local codes use the current CSA C22 1 CANADIAN E...

Страница 8: ...tall L Metal mounting brackets to the top and bottom of the fireplace with supplied screws 3 Hardwire fireplace see page 6 4 Install the fireplace in the framed opening with a minimum 1 1 4 drywall screws to secure the unit 5 Mask the exposed fireplace during the drywall process Install drywall to the drywall stops on the perimeter of the fireplace For more information on the drywall stops see the...

Страница 9: ...tall at the top right of framed opening 5 Mask the exposed fireplace during the drywall process Install drywall to the perimeter of the fire box The unit can be covered with a custom facade 6 Remove glass see page 10 and install media See page 9 for log layout 2 Install L Metal Nailing Flanges to the fireplace 3 Hardwire fireplace see page 6 4 Install the fireplace in the framed opening with a min...

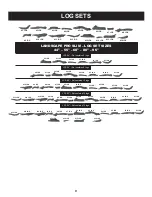
Страница 10: ...5 LOG 6 LOG 1 LOG 2 LOG 3 LOG 4 LOG 5 LOG 6 LOG 1 LOG 2 LOG 3 LOG 4 LOG 5 LOG 6 LOG 7 LOG 8 LOG 7 LOG 8 LOG 7 LOG 8 LOG 7 LOG 8 LOG 9 LOG 10 LOG 9 LOG 10 LOG 9 LOG 10 LOG 11 LOG 12 LOG 11 LOG 12 LOG 14 LOG 13 LOG 16 LOG 15 LOG LANDSCAPE PRO SLIM LOG SET SIZES 44 56 68 80 96 LPS 44 Set contains 6 logs LPS 56 Set contains 8 logs LPS 68 Set contains 10 logs LPS 80 Set contains 12 logs LPS 96 Set cont...

Страница 11: ...Set contains 6 logs LPS 56 Set contains 8 logs LPS 68 Set contains 10 logs LPS 80 Set contains 12 logs LPS 96 Set contains 16 logs 1 1 1 1 1 2 2 2 2 2 3 3 3 3 3 4 4 4 4 4 5 5 5 5 5 6 6 6 6 6 7 8 7 7 8 9 10 11 8 9 10 12 9 11 7 8 10 12 13 14 15 16 LOG PLACEMENT ...

Страница 12: ... now be installed by installing bottom of glass in track then tilt towards fireplace After placing the front glass it can be secured with screws 3 Place the logs on top of the acrylic crystals 1 Remove screws from top of glass bracket Use the small suc tion cup provided in the hardware kit to lean glass towards the front Then lift glass up and away Place glass in soft safe area ...

Страница 13: ...htness of the selected zone Pairing remote or wall mounted touch control Before beginning read pairing instructions in its entirety Locate and familiarize yourself with the manual touch controls on the fireplace and your hand held remote Ensure remote has a battery installed 1 On the fireplace touch controls long press the on off button for 3 seconds until a fast double beeping tone is heard from ...

Страница 14: ...sing this button for 3 seconds places fireplace in RF pairing mode Heat Button Pressing heat button cycles the heater and blower on off Settings Heater and blower OFF Low Heat and High Heat Indicator light will match according to status NOTE On US LPM low and high heat have the same heat output when wired for 120 V Long Press the heater button for 5 seconds to lock unlock the heater Preset Color B...

Страница 15: ...s AP Mode While the fireplace is ON long press the Preset Color button for 6 seconds Two audible beeping tones will sound and then only the FLAME LIGHTS and nothing else will turn to white and begin flashing slowly Fireplace is now in AP pairing mode which lasts for 2 minutes NOTE Fireplace is also equipped with Bluetooth pairing There is no mode setting for the Bluetooth as the APP will automatic...

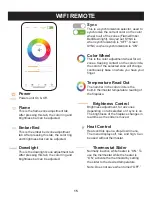
Страница 16: ...ynchronization is ON Color Wheel This is the color adjustment wheel for all zones Keeping contact on the color circle the color of the selected zone will change continuously base on where you have your finger Temperature Read Out The number in the color circle is the built in thermostat temperature reading of the fireplace Brightness Control Brightness adjustment for all zones depending on tab sel...

Страница 17: ...as remote control green monochrome fade cycle Island Time Same as remote control blue monochrome fade cycle Seven Color Demo Same as remote control 7 color jump cycles R G B RG RB GB RGB Three Color Demo Same as remote control 3 color jump cycles R G B Custom 1 Custom mode can be modified from My Ambience setting The default color is Red Custom 2 Custom mode can be modified from My Ambience settin...

Страница 18: ...mode color Color flash mode Color flash speed Includes a preview function See Customize Mode Sub menu continued for more info Timer Pressing the timer button will pop up a sub menu with 10 options to choose from 0 5 1 2 3 4 5 6 7 8 hours cancel Once the selected time has elapsed the fireplace will turn off Ambience Setting The Ambience Setting button will open up a second window where customizatio...

Страница 19: ...ets fireplace status no heat OFF ON Heat Level Sets Heat Level OFF LOW HIGH Temperature Temperature Level for the heater to turn on if the ambient temperature falls below the set temperature High Heat Power Off Turn On Cancel Heat Level Off Low High Cancel ...

Страница 20: ...sired color combination WIFI REMOTE Color Flash Mode Customizing how the color changes Static No change in brightness and flash and only one color can be selected Jump Cycles between selected colors up to 8 Jump speed is selected using the speed slider Gradient Color progression between chosen colors up to 8 Gradient speed is selected using the speed slider Preview Will Preview any customization b...

Страница 21: ...20 WIFI INITIAL LOG IN After download installed Login to Modern Flames app Search for and install the MODERN FLAMES app from Google Play or Apple App store or scan the QR code App example STEP 1 STEP 2 ...

Страница 22: ...1 WIFI PAIRING Once opened and logged in From HOME page From the home page select the add symbol SELECT FIREPLACE Select series of fireplace that will be pairing too and follow instructions STEP 3 STEP 4 ...

Страница 23: ...ure fireplace is ON Using the fireplace manual touch controls turn ON the fireplace WiFi Information If pairing via Wi Fi you must use 2 4 GHz Wi Fi and must have information filled out to move to next step STEP 5 STEP 6 ...

Страница 24: ...ill be displayed accordingly on the top right of the screen Example displayed is EZ mode Wi Fi Pairing confirmed EZ pairing mode is confirmed with a single audible beeping tone is heard and all the lights begin to blink rapidly AP pairing mode is confirmed with two audible beeping tones are heard and ONLY the FLAME begins blinking slowly Select confirm to move forward to Next step Note Device rema...

Страница 25: ... fireplace Damage as a result of this may not be covered under warranty Question or assistance about pairing device contact customerservice modernflames com or call 877 246 9353 Monday Friday 8 00 am 5 00 pm MST STEP 10 PAIRING Device APP should now begin to pair Depending on Wi Fi this can take up the entire 2 minutes to pair or it may need to be repeated more than once if the signal isn t captur...

Страница 26: ...F D ED D H C F C I D ED D H C F D ED DE D A IAF0 A D AC AIC G 0 HD G FD E K AL ED 2 A CE H E I C G AMD F H D MC A B N A D A B N E MD D ED C D G AD CA D ED G AD AD ED N DAD G AMD N E I C KO2L HD HC AF C C3C I IEGD 0123 0123 0123 0123 0123 0123 0123 0123 0123 0123 0123 0123 0123 0123 0123 0123 E P Q R SRT 245 670 689 45 670 89 45 670 489 45 670 689 5 8 456 ...

Страница 27: ...s tripped A Turn the main breaker to the off position for 60 seconds Next flip the breaker back to on position A Low Batteries B Remote not paired properly C Remote control defective A Replace batteries in remote control with CR2025 B With the fireplace ON press and hold the Power button for about 3 seconds until you hear the buzzer sound twice and the power indicators begin to flash Within 5 seco...

Страница 28: ...this fireplace Q Does the fireplace need to be on a dedicated 20 amp circuit A Yes Q What thickness of sheetrock should be used for the recessed installation A 1 2 or 5 8 thinner is recommended for tile facade Q How often do the batteries in the remote need to be replaced A Annually possibly more with heavy use Q Is there a remote receiver in the fireplace that requires batteries A No only the act...

Страница 29: ...l interference in a residential installation This equipment generates uses and can radiate radio frequency energy and if not installed and used in accordance with the instructions may cause harmful interference to radio communications However there is no guar antee that interference will not occur in a particular installation If this equipment does cause harmful interference to radio or television...

Страница 30: ...uch as grills refrigerators and accessories DO NOT RETURN TO STORE STOP CALL US FIRST For immediate help with installation product information or if your product arrives damaged please call our toll free number at 1 877 246 9353 Monday Friday 8 00AM 5 00PM AZ Mountain Time Or email us at customerservice modernflames com OUR STAFF IS READY TO PROVIDE ASSISTANCE Copyright 2022 RPG Brands Modern Flam...

Отзывы: