background image


MOBRIDGE M1000

-

M

-

DA SERIES |


INSTALL NOTES


PAGE 

| 7


The Graphical Interface can be downloaded from our 

website

, and can be used both online and offline mode. 

However, in order to ‘Map the Channels’ you will need to be connected to the DA2/DA3 with power connected too. 
Offline mode allows you to configure Graphic EQ settings and store them for later fine-tuning in the car if desired. 
We recommend all tuning be done with a ‘Live’ System, because this way you can hear all changes being made in 
real time. Graphic EQ, Crossover settings and Time Alignment changes, can all be heard as you make the 
changes when ‘Live’. 

Connecting and Channel Mapping 

 
Once downloaded, we recommend you open the application and connect to your DA unit via a USB cable (not 
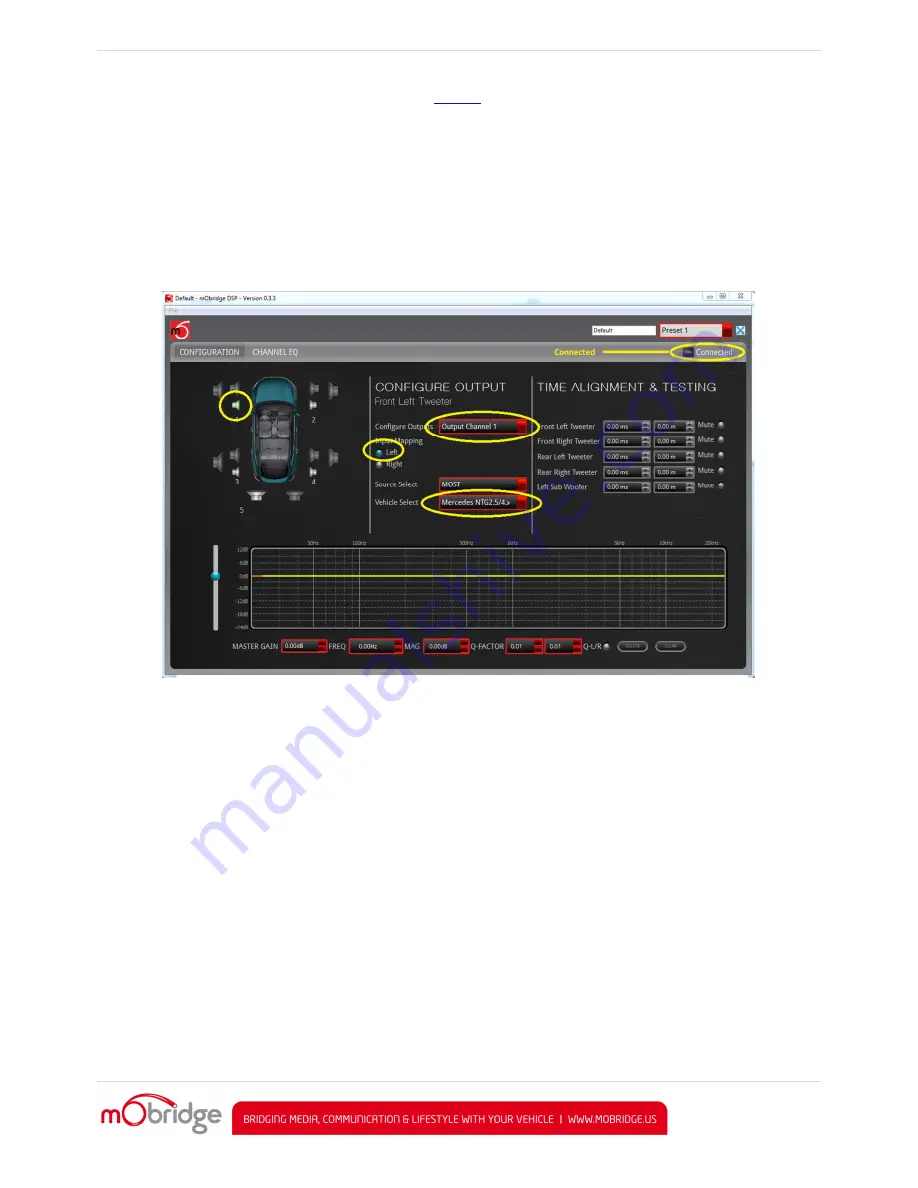
provided). If power is connected to the DA and turned on, you will see the below screen. 


Figure 3 M1000-M-DA3 Connected


The first thing you will need to do is to select the vehicle the DA is being fitted to and then configure the channels 
for the correct mapping of your particular system.


First select a speaker from the image of the vehicle then from the drop down menu in the middle of the screen, 
select the channel output you have connected for that particular speaker. Repeat this for each speaker and its 
corresponding output channel.


When running a component speaker system with a passive crossover, only select one of the speakers in the 
cluster. It is not important which speaker is chosen, as this is only the mapping stage. Crossover settings will allow 
for correct settings for this type of speaker system!


When connecting a Mono Subwoofer, simply select the speaker image and click the ‘Left’ & ‘Right’ buttons for the 
input mapping in order for the M1000

-

M

-

DA3 to know that this is a ‘summed’ channel output, providing information 

from both the left and right hand sides.


Crossover (Filter) Set up 

After channel mapping, you will need to set the crossover for each of the speakers connected. To do this, first click 
on the ‘Channel EQ’ TAB at the top left corner of the screen. This will open the Full EQ page for the individual 
speaker selected.


Содержание m1000-m-da series

Страница 1: ...MOBRIDGE M1000 M DA SERIES INSTALL NOTES PAGE 1 Installation User manual for the mObridge M1000 M DA series of Pre Amplifiers MOBRIDGE M1000 M DA AUDI INSTALLATION V1 0...

Страница 2: ...M DA3 Crossover 8 Figure 5 Channel Equalizer 9 Figure 6 Channel Equalizer with mater mark 9 Figure 7 Time Alignment Cross Hairs 10 Figure 8 Master Equalization 11 Figure 9 Saving Tuned Settings 11 Fi...

Страница 3: ...nclude TOSLINK output Channel Mapping to 8 RCA output channels 1000 Point Parametric Graphic Equalizer for each channel as well as a Master EQ Crossover Type and crossover points for each speaker cros...

Страница 4: ...distributor first and although we endeavor to answer emails we receive in a timely manner due to time zone differences we may not be able to respond immediately mObridge always recommends professiona...

Страница 5: ...ower Ground Remote wiring harness 8x RCA output cable MOST extension cable MOST connectors Free software download from http www mobridge us wizard and also the DSP user interface http www mobridge us...

Страница 6: ...able to extend the factory amplifier wiring to the unit The units also come with a range of other MOST connector shells just in the case the car does not have an existing amplifier In these cases the...

Страница 7: ...d to and then configure the channels for the correct mapping of your particular system First select a speaker from the image of the vehicle then from the drop down menu in the middle of the screen sel...

Страница 8: ...changes make if you are connected and powered on Figure 4 M1000 M DA3 Crossovers You can also adjust the slope of the crossover The adjustment options for slope are 6dB 12dB 18dB and 24dB In the above...

Страница 9: ...n control Figure 6 Channel Equalizer with mater mark In figure 6 we can see that we have enabled a 3 way system and checked the box for the watermark We have also bumped up the gain a little on the tw...

Страница 10: ...e a different sound position so this is only a recommendation Figure 7 Time Alignment Cross Hairs In figure 7 you can see that we have dragged the left tweeter crosshairs over and in the time alignmen...

Страница 11: ...ully as the user cannot just pull power from the unit as this will not work The DA3 has four different presets and these can individually tuned The channel mapping will remain across all four presets...

Страница 12: ...ot require coding All MMI2G cars come with an external amplifier in the system already MMI3G All MMI3G cars require coding If the vehicle originally had a B O or BOSE external amplifier then the codin...

Страница 13: ...s the Diagnose interface for Datenbus in the Audi VAGCOM tools The next figure shows which control module to select for the CAN Gateway Figure 13 Select the CAN Gateway Once the CAN gateway has been s...

Страница 14: ...e 15 Sound System option 0x47 selected In addition to this the radio address 56 also needs to be coded and this is byte 3 bit 0 of the Long Coding string The coding needed for this can be seen in the...

Страница 15: ...s wizard Once the Wizard has been downloaded the latest DA software can be applied The latest software can be found here http mobridge us node 15145 The mObridge DA unit will need to be connected in t...

Страница 16: ...shows us the software versions of the DA unit and presents the user with a software update button Figure 19 DA software versions To perform the software update simply click on the Update button which...

Страница 17: ...DA products MOST unit can be software updated via its USB connection and use of the mObridge DSP software interface that runs on Windows and Mac PC s The DSP GUI can be downloaded here http mobridge u...

Страница 18: ...the GUI we can just click on the Connected in the top right hand corner and this will bring us to the update page a seen below Figure 23 Click on Manual Update and select the file The user then needs...

Страница 19: ...ure 24 DA3 update in progress Once the update has completed the DA unit will reboot and start the system again Sometimes it is a good idea to let the car sleep after the firmware upgrade as some MOST...

Отзывы: