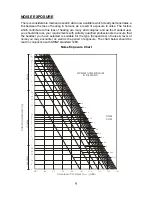
Mobile One HSP-1 Series Скачать руководство пользователя страница 9

NOISE EXPOSURE 


There is considerable medical research data now available which clearly demonstrates a 
link between the loss of hearing in humans as a result of exposure to noise. The factors 
which contribute to this loss of hearing are many and complex, and as the Headset user 
you should discuss your requirements with suitably qualified professionals to ensure that 
the headset you have selected is suitable for the type (frequencies) of noise & level of 
noise you may encounter as well as the period of exposure. The chart below should be 
read in conjunction with AS/NZ standard 1269. 


Noise Exposure Chart 


85

90

95

100

105

110

115

120

125

0.01

0.05

0.1

0.2

0.3

0.4

0.5

0.6

0.7

0.8

0.9

1.0

16
14

12
10

8

7

6
5
4

3

2

1.5

1

50

40

30

0

15

20

30

40

50

1

1.5

2

3

10

9

8

7

6
5

4

20

 s

econ

d

s.

 mi

n

ut

e

s

ho

u

rs

Noise Level - Continuous (L

) dB(A)

Aeq ,T, I 

D

U

RA

TION

 OF

 S

EGM

EN

T (

T,

i)

EXCESSIVE NOISE EXPOSURE

IN THIS REGION

NOISE

DOSE


9

Содержание HSP-1 Series

Страница 1: ...nk you for choosing a quality communications Headset from Mobile One Australia This Headset has been designed and developed to maximise comfort provide superior electronic communications and to ensure excellent hearing protection in high noise environments ...

Страница 2: ...3 9 15 4 29 5 5 3 24 2 33 0 5 8 27 2 35 5 3 4 32 1 38 3 3 2 35 1 42 2 6 0 36 2 According to the Class rating system The HSP 1 Headset is a Class 5 The HSP 2 Headset is a Class 5 WARNINGS This headset will only provide the hearing protection as indicated by the SLC80 rating when it is maintained in good working order and fitted correctly Other factors affecting the noise attenuation characteristics...

Страница 3: ...rect fitment of the Headset to your head is vital for maximum hearing protection and to optimise communications ability A CORRECTLY FITTED HEADSET Figure A Figure B PARTS OF A HEADSET 3 1 Headband 2 Adjusting Slide 3 Ear Cushion 4 Ear Cup 5 Microphone attachment socket 6 Mic Boom 7 Wind Sock Figure C 4 7 6 5 3 2 1 ...

Страница 4: ... the nose shown as the solid black line 2 The vertical position of the Headband on the top of the head as compared the vertical white dotted line Figure D STEP BY STEP USER GUIDE NOTE The Headset is intended to be worn with the microphone and cable on the left side of the head STEP 1 Fitting the Microphone Boom Fit th d on the Ro Ea P Figure 1 0 e Microphone Boom assembly to the mounting socket lo...

Страница 5: ...ore efficient seal on the head to keep out noise b With one hand hold the Headband steady at the top of your head as shown in Figure 3 2 Holding the Ear Cup with your other hand move it up or down to find the best position so that the Ear Cup completely seals onto your head around your ear No part of the ear should be caught between the Ear Cushion and the head Make similar adjustments for both si...

Страница 6: ...ng toward your mouth See figure 5 2 NB Project your voice loudly and clearly into the microphone Figure 5 2 STEP 6 Checking electronic operation Check Earphones speakers You should hear sound from your radio in both Ear Cups If this is not the case check the connection to the communications device or that the device is operating properly Check Microphone Check that the speech you are attempting to...

Страница 7: ...ct sunlight or temperatures above 55 degrees C as distortion of the Ear Cushions may occur PARTS REPLACEMENT See items 1 5 pictured in Figure 6 0 The LEATHER HEAD BAND COVER item 1 is simply wrapped around the Head Band with the edges overlapping so that the Velcro seam can be evenly pressed together To remove the cover pull the top overlap away from the bottom at the Velcro seam To remove and rep...

Страница 8: ...r for the Microphone at the end of the Microphone boom To remove simply pull the Wind Sock off the end and gently stretch and pull the replacement Wind Sock over the Microphone again HEADSET PARTS EXPLODED VIEW 5 3 4 2 1 Figure 6 0 REPLACEMENT PARTS LIST Order Code Description HSP FCK Hygiene Kit items 4 5 HBP Leather Headband Cover item 1 MB102 Microphone Boom items 2 3 WSS2 Replacement Wind Sock...

Страница 9: ...o ensure that the headset you have selected is suitable for the type frequencies of noise level of noise you may encounter as well as the period of exposure The chart below should be read in conjunction with AS NZ standard 1269 Noise Exposure Chart 85 90 95 100 105 110 115 120 125 0 01 0 05 0 1 0 2 0 3 0 4 0 5 0 6 0 7 0 8 0 9 1 0 16 14 12 10 8 7 6 5 4 3 2 1 5 1 50 40 30 0 15 20 30 40 50 1 1 5 2 3 ...

Страница 10: ...WARRANTY 10 ...

Страница 11: ...ustralia Pty Limited Electro Acoustic Service Centre Camden Airport Camden NSW P O Box 123 Camden NSW 2570 AUSTRALIA INTERNATIONAL Phone 02 4655 6677 Phone 61 2 4655 6677 Fax 02 4655 6600 Fax 61 2 4655 6600 www mobileone com au 11 ...

Страница 12: ... developed and manufactured in Australia Mobile One Australia Pty Limited Electro Acoustic Engineering Division Camden Airport Camden NSW AUSTRALIA Phone 02 4655 6677 Fax 02 4655 6600 INTERNATIONAL Phone 61 2 4655 6677 Fax 61 2 4655 6600 www mobileone com au Copyright Mobile One Australia Pty Ltd 2011 Revision 8 Feb 2012 12 ...

Отзывы: