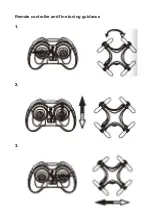
Automatic calibration in between drone and controller before
takeoff.
Slide the switch from Off to ON of the drone and slide the switch of
controller from OFF to ON
The drone corner light will flashing from start. Push the left stick to
bottom left corner and right stick to bottom right corner
simultaneously for 4 seconds, move the stick back to center. If the
light is still flashing, keep turning the stick for both right and left till
the flashing light of drone corner stop flashing. The calibration is
successful and ready to takeoff.
Changing battery in remote controller
•Different types of battery or old and new battery should not be
mixed.
•Insert 2pcs AA alkaline batteries. Follow the polarity correctly to
install and place the batteries into the compartment of the remote
controller. Exhausted batteries should be taken away from the
battery compartment.
•Dispose of battery procedure should follow the environmental
protection agency guidance.
•Remote controller not suitable to operate with any rechargeable
batteries
Recharge the quadcopter battery
1.Plug the USB charging cable (included) into the quadcopter.
2.Plug in the USB cable (other side) to the USB adaptor (not
included) or other power source which should provide 5V, 1A DC
power.
3.During charging the battery, there is no indicator will show on the
USB cable or the quadcopter.
4.Red LED on USB charging cable will be switched on after
completed the charging process.
5.Recharging the drone must under the supervision of an adult. Only
use the provided charge cable for charging the drone.
Preparation before taking off
1.Please operate in spacious indoor or outdoor without rain or snow,
and wind power should below 4 grade. Be away from people,
animaIs and obstacles.
Содержание MO9020
Страница 2: ...MO9020 Buttons...
Страница 3: ...Remote controller and fine tuning guidance 1 2 3...
Страница 4: ...4 5...


