background image

Ventilateur de la tour

 - Manuel en français

23

FR

UTILISATION

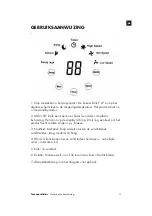
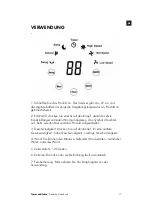
1. Branchez l’appareil. Le buzzer émettra alors un « di » et l’écran 

numérique affichera la température ambiante. Appareil en veille.

2. MARCHE / ARRÊT : Appuyez une première fois, le premier joint 

en plastique déterminera la manière normale d’expulser le vent, la 

première icône de joint en plastique est lumineuse. La deuxième fois, le 

produit est prêt à l’emploi.

3. Vitesse : Appuyez sur ce bouton pour choisir entre le vent à vitesse 

moyenne, le vent à vitesse élevée, vent à vitesse basse.

4. Vent : Vous pouvez choisir le vent mode sommeil, le vent naturel, le 
vent normal.

5. Minuterie : 12 heures.

6. Oscillation : Le sens de déplacement vers la gauche ou la droite est 

automatiquement activé.

7. Télécommande : Veuillez retirer la languette avant de l’utiliser.

Содержание TF1

Страница 1: ...Tower Fan TF1 Instruction Manual English Nederlands Deutsch Français www moacolors com ...

Страница 2: ...move the protective case and ensure that the product is disconnected from the power supply 2 Away from the fire source 3 It is forbidden to use in places where serious dust is found 4 Products can not be placed in high temperature and low temperature 5 The use of wire and other foreign objects shall be prohibited to insert any pores in this product Avoid electric shock or damage to the product 6 I...

Страница 3: ...r Fan English Instruction Manual 3 EN PARTS LOCATION 1 Display panel 2 Air outlet 3 Back cover 4 Front shell 5 Rotating column 6 Chassis PACKING LIST 2 sets Baseboard 8 Mounting screws 1 Remote 1 2 4 3 5 6 ...

Страница 4: ... surface or table Check whether the goods in the box are in line with the packing list 2 Remove two bottom plates and assemble a disk as shown Screw the sides of the disc with four screws 3 Pass the power cord through the bottom panel and insert the base plate with four screws and the main body of the product ...

Страница 5: ...astic seal the normal way to send the wind the first plastic seal icon bright By the second time the product is reworking 3 Speed Press this piece to choose medium speed wind high speed wind low speed wind 4 Wind You can choose the sleeping wind natural wind normal wind 5 Timer 12 hour time 6 Swing The left or right direction is automatically sent off 7 Remote control Please take the diaphragm bef...

Страница 6: ...CLEAN MAINTAIN AND STORE 1 Clean the shell Unplug the power and gently wipe with a cloth Do not use alcohol gasoline banana water and other solvent cleaning 2 Product storage Clean the product and put it in the carton and place it in the shade ...

Страница 7: ...ubt consult your waste disposal facility WARRANTY Dear Valued Customer Thank you very much for purchasing a MOA product We wish you to inform you that this product is covered by a warranty which complies with all legal provisions concerning existing warranty and consumer rights in the country where the product was purchased Should you find any defect or malfunction of your MOA product please conta...

Страница 8: ...HRIFTEN 1 Zorg dat het product niet is verbonden met een stroomvoeding wanneer u de behuizing verwijdert 2 Houd het product uit de buurt van hittebronnen 3 Het product is niet geschikt voor gebruik op plekken met veel stof 4 Het product is niet geschikt voor hoge en lage temperaturen 5 Steek geen draad of andere externe objecten in de openingen van dit product Dit geeft een risico op een elektrisc...

Страница 9: ...NederIandse handleiding NL ONDERDELEN LOCATIE 1 Displaypaneel 2 Luchtuitgang 3 Behuizing achter 4 Behuizing voor 5 Draaiende kolom 6 Onderstel INHOUD 2 grondplaten 8 bevestigingsschroeven 1 afstandsbediening 1 2 4 3 5 6 ...

Страница 10: ... of de onderdelen in de doos overeenstemmen met de inhoud vermeld in deze handleiding 2 Verwijder de twee grondplaten en vorm een cirkel zoals in de afbeelding Schroef de zijden van de cirkel met vier schroeven vast 3 Trek de kabel door het onderste paneel en bevestig de grondplaat met vier schroeven vast aan het hoofdgedeelte van het product ...

Страница 11: ...r blaast wind door de plastic behuizing Het icoon op de display licht op Druk nog een keer om het product lucht te laten zuigen i p v blazen 3 Snelheid Met deze knop wisselt u tussen de verschillende windstanden laag medium en hoog 4 Wind U kunt kiezen tussen wind tijdens het slapen natuurlijke wind normale wind 5 Klok 12 uursklok 6 Rotatie Hiermee stelt u in of de toren naar links of rechts blaas...

Страница 12: ...De behuizing reinigen Haal de stekker uit het stopcontact en neem de behuizing voorzichtig af met een doek Gebruik geen alcohol wasbenzine bananenwater of andere reinigingsmiddelen 2 Product opslaan Reinig het product en zet het terug in de doos Bewaar de doos op een donkere plek ...

Страница 13: ...fvalverwerkingsbedrijf GARANTIE Gewaardeerde klant Hartelijk dank voor uw aankoop van een MOA product Wij wensen u hierbij mee te delen dat dit product wordt gedekt door een garantie die voldoet aan alle wettelijke bepalingen inzake de heersende garantie en consumentenrechten in het land waar het product werd gekocht Mocht u een defect of storing vaststellen aan uw MOA product neemt u dan a u b co...

Страница 14: ...ie Schutzhülle und stellen Sie sicher dass das Produkt nicht an der Stromversorgung angeschlossen ist 2 Nicht in der Nähe einer Feuerquelle befindet 3 Die Verwendung an Orten an denen schwerer Staub vorhanden ist ist verboten 4 Platzieren Sie das Produkt nicht bei zu hohen oder zu niedrigen Temperaturen 5 Die Verwendung von Draht und anderen Fremdkörpern zum Einführen in Öffnungen dieses Produkt i...

Страница 15: ...che Handbuch 15 DE BESTANDTEILE STANDORT 1 Anzeigepanel 2 Luftauslass 3 Rückseitenabdeckung 4 Vordere Schale 5 Rotierende Säule 6 Gehäuse VERPACKUNGSLISTE 2 Sätze Sockelleiste 8 Montageschrauben 1 Fernbedienung 1 2 4 3 5 6 ...

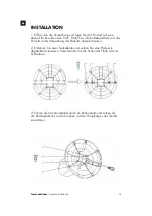
Страница 16: ...ie Bestandteile und das Produkt in der Verpackung der Packliste übereinstimmen 2 Entfernen Sie zwei Sockelleisten und setzen Sie eine Platte wie abgebildet zusammen Verschrauben Sie die Seiten der Platte mit vier Schrauben 3 Führen Sie das Stromkabel durch die Bodenplatte und setzen Sie die Bodenplatte mit vier Schrauben und den Hauptkörper des Geräts zusammen ...

Страница 17: ...siegel normalen Wind produzieren das Symbol d leuchtet auf Beim zweiten Mal wird das Produkt aufgearbeitet 3 Geschwindigkeit Drücken Sie auf den Knopf für eine mittlere Geschwindigkeit hohe Geschwindigkeit niedrige Geschwindigkeit 4 Wind Sie können den Modus schlafender Wind wählen natürlicher Wind normaler Wind 5 Zeitschaltuhr 12 Stunden 6 Rotieren Die linke oder rechte Richtung läuft automatisch...

Страница 18: ...hen Sie den Stromstecker heraus und wischen Sie das Produkt vorsichtig mit einem Tuch ab Verwenden Sie keinen Alkohol kein Benzin kein Bananenwasser und keine anderen Reinigungsmittel 2 Lagerung des Produkts Reinigen Sie das Produkt legen Sie es in die Verpackung und lagern Sie es im Schatten ...

Страница 19: ...geehrte Kundin sehr geehrter Kunde vielen Dank dass Sie sich für ein Produkt der Marke MOA entschieden haben Wir möchten Sie hiermit darüber informieren dass die Gewährleistung dieses Produkts sämtliche gesetzlichen Vorschriften zu bestehenden Gewährleistungen sowie Ihre Rechte als Verbraucher in dem Land berücksichtigt in dem Sie dieses Produkt gekauft haben Sollten Sie einen Fehler feststellen o...

Страница 20: ... 1 Retirez l étui de protection et assurez vous que le produit est débranché de l alimentation électrique 2 Tenez l appareil à l écart de toute source de feu 3 Il est interdit d utiliser l appareil dans des endroits très poussiéreux 4 L appareil ne peut pas être placé dans les endroit dont la température est très élevée ou très basse 5 Il est interdit d insérer des câbles et autres objets étranger...

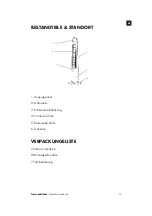
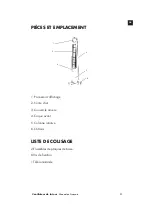
Страница 21: ...n français 21 FR PIÈCES ET EMPLACEMENT 1 Panneau d affichage 2 Sortie d air 3 Couvercle arrière 4 Coque avant 5 Colonne rotative 6 Châssis LISTE DE COLISAGE 2 Ensembles de plaques de base 8 Vis de fixation 1 Télécommande 1 2 4 3 5 6 ...

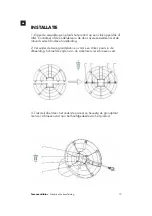
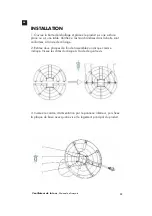
Страница 22: ... table Vérifiez si les marchandises dans la boîte sont conformes à la liste de colisage 2 Retirez deux plaques de fond et assemblez un disque comme indiqué Vissez les côtés du disque à l aide de quatre vis 3 Insérez le cordon d alimentation par le panneau inférieur puis fixez la plaque de base avec quatre vis et le logement principal du produit ...

Страница 23: ...lser le vent la première icône de joint en plastique est lumineuse La deuxième fois le produit est prêt à l emploi 3 Vitesse Appuyez sur ce bouton pour choisir entre le vent à vitesse moyenne le vent à vitesse élevée vent à vitesse basse 4 Vent Vous pouvez choisir le vent mode sommeil le vent naturel le vent normal 5 Minuterie 12 heures 6 Oscillation Le sens de déplacement vers la gauche ou la dro...

Страница 24: ...CKAGE 1 Nettoyage de la coque Débranchez l appareil et essuyez le délicatement avec un chiffon N utilisez pas d alcool d essence d eau de banane et d autres solvants de nettoyage 2 Stockage du produit Nettoyez le produit et rangez le dans l emballage puis stockez le à l ombre ...

Страница 25: ... consultez votre installation d élimination des déchets GARANTIE Très cher client Merci beaucoup d avoir acheté un produit MOA Nous souhaitons vous informer que ce produit est couvert par une garantie conforme à toutes les dispositions légales concernant la garantie et les droits des consommateurs existants dans le pays où le produit a été acheté Si vous constatez un défaut ou un dysfonctionnement...

Отзывы: