Warnings
Only adults can install parts and adjust the car, and keep moving parts
out of children’ s reach.
Children under 36 months cannot use the toy car as it has many small parts.
Children must take the seat belt when using the car, and keep the car out
of the fire.
Children can use the product only in the company of adults, and the adult
cannot leave during the process.
Never let Children stand or play onto the pedal or in the car.
Only adults can complete storage battery charging, and must charge the
product before its first use.
Keep such package materials as plastic bags out of children, or they will
suffocate or kill children.
Never use parts provided by non-manufacturers.
Never let children play with the charger.
Never use the product with over 25-kilogram load.
The product’s applicable age range is 37- 95 months.
The number of connected power by the product can never be over the
recommended number.
Never use the product in such dangerous zones as street, road,
slope or drain.
Never change the circuit and additional electric devices.
Never use remote control in rainy days or in the water, never pour water or
other liquid into the car, keep the product out of the fire, otherwise the car
will be damaged.
Only one child can use the product, and its weight cannot exceed 25
kilograms.
Turn off the power when not in use and remove battery connector when not
using it for a long time.
As the product has battery charger, check whether wire plug shell and other
parts are damaged or not , and fix those damaged parts .
The product must be assembled by the adult! Before assembling,
screws and pins are dangerous sharp points.
Notice of use:
Charging notice:
Charge storage battery less than 10 hours, or the storage battery will be
damaged forever.
In charging, put DC Plug into the power socket , put charger into power
plug;never use the product during charging it.
The product can be used for one hour, and the charging time is 8-10 hours,
exceeding no more than 18 hours.
It is common for charger and storage battery to have not become heated
(temperature under 60 degrees)in charging.
Never use the connector with the water, or short circuit will happen.
Use the product’ s own charger, or cause charger and storage battery
to be damaged or short circuit.
Charge the product when not using it for a long time.
Charging steps are as follows:
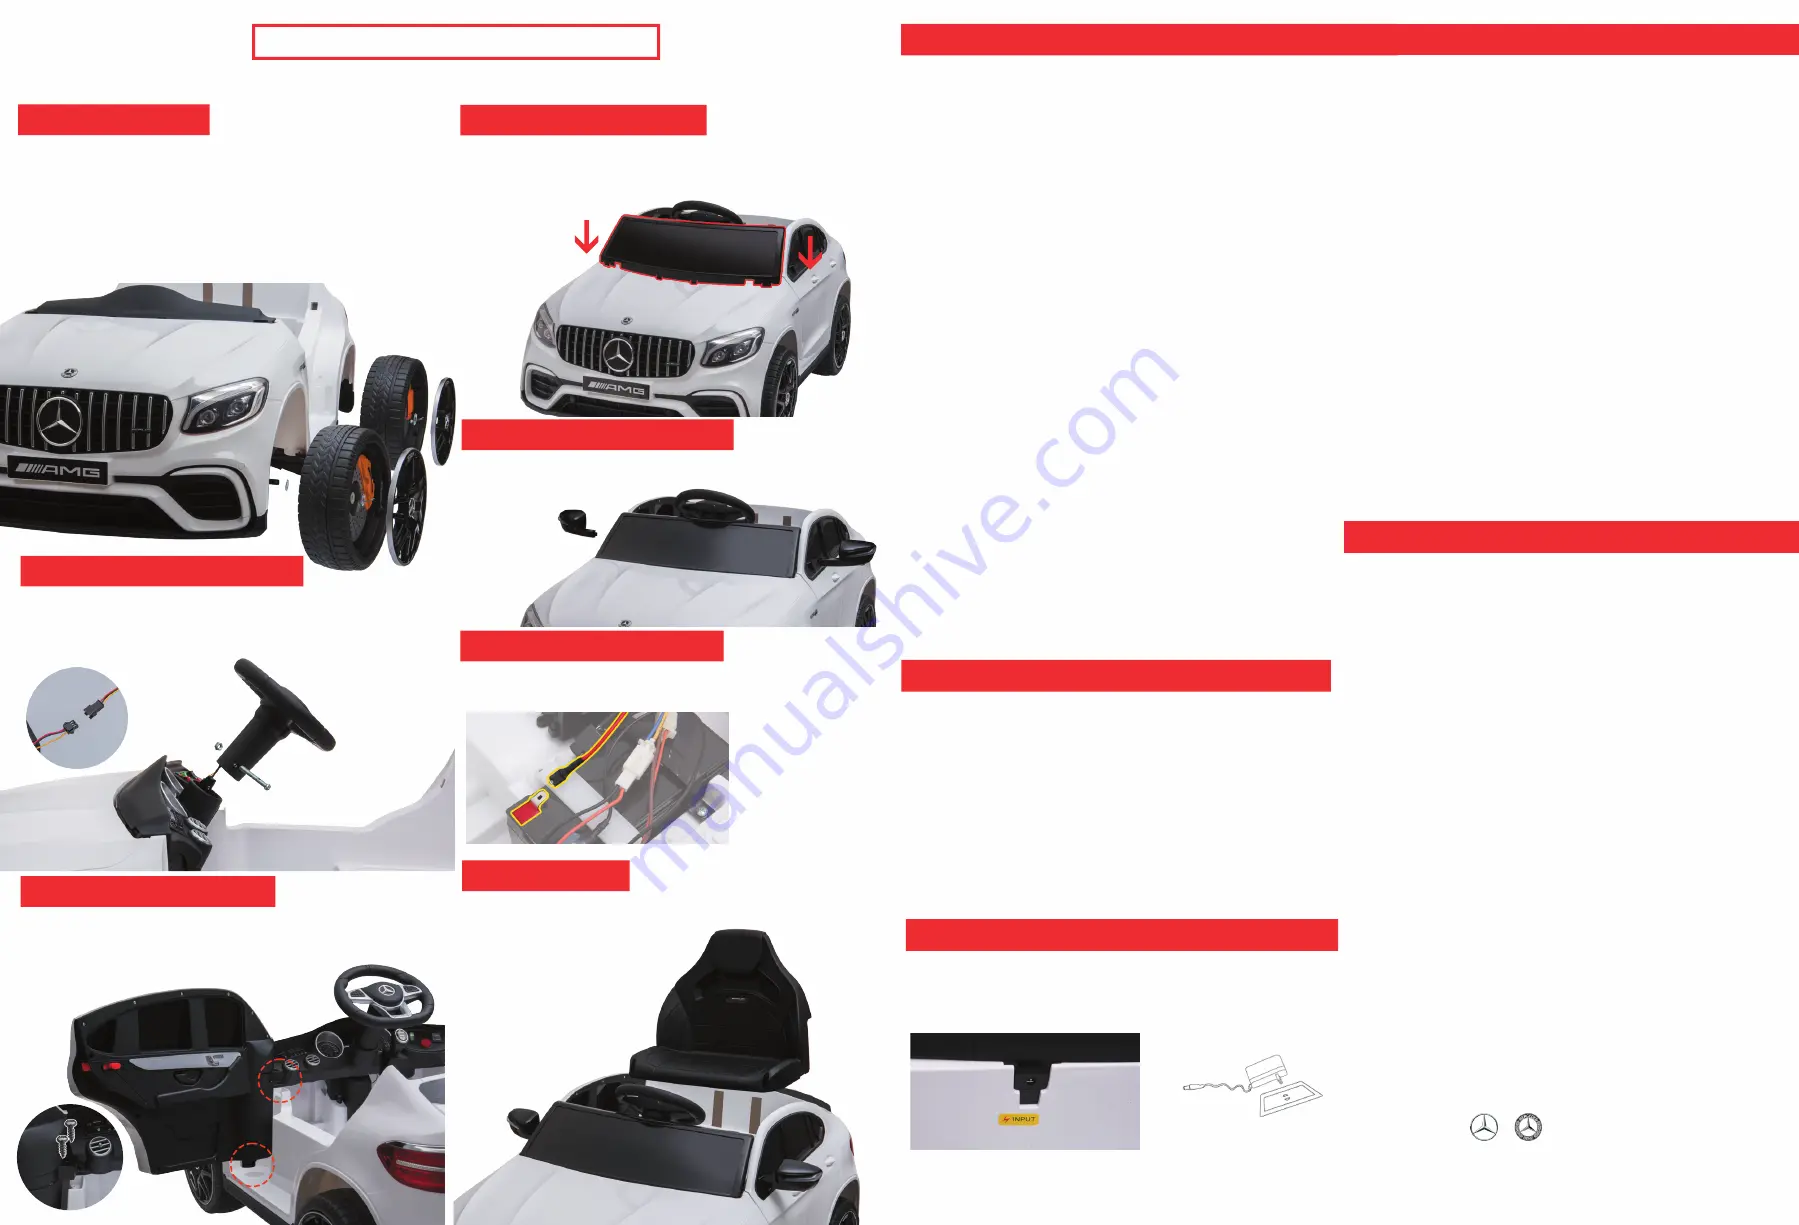
Step 1 : Find the charge hole beneath the car seat’
Step2: Put the charger plug into the plug hole.
Step 3: Connect the charger to the power socket.
Relevant materials: PP plastics, k-carrageenan, generator,
storage battery and iron castings.
Trouble Clearing
Type Analysis Solutions
-----------------------------------------------------------------------------
Low battery voltage; Charge battery fully;
Protection of electric devices; Use the car a few minutes later;
Failure to press the switch button correctly;Use the car according to instructions;
Falling of power connector; Install the connector again;
Battery breakdown; Change battery;
Damage of electric devices; Change electric devices;
Generator breakdown; Change generator.
-----------------------------------------------------------------------------------------------------------------
Falling of battery connector; Install the connector again;
No charging for the charger; Plug the charger again;
Charger breakdown; Change the charger.
---------------------------------------------------------------------------------------------------------------
Not full charging of battery; Charge fully the battery again;
Much-used battery; Change the battery.
----------------------------------------------------------------------------------------------------------------
---------------------------------------------------------------------------------------------------------------
Much-used battery; Change the battery
No electricity for battery; Charge fully the battery again
Overload; Reduce the load below 25 kilograms
Uneven driving surface; Drive on uneven surface
Chemical reactions; Normal reactions
There appear slight noise and
heat of the car in charging.
The car has a
slow speed.
The battery cannot
be charged.
The car has a
short range.
The car cannot
get started.
Maintenance and Service
Before use children’ s parents should check whether charge’ s wiring,
plug, shell and other parts are damaged, and fix those damaged parts.
After using the product for a time, parents should lubricate iron castings
with lube, or those castings will get rusted; they should keep the product
out of fire and lay it flat in dark places; they should put the product inside
the house or cover it with one water-proof cloth in wet whether.
Parents should keep the product out of such hot objects as stove and
heater, or its plastic parts may be thawed; they should keep the product
out of combustible objects in charging, or the fire may happen.
Parents should clean car surface with one dry cloth, or clean plastic parts
with non-waxy furniture polish; they shouldn’t clean plastic parts with
chemical solutions or clean the car with water; children cannot drive the
car in wet or rainy weather, or the car’ s generator, circuit system and
battery will be damaged.
when not using or laying the product, parents should cut off car power,
keeping all the switches into “STOP”or ”OFF” model.
Parents mustn’t use the fuse which doesn’t conform with the agreed
specifications.
Parents should’ t change product structure and circuit system, and
should have the product checked and fixed by professionals or under
the guidance of professionals.
“Mercedes-Benz”, , and the design of the enclosed product
are subject to intellectual property protection owned by Daimler AG.
They are used by Pinghu Qileshi Baby Carrier Co., Ltd under license.
Installation Order Diagram
1. Install the wheels
First, clearly distinguish front wheels from the rear ones.
Then insert the shim and the front wheel into the front axle
in turn, and lock them tight with the split pin, put the wheel
cover snapped into the notch of the front wheel.
Then insert the shim and the rear wheel into the rear axle
in turn, and lock them with the split pin, and snap the wheel
cover into the notch of the rear wheel. Then install the front
and rear wheels on the other side in the same manner.
2. Install the steering wheel
First, take down the screws and nuts from the steering shaft.
After connecting the wires, insert the steering wheel into the
shaft.
Then, insert screws into the hole and fix them with nuts.
3. Instal the doors
Distinguish left door from the right one. Align the convex on
the downside of the door with the concave on the car body,
with the hinge of the door engaged in the car body,
then fix with the screw.
4. Install the windshield
Aim the windshield at the position of the car body and
firmly insert it.
5. Install the rear view mirrors
Distinguish left mirror from the right one. Then insert the
mirrors into the hole site on the door.
6. Connect the power cord
Connect the power cord to the battery.
Then turn on the power to check the circuits.
7. Install the seat
Align the seat with the position of the car body.
Then fix it with screws.
Содержание Mercedes-Benz GLC 63 S Coupe
Страница 3: ......


