background image

54

54

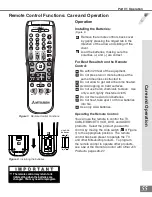
Remote Control Functions: Overview

Overview

(Following page, Figure 1)

1


Slide Switch

: Select A/V product to be 

controlled by the remote control.

2


Numbers

: Individually select channels or 

input information into TV.

3


POWER

: Turns power on and off for TV and 

other A/V products.

4


SQV (Super Quick View

)

: Scan through 

a memorized list of favorite channels.

5


QV (Quick View

)

: Switch to last channel 

viewed.

  HOME THEATER:

  Enables the System 

4 Home Theater Control. Once enabled, a 

press of this key (when in the VCR, DVD, 

or Cable/DTV/DBS layer), will automatically  

switch the inputs of the A / V receiver and 

the TV. 

 (WS-55411, WS-65411 and WS-73411 

ONLY)


7


SLEEP

: Set the TV to turn off within 2 

hours.  See 

Sleep Timer

, page 56, for setup 

instructions.

8


VIDEO

: Select the video settings.

9


AUDIO

: Select the audio settings.

10


MUTE

: Turn sound on or off.

11


INPUT

: Select the signal to view 

(Ant-A, Ant-B, DTV, Input-1, Input-2, Input-3,     

Component-1, or Component-2).

12


CHANNEL

: Scroll up or down through  

memorized channels.

13


VOLUME

: Change sound level.

14


ENTER/EXCH

: Select a channel number 

or menu item.  Exchange PIP or POP and 

main TV picture.

15


HOME

: Exit on-screen menus and return 

to TV viewing.

16


ADJUST

: Navigate menus, change     

settings, and move the PIP on-screen 

location.

17


CANCEL

: Clear SQV and some menu 

entries.

18


MENU

: Display


on-screen menu 

system.

19


INFO

:

  Display on-screen summary of 

the current input used and any broadcast     

information available (including current 

V-Chip information, Signal Source and 

Format).  Additionally, if you press the INFO 

key, it will display time, day and sleep time.

20


GUIDE

: When the slide switch is set 

to CABLE/DBS/DTV, display the on-screen 

program guide (some cable boxes and 

DBS/DTV receivers).

21


V-CHIP

: Enable/Disable the V-Chip Lock.

22


FORMAT

: Change the shape and size of the 

main TV picture.

23


PIP INPUT

: Select the PIP or POP input 

source.

24


PIP/POP

: Cycle through PIP and POP     

display choices.

25


PIP CH

: Scroll up or down through         

memorized channels in PIP or POP.

26


REC

: Manually record with your VCR.

27


STOP

: Stop your VCR, DVD, or CD.

28


PAUSE

: Pause your VCR, DVD, CD, or 

freeze the PIP or POP image.

29


REW/REV

: Rewind or reverse search with 

your VCR, reverse scan with your DVD, or 

skip reverse with your CD.

30


PLAY

: Play your VCR, DVD, or CD.


31

  FF/FWD:


Fast forward or forward search 

with your VCR, fast play with your DVD, or 
skip forward with your CD

.

O

ve

rv

ie

w

6

Содержание VS-50111, VS-60111, WT-42311,

Страница 1: ...Projection Television Models VS 50111 VS 60111 WT 42311 WS 48311 WS 55311 WS 65311 WS 55411 WS 65411 and WS 73411 visit our website at www mitsubishi tv com...

Страница 2: ...es These limits are designed to provide reasonable protection against harmful interference in a residential installation This equipment generates uses and can radiate radio frequency energy and if not...

Страница 3: ...nnels 31 Input Assignment 31 Language 32 Front Button Lock 32 Clock Setting 33 34 Captions Menu 35 Channel Edit Menu 37 39 V Chip Lock Menu 40 V Chip 40 41 Lock by Time 42 Advanced Features Menu Timer...

Страница 4: ...ive force and uneven surfaces may cause the appliance and cart combination to overturn 7 Ventilation Slots and openings in the cabinet are provided for ventilation and to ensure reliable operation of...

Страница 5: ...servicing to qualified service personnel 17 Damage Requiring Service Unplug the TV from the wall outlet and refer servicing to qualified service personnel under the following conditions a When the pow...

Страница 6: ...regarding your television Call 800 332 2119 or email us at MDEAservice bigscreen mea com REMOTE CONTROL AND OWNER S GUIDE Call 800 553 7278 to order a replacement Remote Control or Owner s Guide Or vi...

Страница 7: ...7 7 Introduction Thank You Letter 8 Unpacking Your New TV 9 Special Features 9...

Страница 8: ...neered with future ability Your television will continue to provide unparalleled home entertainment for years Whether this is your first Mitsubishi consumer electronics product or an addition to your...

Страница 9: ...21 for more information 16 9 Widescreen TV Enjoy a full theatrical experience in the comfort of your home View pictures as film directors intended them Both the DTV and DVD support the widescreen form...

Страница 10: ......

Страница 11: ...s Affect PIP and POP 14 System 4 Home Theater IR Control 14 Connecting Your New Mitsubishi Bigscreen Antenna or Wall Outlet Cable 16 Cable Box 16 VCR 17 Audio Receiver 18 DVD Player 19 DTV Receiver 20...

Страница 12: ...d to turn On at a specific time the green timer light blinks while the TV is Off See Timer Menu pages 43 44 for timer setup instructions A V RESET CANCEL A V Reset Press this button to reset the A V m...

Страница 13: ...s or a cable system LOOP OUT sends the ANT A signal out to another component such as a cable box or VCR 4 IR Emitter Repeater System 4 Home Theater IR Control Connecting IR emitters here allow the TV...

Страница 14: ...of PIP and POP pages 58 62 for operating instructions Table 1 No Side by Side with the same channel No Side by Side with the same input How Connections Affect the System 4 Home Theater IR Control App...

Страница 15: ...ctor This procedure is explained in your A V receiver s Owner s Guide Digital Assignment for DTV Assign the digital input you used for DTV to the A V receiver s DTV input selector This procedure is ex...

Страница 16: ...IGHT AUDIO LEFT MONO V IDEO S VIDEO 2 IR EMITTER REPEATER Y P r P b V H Y G Pb B P r R External Antenna or Cable Back Side Flat Twin Lead UHF Antenna Channels 14 69 VHF Antenna Channels 2 13 300 Ohm t...

Страница 17: ...eft cable COMPONENT 480 i 480P 1080i AUDIO RIGHT L EFT MONO AUDIO DT V YPbPr GBRHV MONITOR I N P U T OUT 2 1 ANT A ANT B LOOP OUT 480i 480P 1080i AUDIO RIGHT AUDIO LEFT MONO V IDEO S VIDEO 2 IR EMITTE...

Страница 18: ...lectronic stores Connecting an Audio Receiver Connecting an Audio Receiver Stereo Audio System Figure 1 1 Connect the audio cables from AUDIO MONITOR OUTPUT on the TV back panel to TV IN or AUX IN ter...

Страница 19: ...Device I N P U T 2 1 AUDIO R IGH T AUDIO LEFT MONO V I D EO S VIDEO AUDIO OUT AUDIO IN VIDEO OUT Y C L R L R 1 2 2 1 1 2 Any S Video Device I N P U T 2 1 AUDIO RIGHT AUDIO LEFT MONO V I D EO S VIDEO...

Страница 20: ...to Y Pb Pr 4 Connect the L left and R right audio cables from the DTV receiver to DTV AUDIO on the TV back panel To utilize the benefits of a digital A V receiver connect your DTV receiver s digital...

Страница 21: ...m the DTV receiver and to DTV AUDIO on the TV back panel To utilize the benefits of a digital A V receiver connect your DTV receiver s digital audio out to a digital input on your digital A V receiver...

Страница 22: ...EATER on the TV back panel 2 Place the IR emitter cable under or along the side of the A V device Place the IR lens directly in front of the A V device infrared signal receiver Infrared signal receive...

Страница 23: ...r the whole screen Stationary images or images that only partially fill the screen leaving black or colored bars to fill the screen when used over extended periods of time or when viewed repeatedly ca...

Страница 24: ......

Страница 25: ...etup Menu 29 Memorize Channels 31 Input Assignment 31 Language 32 Front Button Lock 32 Clock Setting 33 Captions Menu 35 Channel Edit Menu 37 SQV Super Quick View 39 V Chip Lock 40 Lock by Time 42 V C...

Страница 26: ...ite receiver code is not listed here please see page 68 for a complete listing Satellite Receiver Codes 3 Figure 2 Programming the remote to control your satellite receiver If you cannot turn the cabl...

Страница 27: ...5 Programming the remote to control your A V receiver Figure 4 Programming the remote to control your DVD LDP Use of the Remote Control with Other A V Products After entering the correct codes in each...

Страница 28: ...th a rectangular yellow outline and the text color will be yellow On screen instructions provide complete menu choice information Some on screen menu options must be set before other options are avail...

Страница 29: ...burn in Menu Screens Overview ENTER for menu or to start MENU to return CAPTIONS menu Closed Captions CC Background or change option MENU to return ADJUST to select On if mute Gray MAIN MENU Figure 2...

Страница 30: ...AV Memory Reset Ant A TV Speaker On Internal Audio Output Variable TV Volume Control AUDIO SETTINGS VIDEO SETTINGS Figure 3 AUDIO VIDEO SETTINGS menu ENTER for menu or to start MENU to return or chang...

Страница 31: ...ou turn an input Off it will be skipped when you press the INPUT button on the remote control Input choices are Antenna A or Antenna B On or Off DTV YPbPr RGB or Off INPUT 1 INPUT 2 INPUT 3 Cycle thro...

Страница 32: ...return SETUP menu Memorize Channels Ant A Air INPUT ASSIGNMENT CLOCK Language English Idioma Front Button Lock Off or change option ENTER for menu MENU to return ADJUST to select MAIN MENU Figure 2 Fr...

Страница 33: ...ll be set automatically after tuning to a channel carrying the Extended Data Service XDS time data usually your local PBS channel MAIN MENU ENTER for menu or to start MENU to return CLOCK menu Clock S...

Страница 34: ...t day of the week MAIN MENU ENTER for menu or to start MENU to return CLOCK menu Clock Setting Manual Time Zone N A Daylight Savings N A Time Clock Time 12 00 AM Set Day Sunday or change option MENU t...

Страница 35: ...n turn On or Off the closed caption decoder select the type of captions or text and choose black or translucent gray as the background color for the closed caption area Closed Captions Figure 2 The TV...

Страница 36: ...u or to start MENU to return CAPTIONS menu Closed Captions CC Background or change option MENU to return ADJUST to select On if mute Gray MAIN MENU Figure 1 CAPTIONS menu CC Background Figure 1 To mak...

Страница 37: ...IT Menu Antenna and Channel Antenna and Channel ENTER for menu or to start MENU to return or change option ENTER to confirm CANCEL to cancel ADJUST to select MAIN MENU CHANNEL EDIT menu Antenna Ant A...

Страница 38: ...ill move one position back If you press CANCEL while at the first character the entire name will be deleted Memory Figure 1 After all available channels have been memorized with Memorize Channels page...

Страница 39: ...option ENTER to confirm CANCEL to cancel ADJUST to select MAIN MENU CHANNEL EDIT menu Antenna Ant A Channel 002 Memory Added Name KCBS SQV SQV1 Off Figure 1 SQV Super Quick View SQV Super Quick View U...

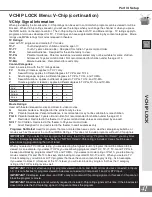
Страница 40: ...press ENTER Figure 2 Re entry to the V CHIP LOCK V CHIP LOCK Figure 3 You can Block or Allow programs based upon rating signals sent by the broadcasting station The factory preset for TV Ratings is TV...

Страница 41: ...old and older Not recommended for children under the age of 13 R Restricted Restricted in the theater to 17 years old and older unless accompanied by an adult NC 17 No Children Restricted in the theat...

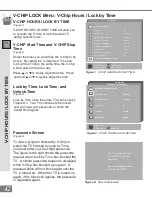
Страница 42: ...HIP HOURS LOCK BY TIME V Chip Start Time 12 00 AM V Chip Stop Time 12 00 AM Lock by Time On Lock Time 8 30 AM Unlock Time 6 00 PM ADVANCED FEATURE MENU or change option MENU to return ADJUST to select...

Страница 43: ...will automatically turn the TV on if it is off at the time you schedule and select When Ant A or Ant B is the selected input you may select any memorized channel The TV will tune to this channel when...

Страница 44: ...l MAIN MENU ENTER for menu or to start MENU to return TIMER menu Timer Off Set Time 12 00 PM Set Day Everyday Input Ant A Channel 003 or change option MENU to return ADJUST to select ADVANCED FEATURES...

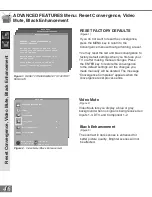
Страница 45: ...ss CANCEL to delete changes Press AUDIO to Advanced Convergence Figure 2 Convergence screen Convergence Screen Figure 2 When the Red and Blue crosshairs are properly converged the center screen crossh...

Страница 46: ...ment RESET FACTORY DEFAULTS Figure 1 If you do not want to reset the convergence press the MENU key to return to the Convergence menu without performing a reset You may reset the red and blue converge...

Страница 47: ...if you prefer Auto Color Correction Figure 2 Set the Auto Color Correction option to On to optimize skin tone color Both Manual Color Adjustment and Reset Color options are grayed out and unavailable...

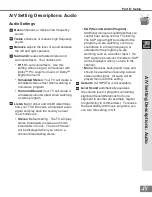
Страница 48: ...er or stereo system cannot be controlled with a remote This allows the TV s internal circuitry to adjust the volume AUDIOSETTINGSandVIDEOSETTINGS After selecting AUDIO SETTINGS or VIDEO SETTINGS you c...

Страница 49: ...o broadcasts in mono The word Stereo will be displayed when you tune to a channel broadcasting stereo A V Setting Descriptions Audio SAP Second Audio Program Additional monaural soundtrack that you ca...

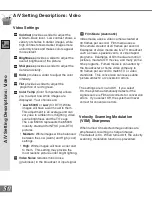
Страница 50: ...images will have a cool cast to them This setting may provide the most realistic picture under bright lighting Video Noise reduces minor noise graininess in the broadcast or input signal Film Mode Aut...

Страница 51: ...s evenly bright over the whole screen Stationary images or images that only partially fill the screen leaving black or colored bars to fill the screen when used over extended periods of time or when v...

Страница 52: ......
Страница 53: ...Remote Control Functions 54 65 Overview 54 Care and Operation 55 Channel Selection 56 Sleep Timer 56 System 4 Home Theater IR Control 57 Special Functions 58 65 Operation of PIP and POP 58 65 Display...

Страница 54: ...P or POP and main TV picture 15 HOME Exit on screen menus and return to TV viewing 16 ADJUST Navigate menus change settings and move the PIP on screen location 17 CANCEL Clear SQV and some menu entrie...

Страница 55: ...Do not allow to get wet or become heated Avoid dropping on hard surfaces Do not use harsh chemicals to clean Use only a soft lightly moistened cloth Do not mix new and old batteries Do not heat take...

Страница 56: ...ote control A message indicating the length of time the sleep timer is to be set appears on the TV screen Each press of SLEEP will increase the time displayed by 30 minutes until the maximum value of...

Страница 57: ...tions Affect the System 4 Home Theater IR Control Pages 14 15 for installation instructions When you change inputs on your TV to watch different video products your TV will send signals via the infrar...

Страница 58: ...med on each layer may vary The most common functions are Remote Control Functions Operation of PIP and POP Picture In Picture PIP and Picture Outside Picture POP features allow you to view Programming...

Страница 59: ...T or to select a different POP live image automatic POP switching must be paused Freeze the PIP and Side By Side Picture Press PAUSE to freeze the PIP and side by side images Press Pause again to retu...

Страница 60: ...the correct aspect ratio ideal for widescreen viewing with a vertical picture area resolution of 810i IMPORTANT You can find aspect ratios on the back of most DVD covers Also Anamorphic DVDs are usua...

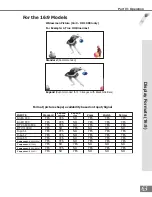
Страница 61: ...een the appearance of figures in Normal Broadcast and Widescreen Picture Normal Broadcast Picture 4 3 Widescreen Picture HD 1080i 16 9 Standard Recommended Standard Not Recommended Zoom Recommended fo...

Страница 62: ...P live image automatic POP switching must be paused Freeze the PIP and Side By Side Picture Press PAUSE to freeze the PIP and side by side images Press Pause again to return to a live image Operation...

Страница 63: ...ES YES NO YES YES YES Component 1 480i 480p YES YES NO YES YES YES Component 1 1080i YES NO YES NO NO NO Component 2 480i 480p YES YES NO YES YES YES Component 2 1080i YES NO YES NO NO NO Expand Expan...

Страница 64: ...en stretched in the Standard format Note This format is not available in the 1080i format 3 Expand 1080i enlarges the picture cropping some of the image on both sides This Expand format is useful to r...

Страница 65: ...ture 4 3 480i 480p For Example NON ANAMORPHIC DVDs Widescreen Picture 16 9 480i 480p For Example ANAMORPHIC DVDs Standard Not Recommended Standard Recommended Expand Recommended for Letterbox Expand N...

Страница 66: ...program view the locked TV cancel the lock or enter the V Chip lock menus If you forget your passcode you can view the locked TV without entering your passcode This is done by pressing the number 9 an...

Страница 67: ...ne of the compatible signal types Please check the DTV receiver specifications before connecting This input is also compatible with some DTV receivers using RGB with sync on green or RGB with separate...

Страница 68: ...21 122 111 Stargate 132 105 Teleview 101 105 Texscan 144 Tocom 135 136 Toshiba 104 Unika 132 125 United Artists 139 137 102 United Cable 119 124 125 126 127 120 121 122 111 Universal 122 132 Videoway...

Страница 69: ...ntly in an up and down motion following the grooves in the screen Clean the entire screen evenly not just sections of the screen Do not allow liquid to drip down the grooves of the screen as some liqu...

Страница 70: ...erting the shield sliding it into the channels starting at the bottom Gently bow the Diamond Shield toward you and insert the Diamond Shield into the top channel 3 Install the left and right molding c...

Страница 71: ...he Diamond Shield toward you and insert the other side of the Diamond Shield into the oppositive channel 3 Install the top and bottom molding clips by pressing them into the opening starting at a corn...

Страница 72: ...the decorative Plastic Covers that were removed in Step Instructions for Separating the Upper and Lower Section of the Projection Television Cabinet For Mitsubishi Dealers and Service Personnel ONLY...

Страница 73: ...ce the Cabinet Top on the floor Cabinet Separation Procedure i Once you have moved and positioned the Cabinet Bottom to its desired location reverse the procedure and mount the Cabinet Top on the Cabi...

Страница 74: ...Listen to setting may be set to SAP Check that TV Speakers setting is ON You have forgotten your lock passcode See Appendix A Bypassing the V Chip Lock page 66 PIP does not display a picture Make sure...

Страница 75: ...the Reset System Defaults menu screen 2 Press the ENTER button on the remote control Result The settings reset to factory defaults 3 Press the HOME or MENU button on the remote control to return to th...

Страница 76: ...ilm Mode Automatic 50 formats display 60 65 front control panel 12 G games 23 51 ghost 23 51 H Home Theater IR System connection 14 22 57 special setups 15 remote control functions 26 28 54 58 I IMPOR...

Страница 77: ...TIONARY PICTURE WARNING 23 51 surface 4 surges 4 T time setting 34 Timer turn TV on 43 44 Timer Sleep 56 treble 49 Troubleshooting 74 75 TV speakers 48 U unpacking 9 upgradeable 9 V V Chip Lock 40 42...

Страница 78: ...I service center physical abuse to or misuse of the product including any failure to carry out any maintenance as described in the Owner s Guide or any product damaged by excessive physical or electri...

Страница 79: ...47B10 CONSUMER RELATIONS If you have questions regarding your television Call 800 332 2119 or email us at MDEAservice bigscreen mea com REMOTE CONTROL AND OWNER S GUIDE Call 800 553 7278 to order a re...

Отзывы: