


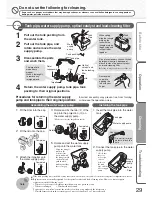


Note
If the tank packing is not installed, it may cause the water in the water tank or food in the refrigerator compartment to freeze.
Replacement is not usually required for the optical catalyst and lead-cleaning fi lter. However, it may require
replacement in the following cases.
• When it clogs because something other than water was put in the tank
• When it is damaged
• When mold has formed
To purchase a new fi lter, contact the retail store where you purchased the refrigerator.
* If mold forms easily in the certain types of water, clean about 2 or 3 times a month.
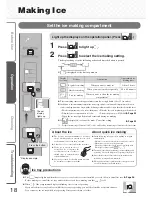
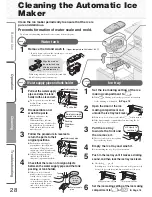
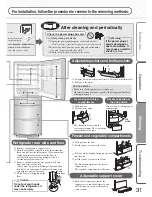
Procedures for returning the water supply
pump and tank pipe to their original positions
Assembling the water supply pump
Installing the tank pipe
Incorrect assembly may prevent ice from forming,
or increase the operation noise.
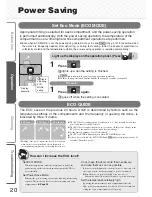
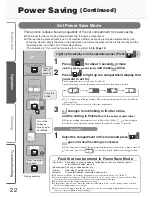
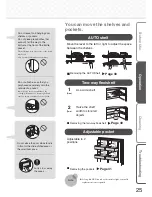
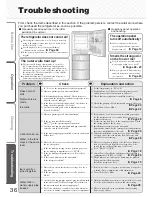
Before Use
Operation
Cleaning
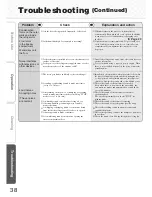
Troubleshooting
Cleaning
29
Water
supply pump
Tank pipe
Impeller
Lid
Optical
catalyst and
lead-cleaning
fi lter
Cap
Tank
Pipe
Water
supply
pump
Tank packing
Rotate
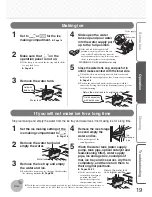
1
Fit the fi lter into the cap.
4
Rotate and fi x the tab ( ) of the
cap into the projection ( ) on
the water supply pump.
* Make sure that the impeller is inside.
5
Rotate and set the water supply
pump onto the water tank.
* Align the triangle
mark on the
bottom of the
water tank with
the triangle mark
on the fi lter and
push in while
making sure that
there is no gap.
2
Fit the lid onto the cap.
3
Attach the impeller onto
the water supply pump.
Remove the
cap while
opening the
tab with your
fi nger.
Rotate
Do not use cleaners such as kitchen
detergents (neutral), benzene or
bleach to clean the optical catalyst
and lead-cleaning fi lter.
Doing so may result in odors of the ice.
When setting,
align the triangle
mark on the
tank with the
triangle mark on
the packing and
fully put them
together.
The impeller is
made from a
magnet.
Wash it thoroughly
to remove any
foreign objects.
Completed
view
Tank
Packing
Tank pipe
Water supply pump
Caution
Do not let foreign
objects block the
hole.
1
Insert the tank pipe into the water
tank.
2
Connect the tank pipe to the water
supply
pump.
* Check that
there are
no foreign
objects
between
the tank
pipe and the
water supply
pump.
Tank
Pipe
Water
supply
pump
Completed
view
Completed
view
Completed
view
Tank pipe, water supply pump, optical catalyst and lead-cleaning fi lter
1
Pull out the tank packing from
the water tank.
2
Pull out the tank pipe, and
rotate and remove the water
supply pump.
3
Disassemble the parts
and wash them.
4
Return the water supply pump, tank pipe, tank
packing to their original positions.
week
once a
Do not use the following for cleaning.
Items such as sponges or scrubbers that may damage surfaces, or cleaners such as alkaline detergents, scouring powder,
boiling water, petroleum or acid
Содержание MR-BX52W-BR-ML
Страница 39: ...Memo...
Страница 40: ...58 60 ECO 63 58 ECO 3 24...
Страница 41: ...42 43 44 45 46 47 48 49 50 51 52 53 54 55 56 57 58 60 61 62 63 64 65 66 67 68 69 70 72 73 74 76 53 55...
Страница 42: ...42 44 45 44 44 44 44 45 70...
Страница 43: ...43...
Страница 44: ...2 10 1 44 5cm 24 10 2 50 60 2...
Страница 45: ...3 4 45 2 3mm 100kg R600a 1 2...
Страница 46: ...46 62 63 48 49 62 64 64 64 65 56 57...
Страница 47: ...30 47 3 9 0 6 9 5 22 16 54 55 3 3...
Страница 48: ...ECO 30 61 48 3 58 ECO ECO 58 60 50 51 56 52 53 53 52 60 30...
Страница 49: ...1 4 60 1 2 3 4 5 60 2 49 3 71 71 1 1...
Страница 50: ...30 5 50 1 56 2 5 72 6 16 9 5 17 8 3 19 6 1 21 5 0 22 3...
Страница 51: ...51 2 3 53 1 52 5 7 9 12 15 18 2 72 6...
Страница 52: ...52 2 30 2 1 1 1 56 2 1 2...
Страница 53: ...30 53 1 60 2 2 1 3 3 12 2 3 1 1 54 55...
Страница 54: ...1 2 54 80 70 1 2 100 400g 2 5 15 30 1...
Страница 55: ...7 24 1 2 3 5 15 50 51 55 53 1 2 1 1cm 250cc 2 1 300g 60 100g 2 3...
Страница 56: ...2 60 80 1 1 10 12 80 140 10 24 66 56 1 2 1 10 12 ECO 58 60 1...
Страница 57: ...1 57 3 1 56 5 66 4 2 66 2 3 66 4 5 66 67 1 56...
Страница 58: ...58 ECO 60 1 30 ECO 1 1 2 3 0 1 0 3 4 1 ECO ECO ECO 30 30 ECO Eco Mode ECO ECO 3 24...
Страница 59: ...59 ECO 30 30 ECO ECO ECO...
Страница 60: ...60 10 0 2 5 57 1 3 2 1 1 2 3 30 3...
Страница 61: ...61 1 3 1 3 1 3 48 ECO 3 3...
Страница 62: ...3 3 62 10 LED 75 49...
Страница 63: ...63 LED 68 68 69 1 2...
Страница 64: ...64 49...
Страница 65: ...65 60 66 67 49 80 140 1 2L...
Страница 66: ...66 2 3 2 2 56 1 6 56 4 3 5 1 60 1 2 3 4 1 2...
Страница 67: ...2 3 67 1 4 5 2 3 1 2 1 2 3 4...
Страница 68: ...2 1 68 10 4 4 4 4 3 2 4 3...
Страница 69: ...3 69...
Страница 70: ...70 1 45 2 3 66 67 57 66 3cm 30 2 2...
Страница 71: ...71 2 5 1 1 5 5...
Страница 74: ...74 24 30 50 60 48 66 67 62 71 4 5 24 44 58 60 60 66 4 5 24 66 57 67 66 60 56...
Страница 75: ...75 61 53 45 5 30 60 1 4 5 49 55 53 53...
Страница 76: ...76 1 2 1 2 100 58...
Страница 77: ...Memo...
Страница 78: ...Memo...
Страница 79: ...Memo...


