background image

E – 19

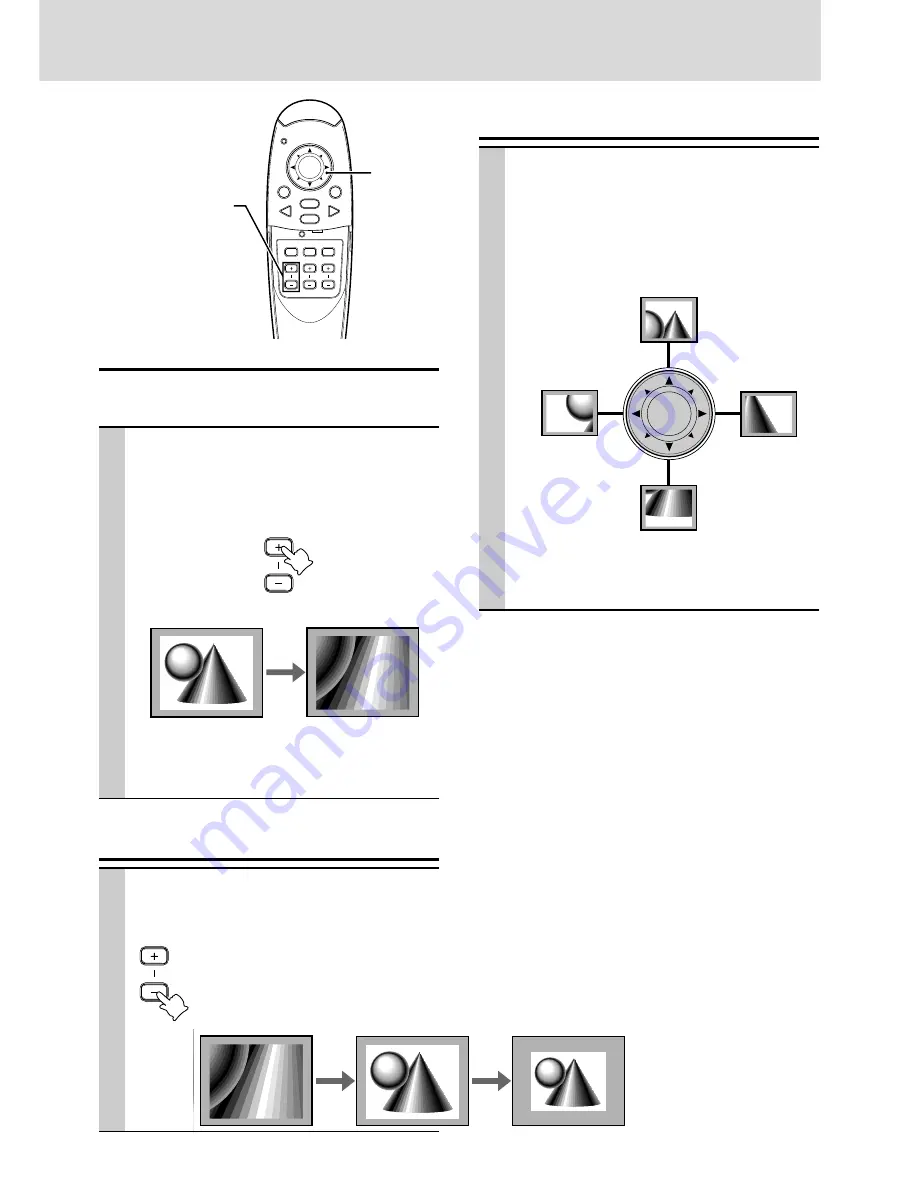
Enlarging the picture

You can enlarge the picture up to ten times the original
size.

Press ZOOM + button.

While the button is pressed the picture is en-
larged until it becomes ten times the original size.

Release the button at the desired size.

ZOOM

Note

The quality of the enlarged picture deteriorates compared to
the original size picture.

Screen Reduction

Press ZOOM – button. When this button is
released, the screen will return to 90%
reduction.

ZOOM


Original size

Ten times as large as

the original size

Enlarged screen

Standard screen

To move to the desired portion of the
enlarged picture

Press the desired portion of the cursor
key.

The available directions are indicated by the four
large triangle marks on the cursor key. The pic-
ture will move in the direction of the mark you are
pressing.

Note

Less than the original size of the picture cannot be moved
because the whole image is fully displayed.

Move upward

Move downward

Move leftward

Move rightward

Cursor key

90% reduction

screen

MOUSE

POWER

VIDEO

MENU

CANCEL

RGB

AUTO

FREEZE

MUTE

ZOOM

VOLUME

KEYSTONE

ZOOM +/– button

The ZOOM +/- buttons are used
for the digital zoom function
which allows you to enlarge a
portion of the image.
To adjust the image size, enlarge
the image manually by using the
zoom ring.

Содержание Mini-mits XD20A

Страница 1: ...ws 95 and Windows 3 1 are registered trademarks in the United States and other countries of Microsoft Corporation IBM is a registered trademark of International Business Machines Corporation Macintosh and MAC are trademarks of Apple Computer Inc Other names of companies and products mentioned are trademarks and registered trade marks of the respective companies TM and marks are not used in this do...

Страница 2: ...outlet after using the unit Before disconnecting the power cable make sure that the POWER indicator lights in amber not blinking or in green I M P O R T A N T S A F E T Y I N F O R M A T I O N This symbol warns the user that uninsulated voltage within the unit may have sufficient magnitude to cause electric shock Therefore it is dangerous to make any kind of contact with any part inside of this un...

Страница 3: ...ll into the unit immediately disconnect the power cable from the unit and have the object removed by a qualified MITSUBISHI service person Do not place any liquids on top of the unit Do not look into the lens while the unit is on Serious damage to your eyes could result Carrying around When carrying the unit around please use the carrying case that comes with it and to protect the lens from scratc...

Страница 4: ...ge sources bring out the true image display quality of the unit Screen not distorted to a trapezoid keystoning when pro jecting to the height of the line of vision Because the projection position is already set to the height of the line of vision there is no keystoning effect Even when projecting above or under the height of the line of vision image distortion if any can be adjusted using the key ...

Страница 5: ...d Replace only with the same or equivalent type recommended by the manufacturer Dispose of used batteries according to the manufacturer s instructions Notes If the remote control gets wet wipe it dry immediately Avoid excessive heat and humidity If you will not be using the remote control for a long time remove the batteries Do not mix new and old or different types of batteries There are operatio...

Страница 6: ...ster button 15 Control panel POWER indicator 14 16 POWER button 14 16 STATUS indicator 32 AUTO button 18 SOURCE button 14 16 Bottom For operational instructions refer to the page indicated in brackets Rear adjuster 15 Lamp cover screw 33 Front adjuster 15 Ventilation slots 3 POWER STATUS POWER SOURCE AUTO Sliding lens cap 3 14 Lamp cover 33 Exhaust vents 3 Adjustment foot 15 Zoom ring 15 ...

Страница 7: ...emark of Kensington Microware Inc The logo is trade marked and owned by Kensington Microware Inc Ventilation slots 3 Remote sensor 5 Built in security slot see below AC IN terminal 14 Rear adjuster 15 AUDIO MOUSE RGB YCbCr VIDEO S VIDEO Terminal Panel MOUSE connector 17 AUDIO jack 10 11 12 VIDEO jack 10 S VIDEO jack 10 Built in Security Slot RGB YCbCr connector 11 12 Ventilation slots 3 Adjustment...

Страница 8: ...during infrared sending POWER button 14 16 MOUSE button 17 VIDEO button 16 MENU button 20 P a r t s a n d c o n t r o l s c o n t i n u e d Infrared transmitter 5 ZOOM button 19 CANCEL button 17 22 RGB button 16 MOUSE POWER VIDEO MENU CANCEL RGB MOUSE POWER VIDEO MENU CANCEL RGB AUTO FREEZE MUTE ZOOM VOLUME KEYSTONE FLIP COVER 18 20 Cursor key 17 19 22 ...

Страница 9: ...o the position where the projected image is horizontally centered to the screen Do not use the unit where temperatures vary greatly The unit must be used at temperatures between 5 C 41 F and 35 C 95 F To raise the projection position place the unit on the stable table If strong light falls on the remote sensor the remote control may not function Do not place the unit in direct lightning For best r...

Страница 10: ...d When connecting two external units the audio from either one of these units can be output from the speaker of this device Audio can be turned on and off for video related input video S video from the menu or RGB or YCbCr input see page 28 C o n n e c t i o n s Connection to the VIDEO jack of the unit Connection to the S VIDEO jack of the unit L R VCR DVD player laser disc player etc VCR DVD play...

Страница 11: ...by setting the RGB YCbCr connector to YCbCr see page 27 from the menu Connection to the RGB YCbCr connector To audio out jack Audio adaptor accessory Audio cable accessory DVD player To component video YCbCr OUT jack Component cable YCbCr cable option Jacks RCA 3 mini D Sub 15 pin Rear panel jacks of this device Plug in the connection cable and tighten the screws White L Red R Green Blue Red Y Cb ...

Страница 12: ...jack of this projector and setting the RGB YCbCr connector to RGB see page 27 Either read the instruction manual or contact the manufacturer concerning the method used to set your PC IBM PC AT compatible Macintosh mini D sub 15 pin monitor output connector To headphone jack Audio cable accessory Rear panel jacks of this device Mini D Sub 15 pin connector RGB cable accessory Plug in the connection ...

Страница 13: ...ontrol Panels and open Monitors 2 Click and open Options 3 Select your new resolution and click OK Notebook computers and resolution standards The unit is designed to project industry standardized video such as VESA Video Electronics Standards Association or XGA eXtended Graphics Array Notebook computers do not use indus try standards They use whatever timing is necessary to match their local LCD ...

Страница 14: ...en 3 Turn on the connected source computer VCR DVD player etc If you use a video component start playback for screen image adjustment 4 Select the input by pressing either the VIDEO or RGB button of the remote con trol or the SOURCE button of this device refer to page 16 MOUSE POWER VIDEO MENU CANCEL RGB SOURCE Notes If the blue or black screen the background type differs depending on the BACKGROU...

Страница 15: ... the projected image is corrected as shown below If a menu is being displayed distortion of the menu will not be corrected 7 Adjust the image size to match the distance to the screen Use the zoom ring to adjust the image size Next use the focus ring to adjust the focus O P E N 8 Change the unit setting to suit the method and source selected in step 4 Select the PROJECTION appropriate for the type ...

Страница 16: ...DEO button RGB button SOURCE button 9 Adjust the picture elements see page 22 then select the picture type according to the video content see page 26 10 Start using the unit The following functions are available while using the unit Adjusting the volume of the unit s speaker see pages 18 and 28 Turning off the image and muting the sound temporarily see page 18 Freezing a moving picture see page 18...

Страница 17: ... the power of this projector if it is on When connection is completed turn on the power of this projector and then start the PC U s i n g t h e R e m o t e C o n t r o l a s t h e P C M o u s e IBM PC AT or Macintosh USB Port Connection Connect the supplied USB mouse cable directly to the USB port universal serial bus of the personal computer as shown in the diagram IBM PS 2 Mouse Port Connection ...

Страница 18: ...f and the sound is muted at the same time To restore the picture and sound press the button again MUTE Adjusting the Volume Adjusting the volume of the unit s speaker Press VOLUME to increase the volume or to decrease VOLUME KEYSTONE Adjustment When distortion of the projected image cannot be compensated with the adjust ers press the KEYSTONE button to adjust accurately KEYSTONE Using KEYSTONE but...

Страница 19: ...rd screen To move to the desired portion of the enlarged picture Press the desired portion of the cursor key The available directions are indicated by the four large triangle marks on the cursor key The pic ture will move in the direction of the mark you are pressing Note Less than the original size of the picture cannot be moved because the whole image is fully displayed Move upward Move downward...

Страница 20: ...CbCr input The advanced menu will be displayed when the MENU button is pressed with the remote control FLIP COVER open Advanced menu MENU button For VIDEO S VIDEO and component video YCbCr input Common menu Common menu M e n u o p e r a t i o n MOUSE POWER VIDEO MENU CANCEL RGB MOUSE POWER VIDEO MENU CANCEL RGB AUTO FREEZE MUTE ZOOM VOLUME KEYSTONE 22 22 22 22 22 25 25 26 26 26 26 27 27 27 28 28 2...

Страница 21: ...1 Normal menu RGB input Advanced menu The Advanced menu cannot be used unless the FLIP COVER of the supplied remote control is open RGB input 22 22 24 24 24 25 25 26 26 27 27 27 28 28 26 26 26 29 30 Å Ç ı ...

Страница 22: ...ress the cursor 䊴 䊳 keys to adjust the brightness 5 Press the cursor keys to select CONTRAST 6 Press the cursor 䊴 䊳 keys to adjust the contrast Some elements are not adjustable for Video S Video and Component YCbCr signal in the procedures from Step 7 Elements that are not adjustable are not dis played A d j u s t i n g t h e p i c t u r e e l e m e n t s To select other menu names Press the MENU ...

Страница 23: ...ze automatically Timing Chart The resolution of the unit is 1024 768 Other resolution images e g 1280 1024 are compressed into 1024 768 In such a case projected letters and lines might appear unevenly Resolution H Sync kHz V Sync Hz IBM PC AT compatible machine 640 350 31 5 70 1 640 350 37 9 85 1 720 350 31 5 70 0 640 400 31 5 70 1 640 400 37 9 85 1 720 400 31 5 70 0 720 400 37 9 85 0 640 480 31 5...

Страница 24: ... FLIP COVER of the remote control and press the AUTO button there If no images appear during setting Use the following procedure when no images appear during setting because the clock frequency or phase is grossly inaccurate 1 Turn off the power of all devices connected The input signal will stop and either a blue or black background This depends on the Background setting page 28 will be projected...

Страница 25: ...p hours of usage 2 Display the INFORMATION menu use the cursor keys to select LAMP USAGE HOURS RESET and then press the EN TER button 3 If the ENTER button is not used during reset press the CANCEL button When the power will not turn on because the lamp usage hours of has exceeded 1100 hours The power will not turn on when the lamp hours of usage has exceeded 1100 hours The status light will be on...

Страница 26: ...ors as desired in accordance with the image contents Subtle color settings are possible as desired Setting is possible for each input 1 Select the image to be input page 16 2 With the FLIP COVER of the remote con trol open press the MENU button to dis play the Advanced menu then use the cursor 䊴 䊳 keys to select COLOR 3 Use the cursor keys to select GAMMA 4 Use the cursor 䊴 䊳 keys to set the GAMMA...

Страница 27: ...r keys to select ASPECT 4 Use the cursor 䊴 䊳 keys to set the ASPECT ratio Any of the following four different settings can be selected for images REAL input signal projection without pixel re placement AUTO projection after automatic input signal zoom in zoom out DIRECT the original aspect ratio of the image is maintained at all times 4 3 16 9 4 3 aspect ratio images are pro jected after conversio...

Страница 28: ... can be muted for each input This function is convenient when multiple video units are connected to this projector 1 Select the input to be muted page 16 2 With the FLIP COVER of the remote con trol open press the MENU button to dis play the Advanced menu then use the cursor 䊴 䊳 keys to select SETUP 3 Use the cursor keys to select SOUND MUTE then use the cursor 䊴 䊳 keys to set muting to ON or OFF ...

Страница 29: ...IDEO button Video and S video are searched Remote control RGB button RGB and YCbCr signals are searched Main unit SOURCE button All input signals are searched individually Selecting a Projection Type If the projection type is not correctly set in accordance with the installation conditions images may be projected reversed verti cally or horizontally 1 With the FLIP COVER of the remote con trol ope...

Страница 30: ...ect OPTION 2 When OPTION menu is displayed use the cursor keys to select MENUTYPE 3 Use the cursor 䊴 䊳 keys to select TRANSLUCENT or OPAQUE Other Menu Settings The time that the menu is displayed on the screen can be set with this function 1 With the FLIP COVER of the remote con trol open press the MENU button to dis play the Advanced menu then use the cursor 䊴 䊳 keys to select OPTION 2 When OPTIO...

Страница 31: ...TATUS indicator blink Is installation correct Was the Keystone adjustment performed correctly Is the lens properly focused Are the screen and projector positioned at the correct angle Does the projection distance place the screen outside the focus range Is there condensation dirt etc on the lens Condensation on the internal optical system is possible when the projec tor has been stored in a cool p...

Страница 32: ... remove whatever is blocking them The temperature protector has been triggered If you try to turn on the unit immedi ately after turning off sometimes the power does not come on If this happens wait at least one minute then turn on the unit again The lamp lighting voltage error detection protector has been triggered Wait at least one minute before turning on the unit again If this does not solve t...

Страница 33: ... upside down carefully 3 Loosen the lamp cover securing screw 4 Remove the lamp cover CAUTION Do not use a lamp cartridge other than the MITSUBISHI replacement lamp cartridge Order this from your MITSUBISHI dealer using the unit model number see Notes below 5 Loosen the three lamp cartridge securing screws This unit has a safety switch 6 Hold the handle then pull the lamp cartridge upward to remov...

Страница 34: ... 17 7 cm D 9 0 in W 1 9 in H 7 0 in D Weight Apploximately 1 5 kg 3 3 lbs Operational Temperatures Data projector 5 to 35 C 41 to 95 F 30 to 85 humidity Remote control 0 to 60 C 32 to 140 F Regulations UL Approved UL 1950 CSA 950 Meets FCC Class A requirements S p e c i f i c a t i o n s D Sub Pin Assignments PC 15 Pin mini D Sub Pin No 1 2 3 4 5 6 7 8 9 10 11 12 13 14 15 Signal to be connected Re...

Страница 35: ...E 35 Dimensions OPEN POWER STATUS POWER SOURCE AUTO POWER STATUS POWER SOURCE AUTO OPEN 230 mm 9 0 177 mm 7 0 48 mm 1 9 11 mm 0 4 27 mm 1 1 ...

Отзывы: