background image

44

Remote Control

VCR POWER

Turns the VCR on or off.  If you have programmed
the VCR to record, you need to turn the VCR off.

EJECT

Ejects a tape.

CHANNEL Up and Down

Selects next higher or lower channel in the VCR’s
or TV’s channel memory.

VOLUME Up and Down

Raises and lowers the sound of the TV.
(Operates the TV only)

TV POWER

Turns the TV on or off.  You need to program your
remote to operate your particular brand of television.

MUTE

Turns off the TV sound.  Press again to restore the
TV sound to its previous volume. (Operates the TV
only)

Number keys

Selects TV stations.
Sets quick search (CM skip) time.

QUICK PROGRAM

Goes to Program to record menu.
Exits the programming screen.

INPUT

Select between the antenna and any other video
equipment that may be connected.

PLAY 

Plays a tape.

2

1

3

5

4

6

8

7

9

0

CHANNEL

EJECT

MUTE

VOLUME

VCR

POWER

TV

POWER

CM SKIP

QUICK PROGRAM

INPUT

PLAY

STOP

REW

FF

DISPLAY

PAUSE

X2

   REC

INDEX

AUDIO/VIDEO

MENU

VCR/TV

SP/EP

ADJUST

CANCEL

ENTER

ADJUST

VCR

TV

STOP 

Stops a tape.

REW 

Rewinds a tape or reverse searches.

FF 

Fast forwards a tape or fast forward searches.

VCR/TV slide switch

Operates the VCR when set to the VCR position, the
TV when set to the TV position.  You need to
program your remote to operate your particular
brand of television.


REC

Starts recording.  While recording, adds manual
index mark.

PAUSE 

Pauses a tape when recording.
Freezes a frame when playing a tape.

DISPLAY

Displays on the TV screen:
• Time elapsed on the tape
• Time left on the tape, current time
• Channel number and audio reception mode
• Audio channel(s) selected
• Source supplying the VCR with a signal
• If the VCR is stopped, playing, or recording
Turns the Child Lock on and off.

X2

Use double speed playback when playing a tape.

INDEX   

I

\

\

\

\

\

^

^

^

^

^

I

Begins index search forward and backward.
Controls the playback speed of a tape.

AUDIO/VIDEO

Selects the audio and video settings to be adjusted.

MENU

Displays the menus.  Exits the menus.

CANCEL

Cancels menu selections.
Resets the counter display to “0h00m00s.”

, –

Selects and adjusts menu selections.

ENTER

Enters menu selections.

VCR/TV

Switches between the VCR’s picture and the TV’s
tuner.

SP/EP

Changes the recording speed.  (SP is standard
play; EP is extended play).

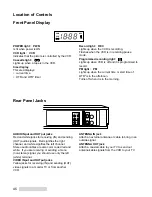
Location of Controls

Содержание HS-U448

Страница 1: ...M INPUT PLAY STOP PAUSE INDEX ADJUST AUDIO VIDEO MENU ADJUST CANCEL ENTER SP EP VCR TV DISPLAY REW REC X2 FF MUTE TV POWER CHANNEL VOLUME 2 1 3 5 4 6 8 7 9 0 VCR TV This Video Cassette Recorder is bas...

Страница 2: ...IS PRODUCT TO RAIN OR MOISTURE CAUTION TO PREVENT ELECTRIC SHOCK HAZARD DO NOT USE THIS POLARIZED PLUG WITH AN EXTEN SION CORD RECEPTACLE OR OTHER OUTLET UNLESS THE BLADES CAN BE FULLY INSERTED TO PRE...

Страница 3: ...Recording 18 Recording a Current Broadcast 18 OTR 19 OTR2 20 Using Audio and Video Functions 21 Timer Recording 24 Conventional VCR Timer Recording 24 Quick Program 26 Timer Recording Hints 27 Editin...

Страница 4: ...1 Power Sources This product should be operated only from the type of power source indicated on the marking label If you are not sure of the type of power supply to your home consult your product deal...

Страница 5: ...ave the VCR on without a tape in it for 2 hours if the VCR has been exposed to sudden changes in tem perature Sudden temperature changes cause moisture to form on the metal parts inside the VCR This m...

Страница 6: ...ou customize these hookups and sell you any additional connection accessories that may be necessary to match your particular equipment and antennas 1 Make a list of each piece of equipment that you wa...

Страница 7: ...300 Ohm to 75 Ohm Matching Transformer Optional UHF VHF Combiner OR supplied coaxial cable OR From Antenna or Cable wall outlet IN OUT VHF UHF VHF UHF ANTENNA OUT IN TV Rear Panel From Cable wall outl...

Страница 8: ...fifth coaxial cable to the ANTENNA OUT on the VCR to the TV s ANTENNA jacks varied by TV 8 If your TV has audio and video inputs continue with the connections on the next page If not plug in power cor...

Страница 9: ...NO R AUDIO OUT AUDIO L R VIDEO OUT L R L R R White Red Yellow White Red Yellow TV Rear Panel VCR Rear Panel Because you purchased a Hi Fi VCR you will want to take advantage of its superior sound capa...

Страница 10: ...VCR2 MONITOR VCR 1 OUT IN OUT IN OUT VIDEO L R L R OUT AUDIO L R VIDEO OUT R L L R Yellow Yellow Yellow Yellow TV Rear Panel VCR Rear Panel Home Theater Receiver Rear Panel White Red White Red You may...

Страница 11: ...convert the VCR s picture to channel 3 or 4 This is called the video channel The factory has already selected channel 3 however if it is a broadcast channel in your area then you will need to change...

Страница 12: ...ding a tape will automatically turn the VCR on Use only tapes that have a label 1 Hold the tape so that the long narrow edge with the contents label faces you The other edge is hinged and should face...

Страница 13: ...E a second time to return to normal play If you leave the VCR in pause for more than 5 minutes the VCR will automatically stop to prevent damage to the tape Controlling the Vibration During Still Fram...

Страница 14: ...e first time you use the menus or set any audio and video functions 1 Make sure you are viewing the picture coming from your VCR Press MENU on the remote control If this is the first time the menus ha...

Страница 15: ...rces connected to the VCR Using the list below as a reference press the ADJUST buttons to select the kind of antenna you connected Cable if you are using any cable combination including a cable box wi...

Страница 16: ...ou use automatic memorizing again you will lose all of the manual changes you made All of the channels you deleted will be added all of the channels you added will be deleted Selecting a Channel Now t...

Страница 17: ...and daylight saving time If there are only a few channels in your area that carry time signals it may take about 30 minutes to complete If you turn the VCR on before the correct time displays the auto...

Страница 18: ...Setting the Clock Manually Skip this section if your VCR has set the clock correctly using the auto clock function 1 Press MENU on the remote control You will see the VCR Main Menu 2 Press the ADJUST...

Страница 19: ...the menus You can adjust the daylight saving time manually When Daylight savings is highlighted press the ADJUST buttons to select ON or OFF If you select ON the VCR will set the clock forward one ho...

Страница 20: ...annel 3 or 4 on the VCR and change the channel on the cable box not on the VCR Additionally if you are using an A B switch remember to set the switch to the correct position 5 Press REC on the remote...

Страница 21: ...irst time you press the button recording will begin The second press of the same button adds 30 minutes to the OTR timer displayed on the front panel 6 Press REC REC LENGTH for each additional 30 minu...

Страница 22: ...ed Similarly if it is currently 2 40 3 00 again the next half hour increment will be displayed Each time you press the button the start time is delayed by 30 minutes 6 Press REC REC LENGTH for each ad...

Страница 23: ...k Choose R to listen to the right channel of a stereo track Mono track is lower in quality than the others The audio monitor is automatically set to Mono if you are watching a tape that was not record...

Страница 24: ...20 T 120 160 minutes T 160 T 160 180 minutes T 180 T 180 200 minutes T 200 T 200 210 minutes T 210 T 210 PerfecTape Select Play PerfecTape This function turns on the PerfecTape Select circuitry which...

Страница 25: ...s 3 Press the ADJUST buttons on the remote to adjust the setting The functions will disappear if you do not press any buttons for 5 seconds IMPORTANT The audio and video function menus do not appear w...

Страница 26: ...to your VCR usually channel 3 or 4 To record from an external source press INPUT or press the ADJUST buttons to Select External L1 for a source connected to the rear panel Select External L2 for a so...

Страница 27: ...from step 3 11 When you are finished with all programming check the following If you have a cable box leave the cable box turned ON and tuned to the station you wish to record Additionally if you are...

Страница 28: ...er one 2 Complete steps 3 through 9 in Conventional VCR timer recording See page 24 When you have finished press QUICK PROGRAM again If the VCR is stopped it will turn off and be ready to record your...

Страница 29: ...If so you must erase a program before you can enter a new one If a tape runs out during timer recording the VCR ejects the tape and the programmed recording light and the cassette light will flash Lo...

Страница 30: ...e to 11 00 PM on the recording start day and the end time to 2 00 AM There is no need to change the day of the week Program skip using menus Sometimes you may want to skip one day of a timer recording...

Страница 31: ...rding starts 1 Press MENU on the remote control Your VCR will turn on and VCR Main Menu will appear on your screen Use the ADJUST buttons on the remote control to select Program to record Press ENTER...

Страница 32: ...is to use another VCR to record and use the HS U448 for playback Regardless of which method you may choose you will need one RCA audio cable and one RCA video cable to connect the two VCRs If you do n...

Страница 33: ...et the audio monitor on the HS U448 to Stereo If the other VCR is a mono VCR set the audio monitor on the HS U448 to Mono See Selecting and adjusting the audio and video functions on page 23 4 Set the...

Страница 34: ...eed by one step in the reverse direction See the chart below 2 To resume normal playback press PLAY After about 5 minutes in the still or slow motion mode the VCR will automatically stop to avoid dama...

Страница 35: ...ay a tape that has excess noise in the picture often looking like vibration or interference at the top or bottom of the screen To correct the picture you have to manually track the tape 1 While the ta...

Страница 36: ...Quick search CM skip 30 second intervals Speed search visually search Counter zero stop direct to start of recording Index search find specific index points Search to blank find the beginning of the b...

Страница 37: ...e than 2 seconds the search speed will slow to 330 times normal speed In order to protect your tapes and the VCR heads the Fast Forwarding Rewinding Speed will be slower than 500x under the following...

Страница 38: ...index marks To add an index mark yourself press REC on the remote control while a tape is recording Index marks must be added at least one minute apart 1 When the tape is stopped press INDEX I to beg...

Страница 39: ...R will also search for a blank section of tape If the VCR encounters any blank sections longer than 4 seconds in length the repeat playback will begin 3 Press STOP to cancel the repeat Search to blank...

Страница 40: ...isplay press DISPLAY twice IMPORTANT The time gauge and remaining time work by detecting control signals on recorded tapes Therefore they do not function while playing blank tapes The remaining time d...

Страница 41: ...ning idle for 30 minutes If a control such as a menu function or channel selection is used or if there is a tape playing or being recorded the VCR will remain on 3 Complete steps 1 and 2 above Customi...

Страница 42: ...ion only when you start a test Any tape with the erasure prevention tab intact can be manually tested It will not automatically test recorded tapes you must choose to test those yourself 3 Complete st...

Страница 43: ...ape function will not appear unless the tape is ejected Rental Xpress Rental Xpress is a feature when activated that will automatically rewind the tape to the beginning eject and power off the VCR aft...

Страница 44: ...code buttons are 0 1 9 MUTE VOLUME CHANNEL and INPUT You do not need to perform this set up again until you change the batteries set up your remote for another brand of television or you get a new TV...

Страница 45: ...the VCR front panel press REC SPEED and REW at the same time To confirm that the VCR responds to VCR B signals b appears on the front panel display to reprogram the HS U448 to respond to VCR A signals...

Страница 46: ...s a tape or reverse searches FF Fast forwards a tape or fast forward searches VCR TV slide switch Operates the VCR when set to the VCR position the TV when set to the TV position You need to program y...

Страница 47: ...ts the start time in OTR2 recording REC REC LENGTH Records to the end of the tape by pressing once Sets the recording time for OTR recording by pressing repeatedly POWER Turns the VCR on or off If you...

Страница 48: ...external antenna or cable to bring in an outside signal ANTENNA OUT jack Attach a coaxial cable to your TV to send out antenna cable signals from the VCR to your TV POWER light PWR Is lit when power...

Страница 49: ...ng of your TV when you watch that type of image When possible you may wish to use your television s PIP POP ZOOM EXPAND or other picture shape controls so that the moving images fill the screen Please...

Страница 50: ...ount down Wait about 1 minute until it reaches 00 to show the tape protecting function is completed then press POWER If the problem with your VCR persists contact your Mitsubishi dealer for assistance...

Страница 51: ...lly Have the VCR video heads cleaned by a qualified service technician Check that VCR operational setting is set to VCR A Check to see that the VCR TV slide switch is set to the correct position Chang...

Страница 52: ...8 0 lbs approx 3 6 kg SUPPLIED ACCESSORIES 1 set coaxial cable 1 remote control 2 AA size batteries 1 registration card A adding channels 14 adjust button 44 adjusting tracking 33 advanced options 42...

Страница 53: ...to speed 28 cancel 25 29 changing settings while 26 Q quick program button 44 quick program 26 quick search 34 R rear panel jacks 46 REC button 44 45 record cancel 29 record light 46 rec speed button...

Страница 54: ......

Страница 55: ...by anyone other than an authorized MITSUBISHI service center physical abuse to or misuse of the VCR operation in a manner contrary to the instructions which accompany the VCR freight damage or any dam...

Страница 56: ...mitsubishi tv com 2002 Mitsubishi Digital Electronics America Inc For your nearest Mitsubishi Authorized Service Center call 1 800 332 2119 RETAIN THIS PORTION FOR YOUR RECORDS SERIAL NO CUSTOMER NAM...

Отзывы: