Mitsubishi DLP XD8600U Скачать руководство пользователя страница 64

EN-64

Replacing the lamp

This projector is equipped with 2 lamps to project 

images. This lamp is a consumable. It may burn out 

or its brightness may decrease during use. In such 

cases, replace the lamp with a new one as soon as 

possible. Be sure to replace the lamp with a new lamp 

separately sold that is exclusive to this projector. 

Contact your dealer for purchase of the lamp. 

Spare lamp  VLT-XD8600LP

Warning:

•  Be careful not to drop the lamp fixing screws into 

the inside of the projector. Don’t put a metal piece 

or flammable object into the projector. Using the 

projector with any foreign object present inside 

may result in electric shock or fire. When you can’t 

remove the foreign object from the inside, contact 

your dealer for removal. 

•  Do not touch the lamp with bare hands or give 

a shock to the lamp. Attach the lamp properly. 
Improper handling may cause explosion.

•  Be sure to install the lamp securely. When the lamp 

isn’t installed properly, it won’t illuminate. Improper 

installation may also result in fire.

•  Don’t shake the removed lamp or don’t lift it above 

your face. You may be injured in your eye by flying 

or falling glass fragments.

•  Don’t replace the lamp immediately after use 

because the lamp cover is very hot. You may get 

burned. Turn off the power using the POWER 

button. After the lamp goes out, wait about 2 

minutes until the intake and exhaust fans for 
cooling the lamp stop rotating. Then unplug the 
power cord, and wait at least 1 hour to allow the 
lamp to cool down enough to the touch.

Interval of lamp replacement

The recommended interval of lamp replacement is 

about 4000 hours

*1*2

 of consecutive use. Such interval 

differs depending on the operating environment 

and may be shorter than 4000 hours

*1*2

. Decrease 

in luminescence and/or color brightness indicates 

that the lamp needs to be replaced. When the lamp 

operation time exceeds 3000 hours

*1

, the indicator 

will blink alternately between green and red (while the 

lamp is lit; when the lamp is not lit, the indicator will 

be lit red only) and the lamp replacement message 

will appear on the screen for 1 minute everytime the 

lamp is turned on. When the lamp has been used 

for about 3800 hours

*1

, the replacement message 

(LAMP REPLACEMENT) will appear on the screen for 

1 minute every 20 hours

*1

 thereafter. 

When the lamp 

operation time exceeds 4000 hours

*1*2

, the projector 

automatically shuts off.

*1: Duration when LAMP MODE of the INSTALLATION 1 

menu is set to LOW. When it is set to STANDARD, this 

duration will be shorted.

*2: When LAMP MODE is set to STANDARD, this duration 

will be shorted to 2000 hours.

Caution:

•  Don’t remove the lamp for any purpose other than 

replacement. Unnecessary removal of the lamp 

may result in a breakdown.

•  This projector uses a high-pressure mercury lamp 

as the light source. The high-pressure mercury 

lamp may explode or fail to illuminate permanently 

because of an impact, scratch, or deterioration 

through use. The period of time until explosion or 

permanent failure to illuminate varies considerably 

from lamp to lamp, depending on operation 

conditions. Therefore, the lamp may explode soon 

after the start of use. 

•  The possibility of explosion of the lamp increases if 

you use it beyond its replacement period. When the 

instruction of lamp replacement appears, replace it 

with a new one immediately even if the lamp is still 

lighting normally. 

•  When the high-pressure mercury lamp explodes, 

glass fragments will scatter inside or outside the 

lamp box and the gas charged inside the lamp 

will diffuse inside or outside the projector. The gas 

inside the lamp contains mercury. Be careful not 

to breathe it or avoid it from entering your eye or 

mouth. If you should breathe it or if it should enter 

your eye or mouth, see a doctor immediately.

•  In the event that the high-pressure mercury 

lamp exploded, glass fragments may have been 

scattered inside the projector. Ask your dealer to 

replace the lamp and to inspect the inside of the 

projector. When you clean or replace the lamp by 

yourself, be sure to hold the handle of the lamp. 

You may get injured by glass fragments. 

•  When removing the lamp from the ceiling-mounted 

projector, use the lamp replacement tray packed 

with the projector or option lamp to prevent glass 

fragments from scattering.

•  Be sure to use the lamp exclusive to this projector, 

VLT-XD8600LP. Use of other lamps may cause a 

failure of the projector.

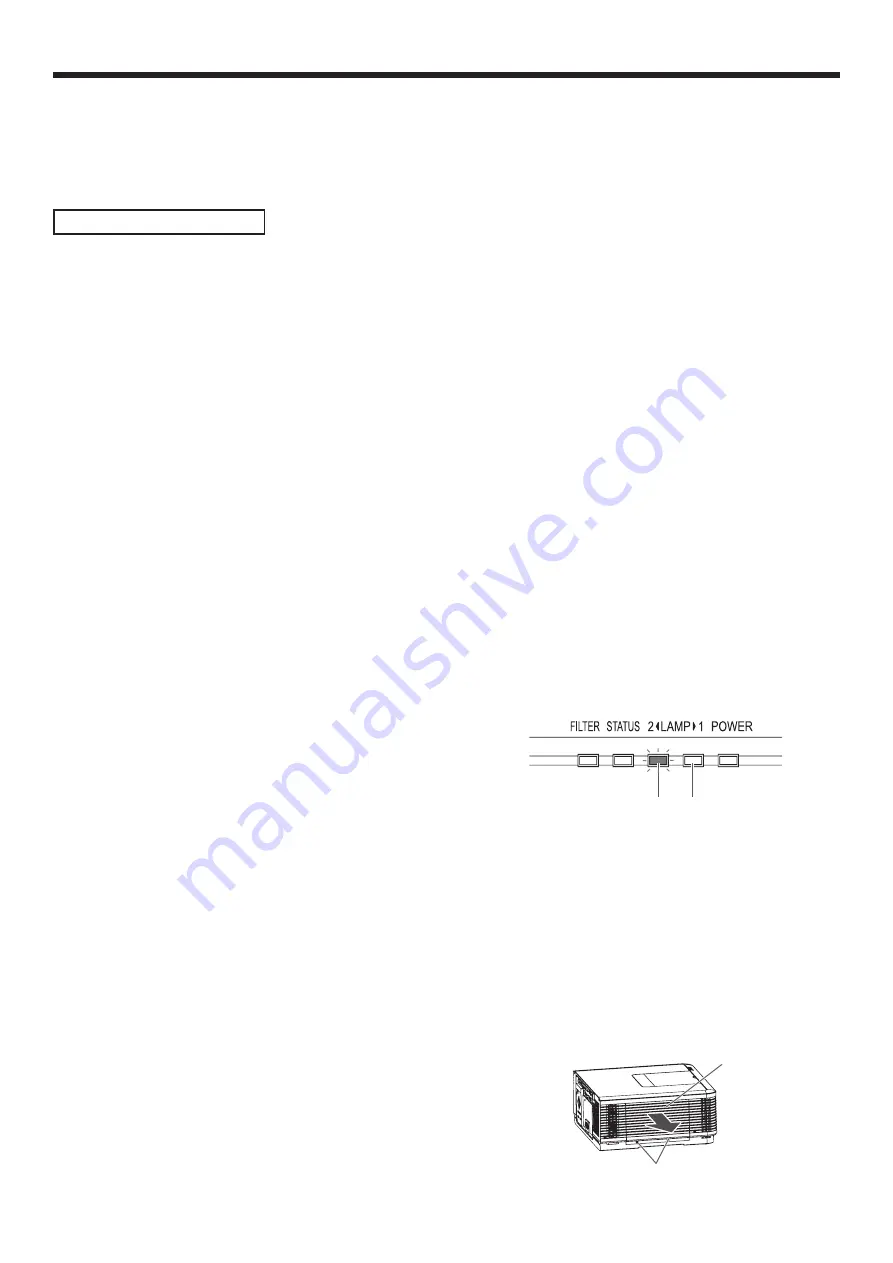
Before replacing the lamp

1.  Check which indicator (for LAMP 1 or LAMP 2) is 

illuminating or blinking.

LAMP 2 indicator

LAMP 1 indicator

•  For the statuses of the indicators urging you to 

replace the lamps, see page 73. 

•  Replace the lamp indicated by the illuminating/

blinking indicator using the following procedure. 

•  When both indicators are illuminating or blinking, 

replace both lamps at the same time.

To replace the lamp:

1.  Unplug the power cord from the outlet or appliance 

inlet. 

2.  Loosen two screws (a) that are securing the lamp 

cover using a Phillips screwdriver and remove the 
lamp cover (b) from the projector.

(a)

(b)

Содержание DLP XD8600U

Страница 1: ...U XD8600 This User Manual is important to you Please read it before using your projector DLP PROJECTOR MODEL XD8600U User Manual...

Страница 2: ...companying the appliance WARNING TO PREVENT FIRE OR SHOCK HAZARD DO NOT EXPOSE THIS APPLIANCE TO RAIN OR MOISTURE CAUTION TO PREVENT ELECTRIC SHOCK DO NOT USE THIS POLARIZED PLUG WITH AN EXTENSION COR...

Страница 3: ...ntColor are all trademarks of Texas Instruments HDMI the HDMI logo and High Definition Multimedia Interface are trademarks or registered trademarks of HDMI Licensing LLC Microsoft Windows and Windows...

Страница 4: ...Never push objects of any kind through openings of this projector as they may touch dangerous voltage points or short out parts that could result in a fire or electric shock Never spill liquid of any...

Страница 5: ...le the lamp is illuminating Do not use the projector with condensation on it It can lead to breakdown or other failure Place of installation For safety s sake refrain from setting the projector at any...

Страница 6: ...s Caution Use of a battery of wrong type may cause explosion Only Carbon Zinc or Alkaline Manganese Dioxide type batteries should be used Dispose of used batteries according to your local regulations...

Страница 7: ...utton 8 button 9 LENS SHIFT button 10 BLANK button 1 8 2 3 4 5 6 7 12 13 9 10 11 1 VIDEO IN terminal BNC 2 S VIDEO IN terminal 3 COMPUTER COMPONENT VIDEO IN 1 terminal mini D SUB 15 pin 4 COMPUTER COM...

Страница 8: ...CUS button 7 ID button 8 MAGNIFY button 9 PinP SPLIT button 1 10 CE Color Enhancer button 11 TEST PATTERN button 12 AUTO POSITION button 13 SDI button 2 14 HDMI button 15 VIDEO button 16 S VIDEO butto...

Страница 9: ...by the remote control signals reflected on the screen However the remote control distance may be restricted by the light reflection loss due to the screen characteristics Operate the remote control wi...

Страница 10: ...is ALL ALL is displayed YY Shows the current CONTROLLER ID When the CONTROLLER ID is ALL ALL is displayed ZZ Shows the CONTROLLER ID to be changed When the CONTROLLER ID is ALL ALL is displayed Before...

Страница 11: ...table to determine the screen size and projection distance For the projection distance of the option lenses see the tables on pages 77 to 78 L L W1 W1 H1 H2 H W L L W1 W1 H1 H2 H W Center of the lens...

Страница 12: ...ssed the image moves to the left When the ENTER button is pressed while the LENS SHIFT menu is displayed the shift mode can be switched between FAST and STEP When FAST is selected the lens shifts in a...

Страница 13: ...and rear projection See page 31 for menu setting 1 Display the INSTALLATION 1 menu 2 Select IMAGE REVERSE by pressing the or button OFF IMAGE REVERSE 3 Select OFF MIRROR INVERT or MIRROR INVERT by pre...

Страница 14: ...TRY button on the remote control to display the CORNERSTONE mode and then press the p q t or u button CORNERSTONE LOWER RIGHT SELECT BLANK 0 0 Every time you press the BLANK button the adjustment menu...

Страница 15: ...h cases set the CORNERSTONE mode adjustment values in the range where the image is displayed without noise Large distortion of the image shape or aspect ratio may not be corrected by the CORNERSTONE m...

Страница 16: ...duct malfunctions When the CURVED mode adjustment is performed the displayed image may be distorted Depending on the installation conditions of the projector and the screen or the correction amount of...

Страница 17: ...t foot of the projector and the other end to the mount kit In this case make sure that no electrical current is flowing in the mount kit due to current leakage or other cause Rear projection Ask a spe...

Страница 18: ...of the computer When viewing images supplied from a digital connected computer press the DVI D HDCP button on the remote control Turn on the power of the projector before starting the computer COMPUT...

Страница 19: ...t plug in or out the power cord with your hand wet It may cause electric shock When you move the projector turn off the power unplug the power cord from the wall outlet and then remove the connected c...

Страница 20: ...mputer images continued VIDEO IN S VIDEO IN IN 1 b You can use the buttons on the operation panel by removing the door of the terminal cover 3 Remove the door b of the terminal cover Important Don t c...

Страница 21: ...the LAMP indicator blinks red See page 73 4 Press the ZOOM FOCUS button to display the ZOOM FOCUS menu 5 Adjust with the or button to get a fine picture When the ENTER button is pressed while the ZOO...

Страница 22: ...st fan rotate to cool the lamp The air outlet fans rotate faster as the temperature around the projector rises Though the fans make loud sounds during cooling such symptom is not a malfunction 16 Unpl...

Страница 23: ...uter images See pages 47 and 48 When you carry out this procedure with a dark image the image may be displaced When connecting to a notebook computer When the projector is connected to a notebook comp...

Страница 24: ...details of connection When a TV tuner or VCR is connected When you use this projector with a TV tuner or VCR connected no image may appear or a message of NO SIGNAL may appear on the screen when you...

Страница 25: ...D terminal In addition this projector supports HDCP and is able to receive encrypted digital video data that are output from DVD players HDCP High bandwidth Digital Content Protection developed by Int...

Страница 26: ...y transfer image data in which different black level settings are employed respectively Therefore the specifications of the signals output from DVD players differ depending on the type of the digital...

Страница 27: ...the warm up process images may appear dark and no commands are accepted By blinking red the LAMP indicator indicates that the lamp should be replaced soon Replace the lamp when the LAMP indicator blin...

Страница 28: ...t fan rotate to cool the lamp The air outlet fans rotate faster as the temperature around the projector rises Though the fans make loud sounds during cooling such symptom is not a malfunction 16 Unplu...

Страница 29: ...ompressed images such as DVD images to 16 9 FULL Select to project images in full size 1024 x 768 pixels irrespective of type of input signal USER Select to adjust the detailed settings With the SIGNA...

Страница 30: ...FILTER MENU INSTALLATION 2 AUTO POWER ON AUTO POWER OFF OFF ON BLUE AUTO 5min IMAGE CAPTURE SPLASH SCREEN DVI LONG CABLE BACK COLOR 1 1 2 2 opt ON ENTER ENTER SETUP R G B R G B V H A U 0 100 COMPUTER...

Страница 31: ...ER 0 COLOR 0 TINT 0 SHARPNESS ADVANCED MENU COLOR MATRIX SUPER RESOLUTION IMAGE 1 1 2 2 BRIGHTNESS 0 COLOR ENHANCER AUTO CONTRAST STANDARD COLOR TEMP opt 0 ENTER ON 5 Set the selected item by pressing...

Страница 32: ...se to emphasize only certain colors or to correct the tonal deviation of only certain colors See page 45 COLOR TEMP STANDARD LOW HIGH Select from the predetermined color temperatures USER Use to adjus...

Страница 33: ...PER RESOLUTION is ON varies depending on the type and resolution of the input image In addition the vertical line of the colored characters may be blurred When the COMPUTER1 COMPUTER2 DVI or HDMI is s...

Страница 34: ...e behind of the screen with the projector installed on the floor INVERT Select when viewing images projected from the behind of the screen with the projector installed on the ceiling MIRROR INVERT Sel...

Страница 35: ...LONG CABLE AUTO Select this option for normal use MANUAL Use to adjust the amount of transmission signal correction when a long DVI cable is used REMOTE 1 MODE ENTER Select when controlling the proje...

Страница 36: ...g colors while viewing the screen to correct color variations among the projectors MEASURE Select this option when adjusting colors using a measuring instrument to correct color variations among the p...

Страница 37: ...vated LANGUAGE English Espa ol Deutsch Fran ais Italiano PORTUGU S SVENSKA POLSKI Nederlands Norsk T rk e Bahasa Indonesia Melayu Use to select the language used in the menus ADVANCED MENU ENTER The A...

Страница 38: ...usted only when a TV60 TV50 480i 576i or 1080i signal is being displayed When SCART INPUT is set to ON normal computer signals aren t projected Use a commercially available SCART Mini D SUB 15 pin cab...

Страница 39: ...REQUENCY The horizontal frequency of the currently projected video signal is displayed HORIZ PIXELS 640 1920 The number of horizontal pixels of the currently projected video signal is displayed When y...

Страница 40: ...PF See page 48 SHUTTER U 0 126 Use to adjust the image when noise appears on the top part of the image SHUTTER L 0 126 Use to adjust the image when noise appears on the bottom part of the image SHUTTE...

Страница 41: ...DHCP server OFF Select this setting when you set IP CONFIG manually IP ADDRESS Press the ENTER button to set IP ADDRESS When DHCP is set to ON you cannot change this setting SUBNET MASK Press the ENTE...

Страница 42: ...s item shows a longer lamp operating time than the actual time When the lamp operating time is 0 to 10 hours 0H is displayed The lamp operating time exceeding 10 hours is indicated by the actual hours...

Страница 43: ...essed the color becomes thicker Every time the button is pressed the color becomes lighter TINT Use to adjust the tint of the projected image Every time the button is pressed the image appears more gr...

Страница 44: ...deo device DETAIL Select when viewing images of which brightness should be kept relatively low such as movies and music performance When MULTI SCREEN is selected 1 8 2 0 2 2 Select the gamma character...

Страница 45: ...mage select SATURATION If you want to adjust the balance of all colors of the image select RGB TINT 6 Press the or button to adjust the color balance of the selected color 7 Repeat steps 5 and 6 for o...

Страница 46: ...ou can save the settings of the SIGNAL menu using the SIGNAL MEMORY You can save multiple signal settings for one signal format and switch the method according to use Up to 8 settings can be saved See...

Страница 47: ...op select Properties and click the Settings tab to display the screen resolution setting The screen resolution setting of your computer is different from the setting of RESOLUTION MEMORIZE in the SIGN...

Страница 48: ...on the right or left half of the image Adjust SHUTTER LS or SHUTTER RS in the SIGNAL USER menu Noise appears on the top or bottom part of the image Adjust SHUTTER U or SHUTTER L in the SIGNAL USER me...

Страница 49: ...joints of the images displayed on the projectors unnoticeable and adjust the differences in the brightness and the color tint of them Important Depending on the installation condition the projected i...

Страница 50: ...to the factory defaults 1 Display the MULTI SCREEN menu 2 Select SETTING MANUAL or MEASURE by pressing the or button 3 Select RESET by pressing the or button 4 Press the ENTER button Adjusting projec...

Страница 51: ...leted as the name stored However when selecting CANCEL the setting is completed without storing The display returns the NETWORK menu after selecting OK or CANCEL It may take some time to reflect the s...

Страница 52: ...NCEL the NETWORK menu is displayed without changing the password If the entered content is not matched NEW NETWORK PASSWORD screen appears again after an error dialog is displayed The password for the...

Страница 53: ...LT GATEWAY 10 132 1 1 0 OK CLEAR DEL CANCEL 1 2 3 4 5 6 7 8 9 4 Enter the Default Gateway Refer to IP Address Settings for the detail of entering 5 When selecting OK the setting is completed as the De...

Страница 54: ...the settings are not correct the communication may be unavailable For the detail consult the network administrator Depending on the settings of standby mode of the projector LAN function may be unavai...

Страница 55: ...lay interval is displayed When the projector is turned off the setting is cleared and the projector resumes operation from the time of the power on or menu setting shown in the preceding step 1H 24H N...

Страница 56: ...r you want to enter and then press the ENTER button Maximum interval 24H 24H 24 hours 1 WEEK 7D 00H 7 days and 00 hours key Shifting the position of enter cursor to the left for each character key Shi...

Страница 57: ...screen being used the displayed image is cropped and the background color is visible In such a case capture images at the current projection size Advanced features Changing the image displayed at the...

Страница 58: ...setting the password function will appear FEATURE DISPLAY INPUT 1 2 opt LOCK UNLOCK 1 2 ENTER ENTER 5 Press the ENTER button The screen for entering a password will appear PASSWORD CONFIRM 1 3 2 4 O K...

Страница 59: ...motion may not run smoothly in the PinP mode You cannot make the MULTI SCREEN menu settings and SIGNAL menu settings in the PinP mode The size of the sub image varies depending on the input signal an...

Страница 60: ...mputer You can supervise and control the projector s operation using a personal computer via a LAN Major functions ProjectorView Global Batch projector controlling supervising application software Bat...

Страница 61: ...y about input switching AVMT Mute control 30 Video mute disable 31 Video mute enable AVMT Inquiry about the mute state ERST Inquiry about the error state 1st byte Fan error 0 or 2 2nd byte Lamp error...

Страница 62: ...d control the projectors collectively or individually it is necessary to assign PROJECTOR IDs or GROUP IDs to them Setting PROJECTOR IDs You can monitor and control multiple projectors individually PR...

Страница 63: ...l contact control You can change the functions of PIN 2 to PIN 8 using REMOTE 1 MODE in the INSTALLATION 2 menu See page 35 Important To reset the pin functions to the defaults set REMOTE 1 MODE in th...

Страница 64: ...n LAMP MODE of the INSTALLATION 1 menu is set to LOW When it is set to STANDARD this duration will be shorted 2 When LAMP MODE is set to STANDARD this duration will be shorted to 2000 hours Caution Do...

Страница 65: ...on 12 Display the FEATURE menu 13 Select ADVANCED MENU by pressing the or button ADVANCED MENU ENTER 14 Press the ENTER button 15 Select LAMP 1 TIME RESET or LAMP 2 TIME RESET by pressing the or butto...

Страница 66: ...or body and lens Flammable substances may ignite causing fire or breakdown while the lamp is illuminating Caution Be sure to turn off the lamp and unplug the power cord from the wall outlet before you...

Страница 67: ...rs 6 Press the ENTER button When you select 24H or 1 WEEK the box to set the cleaning interval is displayed 24H NEXT CLEANUP 24H 0 OK CLEAR DEL CANCEL 1 2 3 4 5 6 7 8 9 1 WEEK NEXT CLEANUP 7D 00H 0 OK...

Страница 68: ...the temperature inside the projector is abnormally high the projector may automatically turn off and go into the standby mode where the light source lamps are off to protect the internal parts and com...

Страница 69: ...lor wheel replacement cover Steady or Blinking Unplug the power cord from the wall outlet and contact your dealer Status of either or both of the indicators No image appears on the screen Press the BL...

Страница 70: ...images are distorted Adjust the projector and the screen so that they are perpendicular to each other See page 14 Projected images are dark Adjust BRIGHTNESS and CONTRAST in the IMAGE menu See page 4...

Страница 71: ...computer See page 75 Some images and texts appear obscured during the keystone adjustment In such cases use the projector without applying the keystone adjustment See page 14 When SUPER RESOLUTION is...

Страница 72: ...y from behind the projector Remove the terminal cover The buttons on the projector except for the POWER button don t function PASSWORD FUNCTION in the FEATURE menu has been set to MENU ACCESS to enabl...

Страница 73: ...ON Normal condition Blinking green When the lamp is illuminating it is in the warmup mode You cannot turn off the power When the lamp is off it is in the cooling mode You cannot turn on the power Stea...

Страница 74: ...35 C High altitude mode Floor installation ceiling installation Rated voltage AC 100 240 V 50 60 Hz Power consumption 9 3 A 910 W During standby AC 100 120 V 2 W when STANDBY MODE is STANDARD 0 2 W wh...

Страница 75: ...x 864 77 49 85 06 1024 x 768 WXGA60 1280 x 768 47 78 59 87 1024 x 615 WXGA60a 1280 x 800 49 70 59 81 1024 x 640 WXGA60b 1360 x 768 47 71 60 02 1024 x 579 WXGA60c 1366 x 768 47 71 59 79 1024 x 576 WXGA...

Страница 76: ...vices having 4 lines R G B CS or having 5 lines R G B H V Composite Sync 490 506 201 119 Without terminal cover With terminal cover Connectors SERIAL IN OUT D SUB 9 pin 1 5 6 9 Pin No Name I O 1 2 TXD...

Страница 77: ...12 30 2 6 3 8 60 152 48 122 36 91 63 1 6 88 2 2 18 46 3 9 5 12 80 203 64 163 48 122 86 2 2 118 3 0 24 61 4 11 6 16 100 254 80 203 60 152 108 2 7 148 3 8 30 76 6 14 8 20 150 381 120 305 90 229 164 4 2...

Страница 78: ...cm inch cm 60 152 48 122 36 91 229 5 8 437 11 1 18 46 3 9 5 12 80 203 64 163 48 122 302 7 7 581 14 8 24 61 4 11 6 16 100 254 80 203 60 152 376 9 5 724 18 4 30 76 6 14 8 20 150 381 120 305 90 229 560 1...

Страница 79: ...1 Zusho Baba Nagaokakyo City Kyoto Japan MITSUBISHIELECTRICCORPORATION U A...

Отзывы: