Mitsubishi Heavy Industries FDE Series Скачать руководство пользователя страница 13

12

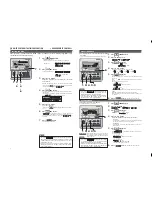
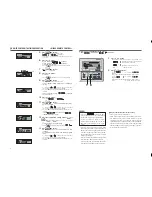
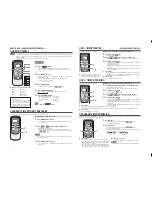
ON – TIMER OPERATION
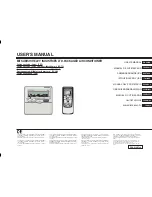
< WIRELESS REMOTE 

CONTROL >

1

Press ON timer button.

ON timer display 

 blinks.

2

Press

 or 

 button to adjust to AM 8:00.

Displayed time will be changed by 10 minutes by pressing the buttons.

3

Press ON timer button.

ON timer display 

 changes from blinking to steady lighting and 

the setting is completed.

(Press within 60 seconds)
TIMER/CHECK display lamp of the air conditioner is lit. (The receiving part of 
indoor unit)

At AM 8:00, TIMER/CHECK display lamp turns off and the air conditioner 

will start operating.

1 · 3

2

Operation is started at the setting time.

J

In case the ON timer is set while the air 
conditioner is in operation, it will be stopped 
and ready for restart at the setting time.

[EXAMPLE] If you would like to start the operation at AM 8:00

J

 Cancellation

  Whenever the CANCEL button is pressed, both ON and 

OFF timer display will be turned off and the PROGRAM 
timer mode will be cancelled. (Operation condition is kept as 
before the button is pressed.)

  Whenever the ON/OFF button is pressed, both ON and OFF 

timer display will be turned off and the PROGRAM timer 
mode will be cancelled. The air conditioner stops operating.

J

 Changing the set time

Press OFF TIMER button or ON timer button to set again.

NOTICE 

The same time cannot be set for OFF timer and ON timer.

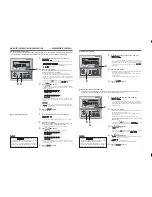
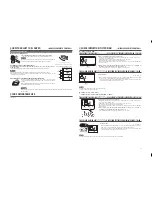
PROGRAM TIMER OPERATION

By setting both ON timer and OFF timer, the settings turn into PROGRAM timer mode. Operation and stopping can be performed at the
same time of each day by setting program timer once.

1

Set ON timer.

Press ON timer button and set the time with 

 or 

 button.

Press ON timer button again.

2

Set OFF timer.

Press OFF timer button and set the time with 

 or 

 button.

Press OFF timer button again.

Both ON TIMER and OFF TIMER are displayed. The direction of arrow mark 
changes depending on the status of operation.

(stop) (operating)

2

1

OFF – TIMER OPERATION

2 · 4

3

1

Operation is stopped at the setting time.

[EXAMPLE] If you would like to stop the operation at PM 9:00 

J

 Cancellation

  Press CANCEL button to turn off the TIMER display and timer is canceled.

  After TIMER setting, if ON/OFF button is pressed before the setting time, TIMER display turns off and the TIMER is canceled.

J

 Time  change

Press OFF TIMER button to set again.

J

 Cancellation 

Press CANCEL button to turn off the TIMER display and timer is canceled.

After TIMER setting, if ON/OFF button is pressed before the setting time, 
TIMER display turns off and the TIMER is canceled.

J

 Time  change

Press ON TIMER button to set again.
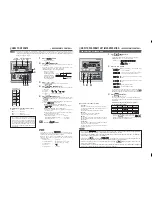
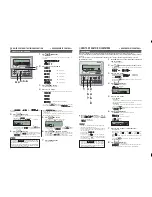
HOW TO OPERATE

Turn on the power supply of both indoor/outdoor units for six hours before starting the unit to protect the units. (The 
crankcase is conducted and the compressor is heated) Do not turn off the power supply. (The crankcase heater is conducted 
while the compressor is stopped, preventing failure of the compressor due to accumulation of liquid refrigerant by keeping the 
compressor warm.)

The operation of remote control must be performed slowly and steadily.

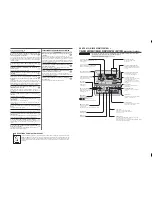
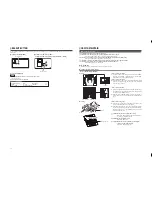
HOW TO USE < WIRELESS REMOTE CONTROL >

ATTENTION

4

1
5

3

2

AUTO
COOL
HEAT
DRY
FAN

J

 Guideline of room temperature setting

COOL ...............26 to 28°C

DRY ..................21 to 24°C

HEAT ................22 to 24°C

FAN ................... TEMP setting is 

unnecessary

Operation mode can be changed even 
when the unit stops. 

•  If you operate under the same condition 

(operation mode, set temperature, 
airflow, louver) just follow step 

1

, no 

other operations are necessary. The 
conditions which were set previously are 
indicated on the remote control

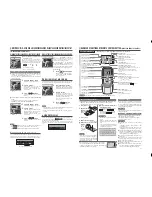
CURRENT TIME SETTING PROCEDURE

1

Press TIME SET UP switch.

Press it with the tip of ballpoint etc. The time display blinks and can be set 
to the current time.

2

Press

 or 

 button to adjust to AM 8:00.

Morning : AM After noon : PM
The displayed time changes by 1 minutes when pressing the button.

If

 or 

 button is pressed during the blinking, fast-forward or fast-

backward can be done.

NOTICE

In case the buttons are not pressed for 60 seconds, the displayed time is set as 
current time without step 

3

.

3

Press TIME SET UP switch.

The display changes from blinking to steady lighting and the setting is 
completed. 

1 · 3

2

The timer is set on the current time. Adjust the current time correctly at first of all.

 [EXAMPLE] AM (morning) 8:00 setting

OPERATION

1

Press

 button.

The operation display light (Green) turns on, and the operation starts.
The setting status is displayed on the liquid crystal area on the remote 
control.

2

Press MODE button.

Current operation mode is indicated with the 

„

 marks besides the 

operation mode icons.
The mode will change in the following order by pressing the button.

(AUTO)        (COOL)        (HEAT)     
             (FAN)         (DRY) 

3

Press TEMP  button.

Set the room temperature by pressing 

 or 

 button.

4

Press FAN SPEED button.

HI

MED

LO

FAN SPEED can be changed in order.

5

Press AIR FLOW button.

Effective AIR FLOW direction

 see page 13

AUTO mode operation ............. Intermediate
Cooling, humidifying ................ Horizontal
Heating .................................... Downwards

Stop

 Press

 button

Operation mode

1

Press ON/OFF button when the air conditioner stops.

The air conditioner starts to operate.
OFF timer can be set only in case the air conditioner is in operation.

2

Press OFF timer button.

OFF timer display 

 blinks.

3

Press

 or 

 button to adjust to PM 9:00.

Displayed time will be changed by 10 minutes by pressing the buttons.

4

Press OFF timer button.

OFF timer display 

 changes from blinking to steady lighting and 

the setting is completed. (Press within 60 seconds)
TIMER/CHECK display lamp of the air conditioner is lit. (The receiving part 
of indoor unit)

At PM 9:00, TIMER/CHECK display lamp turns off and the air 

conditioner

will stops operating.

Содержание FDE Series

Страница 1: ... 2006 95 EC CE markering is van toepassing op het gebied met een net stroom van 50 Hz Este acondicionador de aire cumple con la directiva EMC 89 336 EEC 91 263 EEC 92 31 EEC 93 68 EEC 2004 108 EC LV Directiva 2006 95 EC La indicación CE sólo corresponde al área de suministro eléctrico de 50 Hz Este aparelho de ar condicionado está em conformidade com a Directiva EMC 89 336 CEE 91 263 EEC 92 31 CEE...

Страница 2: ...t may lead to serious outcomes such as death and sericus injuries if the product is mishandled Note however that depending on the situation the items listed in the CAUTION sections do also have the potential of causing serious outcomes Both warnings and cautions provide you important information related to safety please make sure to observe them The symbols used throughout the main text of this ma...

Страница 3: ...ic shock and or fire Before repairing or checking indoor unit be sure to turn off Indoor unit power supply breaker It can result in electric shock or injury due to rotation of indoor unit fan if you perform check or repair with the Indoor unit power supply breaker turned on Place the panels removed for repairing or checking on the stable spot Otherwise dropping or falling may lead to injury CAUTIO...

Страница 4: ...is displayed when any button mentioned in the above is pressed but it is not a malfunction In that case the operation of the button is prohibited When you start to operate for the first time after turning the power supply on the unit starts to operate as below You can change the setting as you like Central control Turned off Operation changeover With auto mode auto cooling Without auto mode coolin...

Страница 5: ... mode ends and returns to the original display If you press button while timer mode is operative timer mode is canceled and the display will return to the original display If you do not press any button for several minutes after entering the timer mode the timer mode ends and returns to the original display ATTENTION After certain period has elapsed the unit stops operating Sleep timer The unit st...

Страница 6: ...Number 4 Four operations can be set with only ON timer or only OFF timer HOW TO PERFORM THE TIMER OPERATION WIRED REMOTE CONTROL 1 Press TIMER button 2 Press button for three times Æ Æ Æ 3 Press SET button EXAMPLE flashes lit 4 Press or button Set the preferred time to start the operation Set Hour If you press or button for a while Hour display is changed by one hour and stops when you stop pressi...

Страница 7: ...ng the timer mode the timer mode ends and returns to the original display NOTICE HOW TO PERFORM THE TIMER OPERATION WIRED REMOTE CONTROL 5 Press SET button mark next to a number is switched to light or is displayed The settings so far are effective and the display changes as shown on the left 6 Press or button Press button and is displayed Press button and is displayed Select either of the above t...

Страница 8: ...original display NOTICE JCanceling Holiday Setting HOW TO PERFORM THE TIMER OPERATION WIRED REMOTE CONTROL JWeekly timer Holiday Setting It is possible to disable the timer settings temporarily which has been already set by applying Holiday Set on a particular day of the week When the Holiday Setting is cancelled the timer setting is enabled again 1 In the Weekly timer mode select and set See Sele...

Страница 9: ...ent Mode Setting Select in step 2 press SET button and silent setting is canceled ending the silent mode is displayed SILENT MODE JSilent Mode Setting If you press button while silent mode is operative silent mode is canceled and the display will return to the original display Note that the setting which has not been completed is canceled HOW TO PERFORM THE TIMER OPERATION WIRED REMOTE CONTROL TIM...

Страница 10: ... the louver No to be set according to the left figure EXAMPLE Note For FDTC and FDE select Other louver No settings have no effect 5 Press SET button Determination of louver No The louver No to be set is confirmed and the display shows the upper limit of the movable range EXAMPLE If No 1 louver is selected current upper limit position 6 Press or button selection of upper limit position Select the ...

Страница 11: ...The cooling heating capacity will get reduced Moreover it leads to waste of electricity and larger operation noise It may cause failure Dew may form and drop during cooling Do not block the inlet and outlet grilles of the indoor and outdoor units Excessive load to the unit may cause failure Keep moderate room temperature Too much cooling or heating is not good for your health It will also waste th...

Страница 12: ...re FILTER display Indicates for two seconds when FILTER button is pressed OFF TIMER display Indicates when OFF TIMER is set See page 12 OPERATION MODE select button Every time this button is pressed displays switch as below AUTO COOL HEAT FAN DRY ROOM TEMP TIME SETTING button Sets room temperature by pressing or button Sets time when setting the time RESET switch Used to reset the microcomputer TI...

Страница 13: ...d the compressor is heated Do not turn off the power supply The crankcase heater is conducted while the compressor is stopped preventing failure of the compressor due to accumulation of liquid refrigerant by keeping the compressor warm The operation of remote control must be performed slowly and steadily HOW TO USE WIRELESS REMOTE CONTROL ATTENTION 4 1 5 3 2 AUTO COOL HEAT DRY FAN J Guideline of r...

Страница 14: ...dealer and inform them address No and error code symptom of the trouble air conditioner type and model name etc Press the ON OFF button to stay the air conditioner on the stop mode Light for 0 5 second wink out for 0 5 second Timer check indicator lamp WHEN LONG FLASHING LIGHT IS SHED FROM THE TIMER CHECK INDICATOR LAMP YELLOW Clean the filter See page 14 When cumulative running time reaches 120 h...

Страница 15: ...gn the hole on the filter with the hook on the grille E 2 places and push it securely until the filter is caught by the hook How to mount the grille 1 Hang the hook on the hole on the panel The hook on the grille can be hanged any hole on the panel 2 After the grille is hanged close the grille while the stopper on the grille 2 places is kept pressed to OPEN direction When the grille comes to the o...

Страница 16: ...gling may be heard when the operation is started when the compressor is activated deactivated during operation or when the operation is stopped These are the sounds of the refrigerant flowing through the system Sounds of rustling or gurgling may be heard from a stopped indoor unit These sounds can be heard when the air conditioning system is performing automatic control The supply air from the ind...

Страница 17: ... system installed in a well ventilated place Are there any obstacles If so it leads to the decrease of the efficiency and the increase of operation noise Avoid the place where cool warm air and operation noise cause problems to your neighbors INSTALLATION LOCATION Normally the efficiency of the air conditioning system will become lower after a while because dirt accumulates inside the system This ...

Страница 18: ...SUBISHI HEAVY INDUSTRIES EUROPE LTD AIR CONDITIONER DIVISION 3rd Floor Thavies Inn House 3 4 Holborn Circus London EC1N 2HA ENGLAND Phone 44 0 20 7842 8171 Fax 44 0 20 7842 8104 MITSUBISHI HEAVY INDUSTRIES AUSTRALIA PTY LTD 81 Railway Street Rockdale NSW 2216 Australia Phone 61 0 2 9597 7977 Fax 61 0 2 9597 7304 ...

Отзывы: