


11
[IN CASE OF FDT, FDTC, FDE, FDK, FDFW]
Press
LOUVER button once, and the current status of louver is displayed.
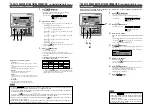
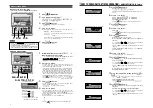
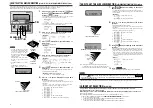
ADJUSTING WITH LOUVER BUTTON (Indoor unit with auto swing function)
HOW TO ADJUST THE LOUVER
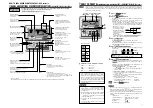
< WIRED REMOTE CONTROL (RC-E series) >
The display during
auto swing
The display with the
louver position fixed
When you operate the swing louver
1.
Press
LOUVER button, and change the display
to “
”.
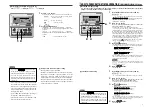
The function of the swing louver
during the heating preparation,
heating/defrost
“
” or “Heating/Defrost” is
displayed, the position of the swing louver is
automatically switched to horizontal.
When the operation is switched to normal after “The heating
preparation” or “Heating/Defrost” ends, the position of swing louver
returns to the last setting.
When the position of the swing louver is fixed
1.
Press
LOUVER button once while the louver
is swinging, and 4 stop positions are displayed every
one second in order.
“
”
ļ
“
”
ļ
“
”
ļ
“
”
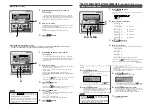
2.
Press
LOUVER button once when the display of
the louver comes to the position you desire.
The display is switched to stop, and the position of louver is fi xed.
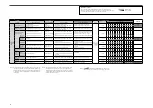
Recommended louver fixed position
COOL•DRY
HEAT
horizontal position
Press
Press
CAUTION
•
Do not move the swing louver forcibly by hands for fear that it may be damaged.
•
Do not blow downwards during cooling operation for a long time for fear that dew condensation may be formed at the side panel.
(In
case of FDE)
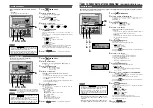
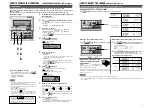
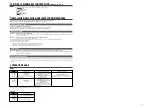
HOW TO OPERATE IN SILENT MODE
< WIRED REMOTE CONTROL (RC-E series) >
1
In the timer mode, set the current day of the week
and current time.
☞
See page 6 step
1
to
7
2
Press
SET button for three seconds or more.
The remote control goes into silent mode setting and the following
is displayed.
“
” or “
” (lights)
3
Press
Ÿ
or
ź
button.
If
ź
button is pressed, “
” is displayed.
If
Ÿ
button is pressed, “
” is displayed.
Select “
”.
If you press the
RESET button, the remote control return to
the original screen.
4
Press
SET button.
The following setting is displayed.
“
” (fl ashing)
“
” (lights)
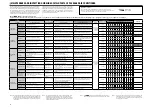
5
Press
Ÿ
or
ź
button.
Set the “ON TIME”.
• Set “Hour”
If you hold
Ÿ
or
ź
, the number in “Hour” display changes, and
if you release it, the number stops changing.
• Set “Minute”
If you press
Ÿ
or
ź
button, the number in the display becomes
larger or smaller by ten minutes.
If you press the
RESET button, the remote control return to
the “
” display.
6
Press
SET button.
The ON TIME is set and the following is displayed.
“
” (fl ashing)
“
” (lights for two seconds)
È
“
” (fl ashing)
“
” (lights)
7
Press
Ÿ
or
ź
button to set the duration.
Select OFF time.
When you press
Ÿ
button, and the duration is increased by two
hours as below, “
”
Æ
“
”
Æ
“
”
Æ
“
”
When you press
ź
button, and the duration is decreased by two
hours.
If you press
RESET button, the “ON TIME SET” display
returns.
8
Press
SET button.
The setting is fi xed and displayed.
“
” is displayed, and the silent mode setting ends.
The setting display turns off, and returns to original display.
3
•
5
•
7
2
•
4
•
6
•
8
1
When the silent mode is set, the unit operates more silently reducing noise from the outdoor unit.
The system applies the silent operation mode at the starting time to be set, and finish it after a certain period of
time has passed.
Once the system is set to operate with the silent mode, the setting is applied everyday until it is canceled.
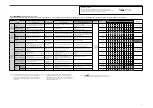
NOTICE
•
The remote control has main-sub units, silent setting
cannot be operated with sub unit .
•
After the silent mode is set, the following is displayed
for 3 seconds at the set time and the unit returns to
the original display.
At the ON time : “
”
At the OFF time : “
”
•
If you select “
”, you can continue the silent
mode until it is canceled. At the fi rst ON time, the
display shows “
” for three seconds and
returns to original display.
J
Canceling Silent Mode (Setting)
Select “
” in step
2
, press
SET button and silent setting is canceled
ending the silent mode.
“
” is displayed.
SILENT MODE
J
Silent Mode Setting
• If you press
button while timer
mode is under setting, timer mode is canceled
and the display will return to the original one.
Note that the setting which has not been
completed is canceled.
Содержание FD Series
Страница 2: ......


