


38
39
Usage - Main Menu settings - Operation setting
Usage - Main Menu settings - Operation setting
C
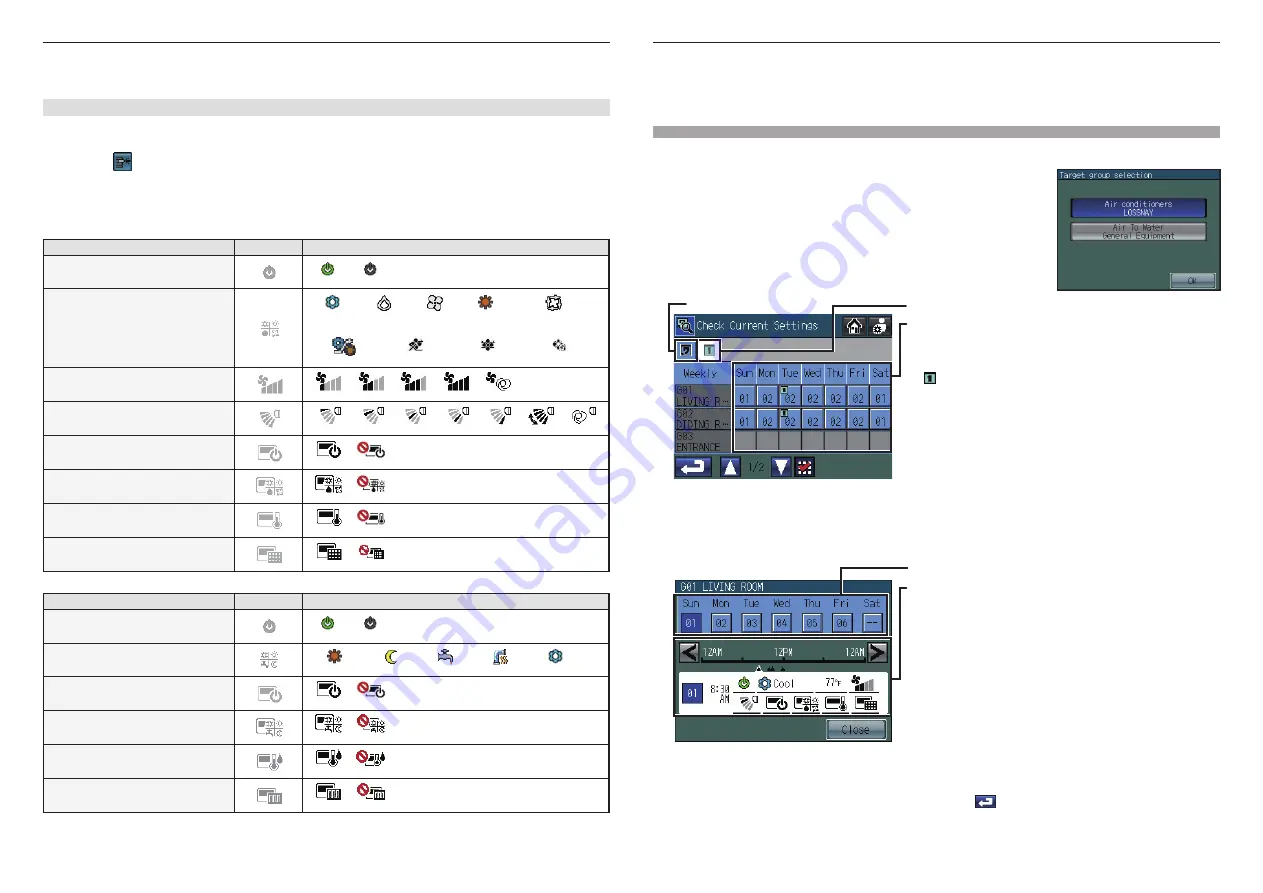
Checking the Weekly/One Day Schedule Settings
Main Menu > Operation Setting > Time and Schedule > Check Current Settings
1. Touch the
[Check Current Settings]
button on the
[Time and Schedule]
screen.
When the selected groups include two or more unit types (e.g. “air
conditioners and ventilators” or “general equipment and Air To Water
(PWFY)”), the
[Target group selection]
screen shown on the right
appears before the
[Check Current Setting]
screen appears. Select
the unit type to be operated, and touch the
[OK]
button.
(This screen does not appear when the selected groups do not
include multiple unit types.)
One Day tab
Weekly tab
Day (Date) grid Displays scheduled patterns
• Weekly screen
Displays the pattern numbers that are assigned to groups and
days.
( ) will appear on the top left corner of the cell to which One-
day schedule is assigned.
One-day pattern will override the Weekly pattern.
•
One Day screen
Displays the One-day schedule patterns that are assigned to
specific dates.
2.
Touch the Weekly or One Day tab.
3. Touch the row that corresponds to the group whose schedules you want to check.
Touch the pattern number under a specific day to check the day's schedule that appears under the
pattern numbers.
Operation pattern numbers
Schedules events for the selected pattern
•
Appears only if the selected pattern has been configured.
•
The functions not supported by the selected group will appear
underlined in red, and they will not be executed.
* Refer to P38 "Icon Definitions".
4. Touch the < > buttons to check the actions for each scheduled event.
Touch the
[Close]
button to return to the previous screen.
5. To change the schedule settings, touch the Return button
to return to the
[Time and Schedule]
screen, and access the
[Set Schedules]
screen.
Inserting an event
1. Touch a row to insert an event above it.
* A red checkmark will appear on the selected row.
2. Touch the
Insert button. A blank row will appear above the selected row.
* If the maximum number of events have been set, no more rows can be inserted.
Icon Definitions
(Air conditioning unit groups and LOSSNAY groups)
Functions
Deselected *
1
Setting Options
ON/OFF
On (green) Off (black)
Mode
Cooling
Drying
Fan
Heating
Auto
(Single/dual set point(s))
Setback
Bypass
Heat Recovery
Auto Damper
Fan Speed
Quiet
Low
Mid
High
Auto
Air Flow Direction
Setting 1
Setting 2
Setting 3
Setting 4
Setting 5
Swing
Auto
Local remote controller operation
prohibition (ON/OFF)
Permit
Prohibit
Local remote controller operation
prohibition (Mode)
Permit
Prohibit
Local remote controller operation
prohibition (Set Temperature)
Permit
Prohibit
Local remote controller operation
prohibition (Filter Sign Reset)
Permit
Prohibit
(General equipment groups and Air To Water (PWFY) groups)
Functions
Deselected *
1
Setting Options
ON/OFF
On (green) Off (black)
Mode
Heating
Heating ECO
Hot water
Anti-freeze
Cooling
Local remote controller operation
prohibition (ON/OFF)
Permit
Prohibit
Local remote controller operation
prohibition (Mode)
Permit
Prohibit
Local remote controller operation
prohibition (Set Temperature)
Permit
Prohibit
Local remote controller operation
prohibition (Check Water Sign Reset)
Permit
Prohibit
*1 The icons corresponding to the functions that are not scheduled will not be displayed except in the Edit Pattern popup
screen.


