Mitsubishi Electric DLP HC910 Скачать руководство пользователя страница 8

EN-8

ON

DVI

PC

COMP

CONTRAST

ASPECT

CNT

M1

AV MEMORY

BRIGHTNESS

BRT

M2

COLOR TEMP

C.T.

GAMMA

SHARPNESS

SHARP

IRIS

AUTO POSITION

A.P.

M3

VIDEO

S-VIDEO

POWER OFF

COMPUTER

DVI-D (HDCP)

COMPONENT

ENTER

MENU

1

2

3
4

5

6

7

8

9

18

19

17

16

15

14

13
12

11
10

1

2

3

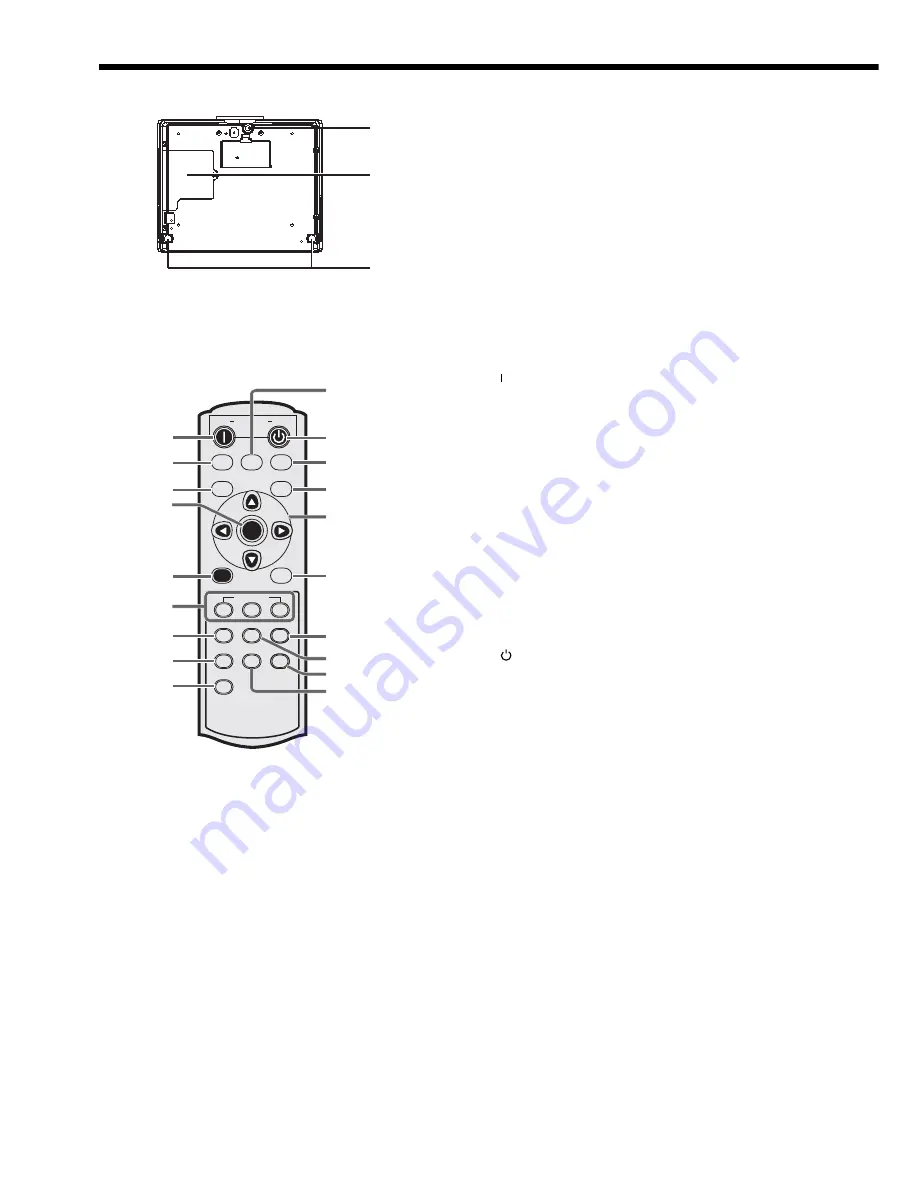
Preparating your projector (Continue)

Bottom side

1 Adjustment 

foot 

(Front)

2 Lamp 

cover

3 Adjustment 

feet 

(Rear)

Caution:

Do not replace the lamp immediately after using the 
projector because the lamp would be extremely hot 
and it may cause burns.

Remote control

1 ON 

(  ) button

2 DVI-D(HDCP) 

button

3 COMPUTER 

button

4 ENTER 

button

5 MENU 

button

6  AV MEMORY buttons
7 CONTRAST 

button*

8 GAMMA 

button*

9  AUTO POSITION button
10 SHARPNESS button*
11 IRIS button
12 BRIGHTNESS button*
13 COLOR TEMP button*
14 ASPECT button
15 Direction buttons
16 S-VIDEO button
17 VIDEO button
18 OFF ( ) button
19 COMPONENT button

* : See below for the picture quality adjusting buttons.  

Important:

When you press any button on the remote control, the buttons 
on the remote control are lit. Wait approx. 5 seconds after 
releasing the button to turn them off.

Using the picture quality adjusting buttons

When you press any of the picture quality adjusting buttons, the screen for adjusting the picture quality appears. Ad-
just the picture quality by pressing the 

 and 

 buttons. The picture quality adjustment can be made alternatively in 

the IMAGE menu. (See Page 22.) Items in the menus are shown in parentheses below. 

CONTRAST (CONTRAST)  ………… Adjust the contrast of the projected image.
GAMMA (GAMMA MODE)  ………… Selects one of the preset gamma mode.
SHARPNESS (SHARPNESS) ……… Adjust the sharpness of the projected image.
BRIGHTNESS (BRIGHTNESS)  …… Adjust the brightness of the projected image.
COLOR TEMP (COLOR TEMP.) …… Selects one of the preset color temperatures (HIGH BRIGHTNESS/9300K/6500K/

5900K/USER). Color adjustment of USER mode is also available. Select "USER" 
and press the ENTER button for color adjustment of USER mode. Use the 

 or 

 button to select an item and 

 or 

 button to adjust the selected item. (Refer 

to page 25.)

Содержание DLP HC910

Страница 1: ...HC910 DLP PROJECTOR MODEL HC910 User Manual ENGLISH This User Manual is important to you Please read it before using your projector ...

Страница 2: ... specified power supply cord If you use another power supply cord it may cause interference with radio and television reception Use the attached RS 232C cable and RGB cable with this equipment so as to keep interference within the limit of a FCC Class B device This apparatus must be grounded DO NOT LOOK DIRECTLY INTO THE LENS WHEN THE PROJECTOR IS IN THE POWER ON MODE CAUTION Not for use in a compu...

Страница 3: ... Troubleshooting 32 Indicators 35 Specifications 36 Trademark Registered trademark Macintosh is registered trademark of Apple Computer Inc DLP Digital Micromirror Device and DMD are all trademarks of Texas Instruments Other brand or product names are trademarks or registered trademarks of their respective holders Note This symbol mark is for EU countries only This symbol mark is according to the di...

Страница 4: ...ids Never push objects of any kind through openings of this projector as they may touch dangerous voltage points or short out parts that could result in a fire or electric shock Never spill liquid of any kind on the projector 14 Servicing Do not attempt to service this projector by yourself Refer all servicing to qualified service personnel 15 Damage requiring service Unplug this projector from the ...

Страница 5: ...ubjected to high temperature and high humidity Please maintain an operating temperature humidity and altitude as specified below Operating temperature between 41 F 5 C and 95 F 35 C Operating humidity between 30 and 90 Never put any heat producing device under the projector so that the projector does not overheat Do not attach the projector to a place that is unstable or subjected to vibration Do n...

Страница 6: ...nserted from the side first inserting the side is difficult because the coil spring end hits on the battery side If the battery is forced to insert in this way the outer label of the battery may get ripped and it may cause a short circuit and heating 3 Attach the rear lid Important Use two size AAA batteries R03 Replace the two batteries with new ones when the remote control is slow to operate CAUTI...

Страница 7: ...the screen for the keystone adjust ment or password entry is being displayed the COMPU TER VIDEO and AUTO POSITION buttons function as the and buttons respectively While the menu is on the screen the KEYSTONE button functions as the ENTER button S VIDEO IN COMPONENT VIDEO IN 1 2 3 4 5 8 7 6 6 9 VIDEO IN Terminal panel 1 Power jack 2 DVI D HDCP IN terminal DVI D 24 pin 3 COMPUTER IN COMPONENT VIDEO...

Страница 8: ... buttons Important When you press any button on the remote control the buttons on the remote control are lit Wait approx 5 seconds after releasing the button to turn them off Using the picture quality adjusting buttons When you press any of the picture quality adjusting buttons the screen for adjusting the picture quality appears Ad just the picture quality by pressing the and buttons The picture ...

Страница 9: ...mp near the remote control the remote control opera tion may become unstable Reception angle Vertical directions Vertical directions ceiling mount Front of projector Rear of projector Operate the remote control within a distance of 10 m from the projector pointing the light beam at the remote control photo sensor front or rear of the projector When operating the remote control keep the distance fr...

Страница 10: ...riate angle 2 Press the foot adjustment buttons next to the adjustment feet rear and the adjustment feet will come out 3 Release the buttons to lock the adjustment feet rear to that position 4 Rotate the adjustment feet rear for fine adjustment After using the projector 5 Put the adjustment feet rear back into the projector by pressing the foot adjustment buttons If necessary rotate the adjustment ...

Страница 11: ...cm inch cm inch cm inch cm inch cm inch m inch m inch cm 40 102 24 61 32 81 18 46 32 81 3 0 8 51 1 3 62 1 6 5 8 14 9 60 152 36 91 48 122 27 69 48 122 4 5 11 77 2 0 94 2 4 8 8 22 3 80 203 48 122 64 163 36 91 64 163 6 0 15 103 2 6 125 3 2 11 7 29 7 100 254 60 152 80 203 45 114 80 203 7 5 19 130 3 3 157 4 0 14 6 37 1 150 381 90 229 120 305 67 5 171 120 305 11 3 29 196 5 0 237 6 0 21 9 55 7 200 508 12...

Страница 12: ...video equipment Preparation Make sure that the power of the projector and that of the video equipment are turned off Basic home theater system connection VIDEO IN COMPONENT VIDEO IN CB PB Y CR PR S VIDEO IN Video player DVD player Set top box or digital tuner ...

Страница 13: ...he TV tuner or VCR with its channel skip function that is a function not to display channels that are not being received enabled Connecting to a DVD player To connect this projector to video equipment that has component video output terminals such as a DVD player use the COMPONENT terminals When the video equipment is equipped with the S video output terminal make the connection as follows 1 Conne...

Страница 14: ...fer depending on the type of the digital data transfer method they use Some DVD players are provided with a function to switch the methods to output DVI Digital signals When your DVD player is provided with such function set it as follows EXPAND or ENHANCED NORMAL See the users guide of your DVD player for details When your digital device does not have such function adjust the BRIGHTNESS to 16 and...

Страница 15: ...he LOW lamp mode in 1 minute 3 Select an input source Press the VIDEO button on the projector or the VIDEO S VIDEO or COMPONENT button on the remote control that is corresponding to the terminal in use The input source is switched between VIDEO S VIDEO and COMPONENT at every press of the VIDEO button on the projector Though it may take some time before an image is displayed on the screen depending...

Страница 16: ... images are distorted to a trapezoid With the control area of the projector 1 Press the KEYSTONE button on the control area of the projector 2 Equalize the widths at the top and bottom of the screen by pressing the or button viewing the screen With the INSTALLATION menu See Page 21 for menu setting 1 Display the INSTALLATION menu 2 Select KEYSTONE by pressing the or button 3 Equalize the widths at...

Страница 17: ...4 3 480i 576i 480p 576p 16 9 image 1080i 16 9 image 720p 4 3 Projects images with an aspect ratio of 4 3 when the input signal is 4 3 image EXPAND Projects images in the CinemaScope size or Vista size together with subtitles REAL Projects images in their original size as input Available only when the input signal is 480i or 576i Available only when the input signal is 480i or 576i Not available 16...

Страница 18: ...ction 1 Connect one end of a commercially available DVI cable to the DVI D IN terminal of the projector 2 Connect the other end of the DVI cable to the DVI terminal of the computer Additional devices such as a conversion connector and an analog RGB output adapter are required depending on the type of the computer to be connected When viewing images supplied from a digital connected computer press ...

Страница 19: ...DCP button on the remote control that is corresponding to the terminal in use The input source is switched between COMPUTER and DVI at every press of the COMPUTER button on the projector Though it may take some time before an image is displayed on the screen depending on the type of the input signal such symptom is not a malfunction Images may not be projected in the correct position depending on ...

Страница 20: ...Example of the setting procedure for external output Press the Fn key and any of the keys F1 to F12 at the same time The key to be pressed depends on the type of the computer you use Viewing computer images continued To stop projecting 8 Press the POWER button on the projector or the OFF button on the remote control A confirmation message is displayed To cancel the procedure leave the projector for...

Страница 21: ... button doesn t function unplug the power cord from the wall outlet Wait about 10 minutes plug the power cord in and try again After selecting the items marked with press the ENTER button OFF AUTO POWER ON OFF AUTO POWER OFF 30min AUTO POWER ON OFF AUTO POWER OFF IMAGE CONTRAST 30 BRIGHTNESS 30 WHITE ENHANCE AUTO 0 10 9300K 6500K 5900K USER COLOR TEMP COLOR 10 TINT 10 SHARPNESS 5 GAMMA MODE AUTO S...

Страница 22: ... when watching movies in dim lighting as in a theater THEATER2 Select to gain the halftone to make the skin color more vibrant even in a dark scene This mode is suitable for TV viewing For more enhanced color reproduction set WHITE ENHANCE to 0 The white portion of the color wheel will be disabled and you can reproduce true to life images 2 INSTALLATION menu ITEM SETTING FUNCTION KEYSTONE 20 Use t...

Страница 23: ...Use to adjust the vertical position of the projected image FINE SYNC Use to eliminate flickering or blur if appears viewing the projected image TRACKING Use to eliminate vertical wide stripes if appears viewing the projected image COMPUTER INPUT RGB Select this option when connecting the projector to high definition video equipment having R G and B output terminals YCBCR YPBPR Select this option whe...

Страница 24: ...ress the MENU button COLOR Use to adjust the color thickness of the projected image Every time the button is pressed the color becomes thicker Every time the button is pressed the color becomes lighter COLOR is unavailable when the computer or DVI D is selected as the input source TINT Use to adjust the tint of the projected image Every time the button is pressed the image appears more greenish Ev...

Страница 25: ... of contrast blue and red To rise the color temperature Increase the CONTRAST B blue and decrease the CONTRAST R red To reduce the color temperature Decrease the CONTRAST B blue and increase the CONTRAST R red AV MEMORY You can store up to 3 patterns of the image quality setting regardless the input source To store the settings 1 Press an AV MEMORY button M1 M2 or M3 on the remote control to store...

Страница 26: ... to adjust 3 Adjust the selected item by pressing the or button To cancel the menu 4 Press the MENU button Do not change the settings of the SIGNAL menu in normal use Simple method to adjust the image position To adjust the horizontal position 1 Align the left edge of the image with the left side of the screen by adjusting HORIZ POSITION Then align the right edge of the image with the right side o...

Страница 27: ...tton You can set the next digit 7 Repeat steps 5 and 6 to set a four digit password 8 Enter the password again for confirmation using the same steps 9 Select OK and press the ENTER button If the entered passwords don t match an error message will appear To cancel the procedure select CANCEL and press the ENTER button You can cancel the procedure by pressing the MENU button alternatively To cancel t...

Страница 28: ...R INVERT Ask your installation specialist to provide a breaker When you do not use the projector be sure to shut down the main power by the breaker When the projector is installed on the ceiling projected images may appear darker than those projected when the projector is installed on the floor This symptom is not a malfunction Do not install the projector where the exhaust vents are exposed to air...

Страница 29: ...s Cleaning the filter 1 Remove the screw a from the filter cover Be careful not to lose the screw 2 Move the filter cover in the direction of the arrow 3 Release three hooks and remove the filter cover from the projector If you use excess force to pull the filter cover the latches may be damaged 4 Remove the holder that is retaining the filter while pushing the tab of the holder in the direction of the...

Страница 30: ...GE will appear on the screen for one minute every 20 hours 1 thereafter When the lamp operation time exceeds 3000 hours 1 2 the projector automatically shuts off and can t be used until the lamp is replaced and the lamp operation time is reset 1 Duration when LAMP MODE of the INSTALLATION menu is set to LOW When it is set to STANDARD this duration will be shorted 2 Duration when LAMP MODE is set t...

Страница 31: ...mp operation time is reset successfully The projector doesn t turn on if the lamp cover isn t attached securely Be sure to reset the lamp operation time whenever you replace the lamp Do not reset the lamp operation time unless you replace the lamp This projector uses a lamp that contains mercury Disposal of the lamp or the projector with the lamp may be regulated due to environmental consideration...

Страница 32: ... turned on No image appears on the screen Projected images suddenly disappear Solution Check whether the indicators are on or off and how they are lightning Check that the lens cap is removed It may take about one minute for the lamp to light up The lamp fails to light up on rare occasions In such a case wait for a few minutes and then try again If the projector was turned off before the lamp was ...

Страница 33: ...creen surface and is not a malfunction Replace the screen or displace the focus a little Connect the plugs of the cables to external devices securely Keep the projector away from devices that emit interfering radio waves When the keystone adjustment is carried out the image may not be displayed correctly depending on the type of input signal This isn t a product malfunction In this case readjust t...

Страница 34: ... malfunction Check that the batteries are loaded in the remote control or the batteries are not weak See page 6 Check that the remote control sensor isn t exposed to direct sunlight or fluorescent light See page 9 Use the remote control within its operation range See page 9 Use the remote control at least 10 cm away from the projector The password function is working Cancel the password lock See pa...

Страница 35: ...rilles Relocate the projector to a cooler place Wait until the STATUS indicator goes out then press the POWER button If the above solution is not effective replace the lamp Replace the lamp Change with a new lamp if this problem recurs Close the cover correctly Contact your dealer 1 Duration when LAMP MODE of the INSTALLATION menu is set to LOW When it is set to STANDARD this duration will be shor...

Страница 36: ...m resolution 1280 x 1024 dots Analog compressed Panel resolution 1024 x 576 dots NTSC PAL SECAM NTSC 4 43 PAL M PAL N PAL 60 480i 480p 576i 576p 720p 1080i Panel resolution 1024 x 576 dots Signal type Terminal type Line Analog RGB D SUB 15P 1 Digital RGB DVI 1 Signal type Terminal type Line Video input RCA 1 S Video input S 1 Component video input RCA 1 RS 232C 8 pin 41 F 5 C to 95 F 35 C AC100 24...

Страница 37: ... Resolution Horizontal Vertical Normal mode Real mode H x V frequency kHz frequency Hz H x V 1 H x V 1 When ASPECT in the FEATURE menu is set to AUTO 2 Available for the signal for DVI D terminal Important Some computers aren t compatible with the projector The projector s maximum resolution is 1024 x 576 pixels It may not display images of higher resolutions than 1024 x 576 correctly If the resol...

Страница 38: ...a CHINA Mitsubishi Electric Air Conditioning Visual Information Systems Shanghai Ltd 26 F Oriental Center 699 Nanjing Rd W Shanghai 200041 China Sales Inquiries Phone 86 21 5211 0882 3010 Fax 86 21 5211 0576 Technical Inquiries Phone 86 21 5211 0882 3018 Fax 86 21 5211 0576 HONG KONG Mitsubishi Electric Ryoden Air Conditioning Visual Information Systems HongKong Ltd 7th Floor Manulife Tower 169 El...

Отзывы: