background image

EN-0

Viewing video images (continued)

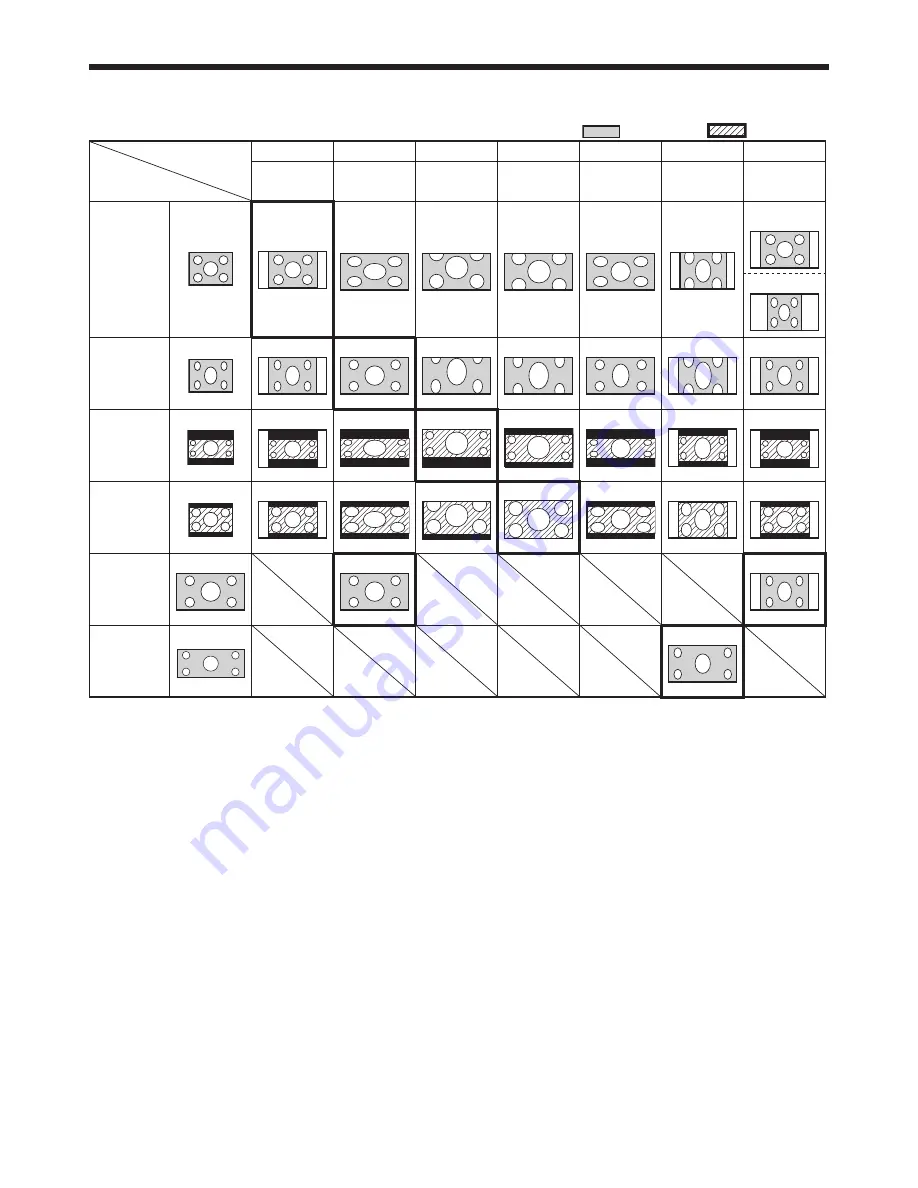
Setting the aspect ratio

You can change the aspect ratio of the input video signal (or the ratio of width to height of the image). Change the 
setting according to the type of the input video signal.

 : Signal size  

 : Image area

Setting

Original image size

4:

16:9

ZOOM1

ZOOM

STRETCH

ANAMORPHIC1 ANAMORPHIC

Aspect ratio 

changes depending 

on the input signal.

Squeezed image is 
expanded to 16:9. 

CinemaScope image 

is enlarged and 

displayed together 

with subtitles.

Vista image is 

enlarged and 

displayed together 

with subtitles.

Image is enlarged to 

16:9 while the center 

aspect ratio remains 

unchanged. 

This mode is suitable 

for viewing .5:1-

size images using the 

anamorphic lens.

This mode is suitable for 

viewing 16:9- or 4:-size 

images or images input 

from personal computers 

using the anamorphic lens.

4: image 

(480i, 576i, 

480p, 576p, 

and PC)

480i, 576i, 

480p, 576p

PC signal

Squeezed 4:

(480i, 576i, 

480p, 576p)

4: 

CinemaScope

(480i, 576i, 

480p, 576p)

Sub Title

Sub Title

Sub Title

Sub Title

Sub Title

Sub Title

Sub Title

Sub Title

4: Vista 

image

(480i, 576i, 

480p, 576p)

16:9 image

(70p, 1080i, 

1080p)

.5:1 image

Bold frames are recommended modes.
When ASPECT is set to AUTO, an optimum aspect ratio is automatically selected depending on the input signal.
When ASPECT is set to ZOOM1, ZOOM or ANAMORPHIC1, display position can be changed with 

p

 or 

q

 button 

on the remote control.
OVER SCAN in the SIGNAL menu is not available in the STRETCH mode.
Display pattern changes according to the setting of SCREEN SIZE in the IMAGE menu. The table above is in the 
case of “16:9.”
This projector is equipped with a function to change the aspect ratio. If you select an aspect ratio that is inconsistent 
with that of the input signal, images around the screen edges may be hidden or deformed. When viewing original 
video works reflecting the authors’ intentions, you are recommended to keep their aspect ratios unchanged.
It may be an infringement of the rights protected by the copyright law to project images compressed or enlarged 
by changing the aspect ratio in public areas, such as inside and outside shops and hotels, for commercial or public 
viewing purposes.
When SCREEN SIZE of ADVANCED MENU is set to CINEMA SCOPE(.5:1) in the IMAGE menu, STRETCH, 
ANAMORPHIC1 and ANAMORPHIC cannot be selected for ASPECT.


Содержание DLP HC3200

Страница 1: ...DLPTM PROJECTOR This User Manual is important to you Please read it before using your projector MODEL HC3200 User Manual HC3200 ...

Страница 2: ... AND SHALL BE EASILY ACCESSIBLE WARNING Use the attached specified power supply cord If you use another power supply cord it may cause interference with radio and television reception Use the attached RGB cable with this equipment so as to keep interference within the limits of an FCC Class B device This apparatus must be grounded DO NOT LOOK DIRECTLY INTO THE LENS WHEN THE PROJECTOR IS IN THE POW...

Страница 3: ...marks of their respective holders Your MITSUBISHI ELECTRIC product is designed and manufactured with high quality materials and components which can be recycled and or reused This symbol means that electrical and electronic equipment batteries and accumulators at their end of life should be disposed of separately from your household waste If a chemical symbol is printed beneath the symbol shown ab...

Страница 4: ...pe of power please consult your appliance dealer or local power company Power cord protection Power supply cords should be routed so that they are not likely to be walked on or pinched by items placed upon or against them Pay particular attention to cords at plugs convenience receptacles and points where they exit from the appliance Do not put the power cord under a carpet Overloading Do not overl...

Страница 5: ...the projector with condensation on it It can lead to breakdown or other failure Place of installation For safety s sake refrain from setting the projector at any place subjected to high temperature and high humidity Please maintain an operating temperature humidity and altitude as specified below Operating temperature between 41 F 5 C and 95 F 35 C Operating humidity between 30 and 90 Never put an...

Страница 6: ...ck lid Important Use two size AA batteries R6 Replace the two batteries with new ones when the remote control is slow to respond Removing the batteries from the remote control Remove the back lid of the remote control and take out the batteries Caution Use of a battery of wrong type may cause explosion Only Carbon Zinc or Alkaline Manganese Dioxide type batteries should be used Dispose of used bat...

Страница 7: ...While the menu or the screen for the keystone adjustment or password entry is being displayed the HDMI COMPUTER VIDEO and AUTO POSITION buttons function as the t u and p buttons respectively Terminal panel VIDEO IN and S VIDEO IN terminals COMPONENT VIDEO IN terminals COMPUTER IN COMPONENT VIDEO IN terminal Mini D SUB 15 pin HDMI IN terminal HDMI 19 pin SERIAL terminal Mini DIN 8 pin Used for proj...

Страница 8: ...ing buttons the screen for adjusting the picture quality appears Adjust the picture quality by pressing the t and u buttons The picture quality adjustment can be made alternatively in the IMAGE menu See page 26 Items in the menus are shown in parentheses below CONTRAST CONTRAST Adjusts the contrast of the projected image BRIGHTNESS BRIGHTNESS Adjusts the brightness of the projected image COLOR TEM...

Страница 9: ...ng the remote control keep the distance from the remote control to the projector via the screen within about 5 m 15 feet The operable range of the remote control however depends on the characteristics of the screen Reception angle Vertical directions 20 10 20 10 Vertical directions ceiling mount 20 20 30 30 Operate the remote control within a distance of 10 m 30 feet from the projector pointing th...

Страница 10: ...U of the IMAGE menu To display the menu on the screen adjust SHUTTER U in the SIGNAL USER menu to position the menu Screen size and projection distance Refer to the following tables to determine the screen size and projection distance The figures in the tables are approximate and may be slightly different from the actual measurements SW Hd SH Center of the lens Width of the projected image Project...

Страница 11: ...6 244 54 137 96 244 9 0 23 133 3 4 199 5 0 18 2 46 150 381 90 229 120 305 68 171 120 305 11 3 29 166 4 2 249 6 3 22 7 58 200 508 120 305 160 406 90 229 160 406 15 0 38 223 5 7 332 8 4 30 3 77 250 635 150 381 200 508 113 286 200 508 18 8 48 279 7 1 416 10 6 37 8 96 300 762 180 457 240 610 135 343 240 610 22 5 57 335 8 5 45 4 115 Projection distance changes according to the setting of SCREEN SIZE in...

Страница 12: ...en To cancel the menu Press the MENU button several times When the keystone adjustment is carried out the adjustment value is indicated Note that this value doesn t mean a projection angle The allowable range of the adjustment value in the keystone adjustment varies depending on the installation condition Input signal and aspect settings in MENU When the keystone adjustment takes effect the resolu...

Страница 13: ...et grille and the air outlet grilles that emit hot air from being blocked Do not use the projector in the following locations and manners which may cause fire or electric shock In a dusty or humid place In a sideways position or with the lens facing down Near a heater In an oily smoky or damp place such as a kitchen In direct sunlight Where the temperature rises high such as in a closed car Where ...

Страница 14: ...ose to each other the projected image may be affected by their interference See the owner s guide of each device for details about its connections Preparation Make sure that the power of the projector and that of the video equipment are turned off Basic home theater system connection DVD player Video player Set top box or digital tuner ...

Страница 15: ... that is a function not to display channels that are not being received enabled Connecting to a DVD player or HDTV decoder To connect this projector to video equipment that has component video output terminals such as a DVD player use the COMPONENT VIDEO IN terminals PB CB Y PR CR PB CB PR CR Y Component cable option DVD player or HDTV decoder The terminal s names Y PB and PR are given as examples...

Страница 16: ...erminal Use a commercially available HDMI with HDMI logo cable Some cables may not be connected correctly depending on the size and shape of their connectors To connect to the video device using a splitter make sure to use the splitter compliant with the HDMI 1 3 Deep Color Standard If you use the splitter not compliant with the HDMI 1 3 standard this projector may not display any image or not ope...

Страница 17: ...e U S is provided with this projector never connect this cord to any outlet or power supply using other voltages or frequencies than rated If you want to use a power supply using other voltage than rated prepare an appropriate power cord separately Use 100 240 V AC 50 60 Hz to prevent fire or electric shock Do not place any objects on the power cord or do not place the projector near heat sources ...

Страница 18: ...TUS indicator indicates that the lamp should be replaced soon Replace the lamp when the STATUS indicator blinks red See page 44 Adjust the focus by turning the focus ring Select an input source Press the VIDEO or HDMI COMPUTER button on the projector or the VIDEO S VIDEO COMPONENT or HDMI button on the remote control that is corresponding to the terminal in use The input source is switched between...

Страница 19: ...xhaust fan rotate to cool the lamp The lamp can t be lit again for 1 minute after turning off the projector for safety purpose It will take another 1 minute for the STATUS indicator to go out If you want to turn on the projector again wait until the indicator goes out and then press the POWER button The air outlet fans rotate faster as the temperature around the projector rises Do not unplug the p...

Страница 20: ...3 Vista image 480i 576i 480p 576p 16 9 image 720p 1080i 1080p 2 35 1 image Bold frames are recommended modes When ASPECT is set to AUTO an optimum aspect ratio is automatically selected depending on the input signal When ASPECT is set to ZOOM1 ZOOM2 or ANAMORPHIC1 display position can be changed with p or q button on the remote control OVER SCAN in the SIGNAL menu is not available in the STRETCH m...

Страница 21: ...t ratio by pressing the t or u button To cancel the menu Press the MENU button Important When a 4 3 or 2 35 1 CinemaScope image is kept displayed for a long time before displaying 16 9 image the afterimages of the black bars may appear on the 16 9 image screen See page 41 1 1 4 FEATURE AUTO AUTO AUTO opt MENU POSITION CINEMA MODE VIDEO SIGNAL ASPECT RESET ALL English LANGUAGE A Ë OFF AUTO OK DISPL...

Страница 22: ...quired depending on the type of the computer to be connected Use of a long cable may decrease the quality of projected images Also read the instruction manual of the equipment to be connected Images may not be projected correctly depending on the type of the computer connected Contact your dealer for details of connection About DDC The COMPUTER IN COMPONENT VIDEO IN terminal of this projector comp...

Страница 23: ...d no commands are accepted By blinking red the STATUS indicator indicates that the lamp should be replaced soon Replace the lamp when the STATUS indicator blinks red See page 44 Adjust the focus by turning the focus ring Select an input source Press the HDMI COMPUTER button on the projector or the COMPUTER button on the remote control to select COMPUTER The input source is switched between COMPUTE...

Страница 24: ...s with the power off To light the lamp again press the POWER button If the lamp doesn t light up immediately repeat pressing the POWER button two or three times If it should still fail to light up replace the lamp Cover the lens with the lens cap to protect it from dust AUTO POSITION button When the image supplied from the computer is displaced carry out the following procedure Display a bright im...

Страница 25: ...COLOR MANAGEMENT BEGIN LOCK UNLOCK END CLAMP POSITION CLAMP WIDTH VERT SYNC LPF SHUTTER U SHUTTER L SHUTTER LS SHUTTER RS BRIGHTNESS B BRIGHTNESS G BRIGHTNESS R CONTRAST B CONTRAST G CONTRAST R REFERENCE TINT SHARPNESS 1 ADVANCED MENU AV MEMORY SAVE KEYSTONE LAMP MODE AUTO POWER ON AUTO POWER OFF SPLASH SCREEN BACK COLOR IMAGE REVERSE TRIGGER OUT TEST PATTERN ASPECT PASSWORD FUNCTION MENU POSITION...

Страница 26: ...automatically selected depending on the input signal Default is AUTO SPORTS This is a bright mode suitable for watching sports images VIDEO This is a standard mode suitable for watching video images etc CINEMA This is a mode for watching movies in dim lighting as in a theater USER1 USER2 Select to adjust the gamma curve See page 33 CONTRAST 30 Use to adjust the contrast of the projected image See ...

Страница 27: ... appears when no signal is supplied IMAGE REVERSE OFF Select when viewing images from the front with the projector installed on the floor MIRROR Select when viewing images projected from the behind of the screen with the projector installed on the floor INVERT Select when viewing images projected from the behind of the screen with the projector installed on the ceiling MIRROR INVERT Select when vi...

Страница 28: ...markable select FILM when a film source signal is input or select VIDEO for other signals VIDEO The film mode will not be activated FILM Fixed to the film mode VIDEO SIGNAL 8 options When AUTO is selected the appropriate video format is automatically selected depending on the input signal If the image isn t displayed correctly select the desired video format manually SETUP AUTO Select AUTO for nor...

Страница 29: ...d image when playing LD and DVD discs HOLD OFF ON Use to adjust the image when flagging occurs near the top of the screen Though horizontal strips may appear on the enlarged projected image such symptom is not a malfunction When you change the horizontal or vertical position to a large extent noise may appear The adjustable range of the vertical position varies depending on the type of the input s...

Страница 30: ...L FREQUENCY Indicates the vertical frequency of the currently projected video signal HORIZONTAL FREQUENCY Indicates the horizontal frequency of the currently projected video signal SYNC TYPE Indicates the type of the sync signal for the currently projected video signal AV memory You can store up to 3 patterns of the image quality setting for each input source To store the settings Set the items of...

Страница 31: ...very time the u button is pressed the color intensity increases Every time the t button is pressed the color intensity decreases TINT Use to adjust the tint of the projected image Every time the u button is pressed the image appears more greenish Every time the t button is pressed the image appears more reddish To sharpen or soften the projected image SHARPNESS You can adjust the sharpness of the ...

Страница 32: ...ect the desired item Press the t or u button to adjust the selected item Repeat steps 6 and 7 for optimum adjustment results To cancel the menu Press the MENU button To enable the stored color temperature Select USER by pressing the COLOR TEMP button on the remote control About color temperature There are different kinds of white color Color temperature is a way to show the differences in white Wh...

Страница 33: ...he original ratio of change in brightness To customize the gamma mode To customize and store the gamma mode to your preference carry out the following procedure See page 26 for menu setting Select GAMMA MODE in the IMAGE menu Press the t or u button to select USER1 or USER2 Press the ENTER button Press the p or q button to select REFERENCE Press the t or u button to select basic gamma curve Genera...

Страница 34: ... ON press the ENTER button and adjust BEGIN or END to minimize the flagging A solid black or solid white appears in the image Adjust CLAMP POSITION or CLAMP WIDTH in the SIGNAL USER menu The motion doesn t run smoothly Adjust VERT SYNC in the SIGNAL USER menu Select AUTO for normal use Noise appears on the right or left half of the image Adjust SHUTTER LS or SHUTTER RS in the SIGNAL USER menu Nois...

Страница 35: ...CONFIRM 1 3 2 4 O K ENTER CANCEL MENU Enter a 4 8 digit password using the or buttons on the remote control as shown below 1 2 3 4 Press the ENTER button To cancel the procedure press the MENU button Enter the password again for confirmation using the same steps Press the ENTER button If the entered passwords don t match an error message will appear To cancel the procedure press the MENU button 1 ...

Страница 36: ...out 4750 hours 1 the replacement message LAMP EXCHANGE will appear on the screen for one minute every 25 hours 1 thereafter When the lamp operation time exceeds 5000 hours 1 2 the projector automatically shuts off and can t be used until the lamp is replaced and the lamp operation time is reset 1 Duration when LAMP MODE of the INSTALLATION menu is set to LOW When it is set to STANDARD this duratio...

Страница 37: ...rews firmly Secure the lamp cover with screw b back again and mount the cover a Caution Make sure that the lamp cover is secured firmly Otherwise the POWER indicator flashes red and green disallowing the projector to be powered on 1 4 5 B When the projector is mounted to the ceiling When removing the lamp unit from the projector mounted to the ceiling never fail to use the Lamp Replacement Attachm...

Страница 38: ...is secured firmly Otherwise the POWER indicator flashes red and green disallowing the projector to be powered on 4 5 6 7 8 Reset of the lamp operation time Plug in the power cord and reset the lamp operation time by keep pressing the t u and POWER buttons on the control panel at the same time Important Unless these 3 buttons are held down at the same time the lamp operation time isn t reset Make s...

Страница 39: ...ector and the ventilation grilles When the grilles become dirty wipe them with a soft cloth dampened with diluted mild detergent and then wipe them with a dry cloth To protect the surface of the projector from fading or deteriorating Do not spray insecticide on or inside the projector Do not use benzine or thinner to clean it Do not let rubber or plastic materials contact with projector Cleaning o...

Страница 40: ...he lens cap is removed It may take about one minute for the lamp to light up The lamp fails to light up on rare occasions In such a case wait for a few minutes and then try again If the projector was turned off before the lamp was cooled down sufficiently last time the fan may start rotating and the POWER button may not work after the power cord is plugged After the fan stops rotating press the PO...

Страница 41: ...ed Adjust the focus See pages 18 and 23 Clean the lens Press the t or u button on the remote control to eliminate flicker Adjust TRACKING and FINE SYNC in the SIGNAL menu See page 34 Adjust BRIGHTNESS and CONTRAST in the IMAGE menu See page 31 Adjust the projector and the screen so that they are perpendicular to each other See page 10 White dots are seen on projected images Black dots are seen on ...

Страница 42: ...is is not a product malfunction Others Problem Solution The exhaust vents emit warm air This air comes out after cooling the inside of the projector You may feel hot but this is not a malfunction The menu can t be used The microcomputers inside the projector may be wrongly operating because of noise Press the POWER button to turn off the lamp and wait about 90 seconds Then unplug the power cord fr...

Страница 43: ...rs after the lamp is replaced check the following first Problem Solution The projector does not turn on Fit the lamp cover securely See pages 36 and 37 Reset the lamp operating time See page 38 The STATUS indicator blinks Reset the lamp operating time See page 38 ...

Страница 44: ...green The protection circuit is working or the lamp is in an abnormal condition Wait until the STATUS indicator goes out then press the POWER button If the above solution is not effective replace the lamp Steady green Blinking green red Lamp operation time warning Total lamp operation time reached 3750 hours 1 while the power was on Replace the lamp Change with a new lamp if this problem recurs St...

Страница 45: ...put Signal type Terminal type Line HDMI HDMI 1 Video input RCA 1 S video input S 1 Component video input RCA x3 YCBCR YPBPR 1 Control terminal others SERIAL RS 232C Mini DIN 8 pin TRIGGER DC 12 V max 200 mA stereo mini jack Operating temperatures 41 F 5 C to 95 F 35 C Rated voltage AC100 240 V 50 60 Hz Power consumption 3 3 A Dimensions 345 mm W x 129 mm H x 270 mm D Not including protrusion Weigh...

Страница 46: ...7 88 60 32 1440 x 1080 2 SVGA72 800 x 600 48 08 72 19 1440 x 1080 SVGA75 800 x 600 46 88 75 00 1440 x 1080 SVGA85 800 x 600 53 67 85 06 1440 x 1080 XGA60 1024 x 768 48 36 60 00 1440 x 1080 2 XGA70 1024 x 768 56 48 70 07 1440 x 1080 XGA75 1024 x 768 60 02 75 03 1440 x 1080 XGA85 1024 x 768 68 68 85 00 1440 x 1080 MAC13 640 x 480 35 00 66 67 1440 x 1080 MAC16 832 x 624 49 72 74 55 1440 x 1080 MAC19 ...

Страница 47: ...V 10 GND 11 GND 12 DDC Data 13 HD CS 14 VD 15 DDC Clock HDMI IN HDMI 19 pin 19 1 18 PIN No Spec PIN No Spec 1 TMDS Data2 11 TMDS Clock Shield 2 TMDS Data2 Shield 12 TMDS Clock 3 TMDS Data2 13 CEC 4 TMDS Data1 14 5 TMDS Data1 Shield 15 SCL 6 TMDS Data1 16 SDA 7 TMDS Data0 17 DDC Ground 8 TMDS Data0 Shield 18 5 V Power 9 TMDS Data0 19 Hot Plug Detect 10 TMDS Clock Replacement part option not include...

Страница 48: ...al Information Systems Shanghai Ltd 12 F Hong Kong New World Tower 300 Huaihai Middle Road Shanghai 200021 China Sales Inquiries Phone 86 21 6335 3030 Ext 3007 Fax 86 21 6335 3600 Technical Inquiries Phone 86 21 6335 3030 Ext 3021 Fax 86 21 6335 3600 HONG KONG Mitsubishi Electric Ryoden Air Conditioning Visual Information Systems HongKong Ltd 7th Floor Manulife Tower 169 Electric Road North Point ...

Отзывы: