English-19
English
RG
B2
IN
(D
VI
-D
)
RG
B
1
IN
(HDMI)
AU
D
IO I
N
1 (m
in
i)
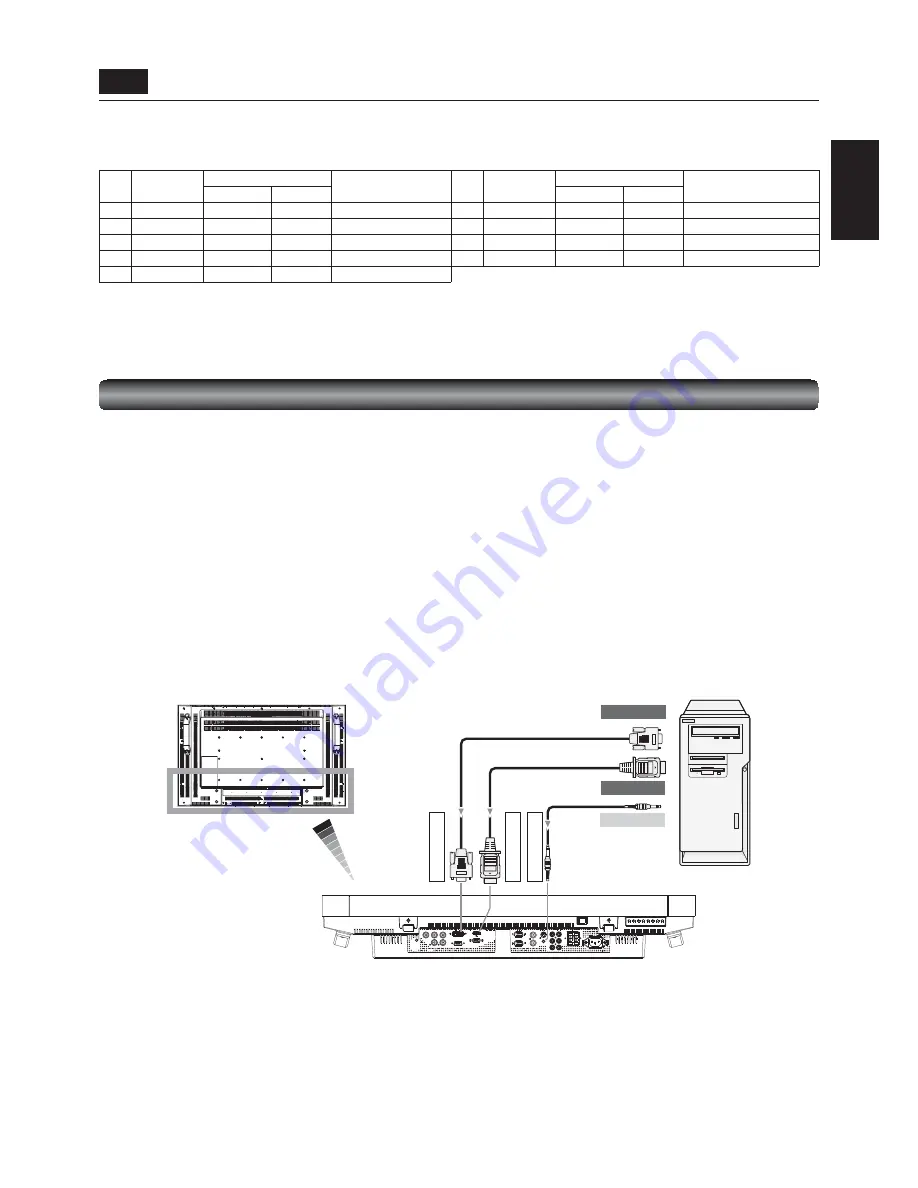
DVI-D cable
HDMI cable
To DVI-D output
To HDMI output
To Audio output
Audio cable
(ø3.5 mm stereo mini)
Computer
(DVI-D, HDMI)
LCD monitor
Connecting with a computer (digital connection)
Digital connection:
• Connection via the RGB1 IN connector (HDMI)
(1) Connect an HDMI cable (commercially available) to the RGB1 IN connector.
(2) Select [RGB1] using the INPUT button on the monitor or the HDMI button on the wireless remote control.
• Connection via the RGB2 IN connector (DVI-D)
(1) Connect a DVI-D cable (commercially available) to the RGB2 IN connector.
(2) Select [RGB2] using the INPUT button on the monitor or the DVI-D button on the wireless remote control.
Audio connection:
•
Connect an audio cable (ø3.5 mm stereo mini) (commercially available) to the AUDIO IN1 connector.
Select [AUDIO1] using the AUDIO INPUT buttons on the wireless remote control.
When an HDMI cable is connected, select HDMI audio.
(You can select HDMI only when the video input is [RGB1].)
LCD monitor (rear)
P-4
Connection procedure (continued)
The monitor automatically distinguishes the timings shown in the table below and sets the screen information. When a PC or other
device is connected, it automatically displays images properly.
<Factory preset timing>
Resolution
Frequency
Remarks
Resolution
Frequency
Remarks
Horizontal
Vertical
Horizontal
Vertical
1
640 x 480
31.5 kHz
60 Hz
6
1280 x 1024
64.0 kHz
60 Hz
2
800 x 600
37.9 kHz
60 Hz
7
1600 x 1200
75.0 kHz
60 Hz
3
1024 x 768
48.4 kHz
60 Hz
8
1920 x 1080
67.5 kHz
60 Hz
4
1280 x 768
47.8 kHz
60 Hz
9
1920 x 1200
74.0 kHz
60 Hz
CVT Reduced Blanking
5
1360 x 768
47.7 kHz
60 Hz
Recommend timing
NOTE:
When a signal other than 1
x
is input, characters may be blurred and fi gures and objects may be distorted.
Images may not be displayed correctly depending on the video card or driver being used.
Содержание BH030
Страница 1: ...31 5 LCD Display Monitor MODEL ...


