


36
2.
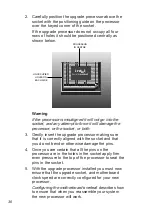
Carefully position the upgrade processor above the
socket with the positioning guide on the processor
over the keyed corner of the socket.
If the upgrade processor does not occupy all four
rows of holes it should be positioned centrally as
shown below.
PROCESSOR
IN CENTRE
UNOCCUPIED
HOLES ON
EACH SIDE
int l
e
OVERDR
I
V
E
Warning
If the processor is misaligned it will not go into the
socket, and any attempt to force it will damage the
processor, or the socket, or both.
3.
Gently insert the upgrade processor making sure
that it is correctly aligned with the socket and that
you do not bend or otherwise damage the pins.
4.
Once you are certain that all the pins on the
processor are in the holes in the socket apply firm
even pressure to the top of the processor to seat the
pins in the socket.
5.
With the upgrade processor installed you must now
ensure that the upgrade socket, and motherboard
clock speed are correctly configured for your new
processor.
Configuring the motherboard overleaf describes how
to ensure that when you reassemble your system
the new processor will work.


