background image

Chapter 21    Backup/Restore

124

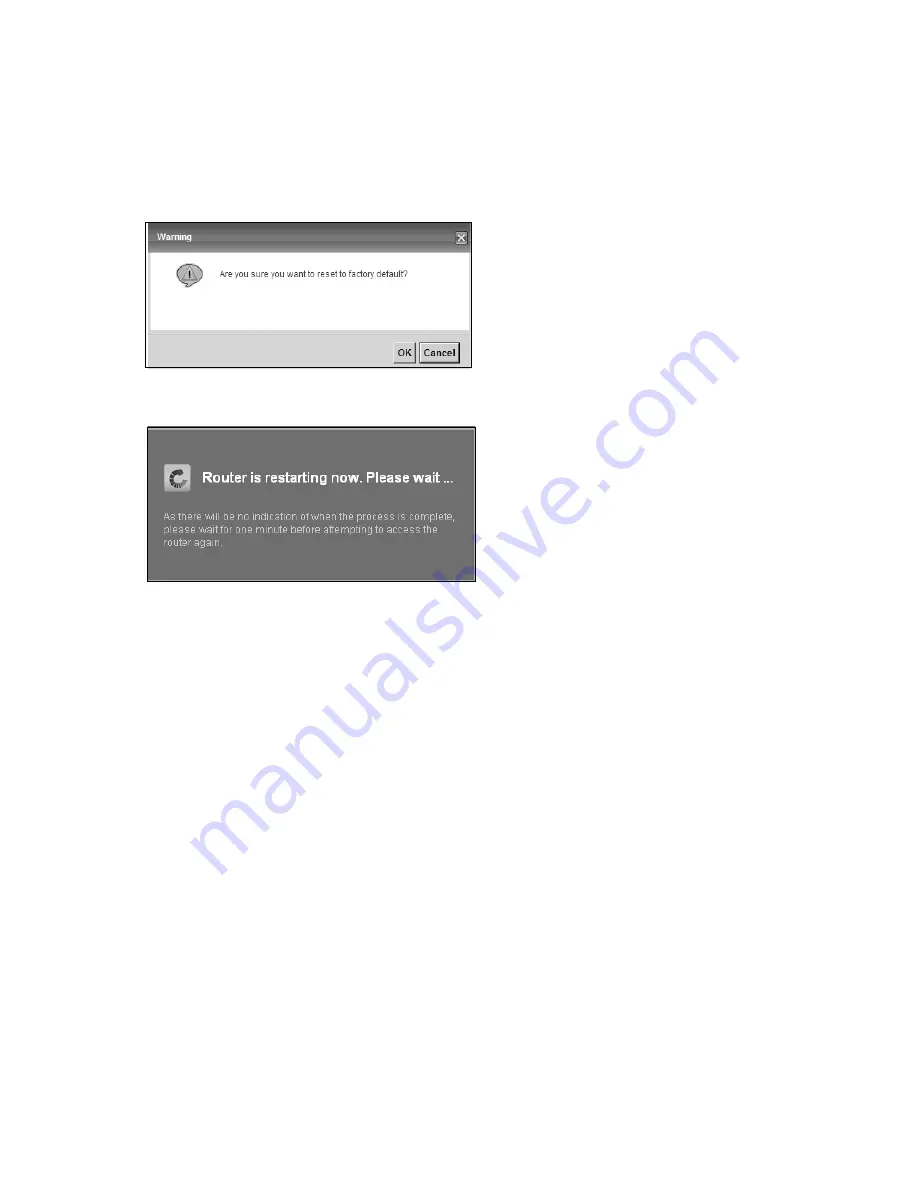
Reset to Factory Defaults  

Click the 

Reset

 button to clear all user-entered configuration information and return the Router to 

its factory defaults. The following warning screen appears.

Figure 89 

Reset Warning Message

Figure 90 

Reset In Process Message

You can also press the 

Reset

 button on the back panel to reset the factory defaults of your Router. 

Refer to 

Chapter 1 on page 7

 for more information on the 

Reset

 button.

21.2  The Reboot Screen 

System restart allows you to reboot the Router remotely without turning the power off. You may 

need to do this if the Router hangs, for example.

Click 

Maintenance > Reboot

. Click the 

Reboot 

button to have the Router reboot. This does not 

affect the Router's configuration. 

Содержание DSL-2401HN2-E1C

Страница 1: ...1st Edition Mar 2017 DSL 2401HN2 E1C User s Guide...

Страница 2: ...Graphics in this book may differ slightly from the product due to differences in operating systems operating system versions or if you installed updated firmware software for your device Every effort...

Страница 3: ...17 Chapter 3 WAN 17 The WAN Screen 19 Edit ADSL Ethernet Connection 24 Edit VDSL Ethernet Connection 28 Chapter 4 Wireless 2 4GHz 28 Wireless General Screen 30 No Security 31 Basic WEP Encryption 31 M...

Страница 4: ...Class Setup Screen 61 Add Edit QoS Class 65 The QoS Monitor Screen 66 Chapter 8 Network Address Translation NAT 66 The General Screen 66 The Port Forwarding Screen 67 The Port Forwarding Screen 68 Th...

Страница 5: ...der Screen 100 Edit SIP Service Provider 105 Phone Screen 106 Call Rule Screen 107 Chapter 15 System Monitor 107 The Log Screen 108 The WAN Traffic Status Screen 109 The LAN Traffic Status Screen 110...

Страница 6: ...reen 125 The WWW Screen 127 Telnet Screen 127 FTP Screen 129 SNMP Screen 130 DNS Screen 131 ICMP Screen 132 SSH SCP SFTP Screen 134 Chapter 23 Troubleshooting 134 Overview 134 Power Hardware Connectio...

Страница 7: ...for making calls over the Internet Voice over IP or VoIP The following figure shows an application example of the Router The Router provides wired and wireless Internet access to home devices on the L...

Страница 8: ...1 second to turn it off To enable the WPS feature press the button for 5 seconds The WPS LED on the front panel will flash yellow while the Router sets up a WPS connection with the wireless device No...

Страница 9: ...tion with a device on the LAN Blinking The Router is sending or receiving data to from the LAN Off The Router does not have an Ethernet connection with the LAN WPS WLAN Green On The wireless network i...

Страница 10: ...er attempted to make an IP connection but failed Possible causes are no response from a DHCP server no PPPoE response PPPoE authentication failed Off There is no Internet connection VOIP Green On The...

Страница 11: ...blocking is enabled by default in Windows XP SP Service Pack 2 JavaScript enabled by default Java permissions enabled by default 2 1 1 Accessing the Web Configurator 1 Make sure your Router hardware...

Страница 12: ...atus of the Router and clients connected to it Use this screen to view the network connection status of the device and its clients A warning message appears if there is a connection problem You can co...

Страница 13: ...s name and Info Click Parental Control to open the following screen where you can block web sites with the specific URLs See Chapter 12 on page 86 for more information on this feature If you prefer t...

Страница 14: ...creen Click Status to display the System Info screen where you can view the Router s interface and system information You can use the Status screen to look at the current status of the Router system r...

Страница 15: ...yout B C A a b As illustrated above the main screen is divided into these parts A title bar B main window C navigation panel 2 4 1 Title Bar The title bar shows the Logout icon in the upper right corn...

Страница 16: ...een a in Figure 8 on page 15 to display the Network Map sc reen See Section 2 2 on page 12 for more information Click Virtual Device on the System Info screen b in Figure 8 on page 15 to display a vis...

Страница 17: ...the Ethernet connection to access the Internet Use the WAN screen to manage WAN interfaces Click Network Setting WAN Figure 10 Network Setting WAN Table 3 Network Setting WAN LABEL DESCRIPTION ADSL C...

Страница 18: ...ck the Edit icon to configure the connection VDSL Connections Table Active This shows whether the VDSL connection is activated VLAN This is the service name of the connection IP This shows the WAN IP...

Страница 19: ...t ADSL Ethernet Connection In Network Setting WAN click the Edit icon next to an ADSL Ethernet connection to display the following screen Use this screen to configure an ADSL connection Figure 11 Netw...

Страница 20: ...ary depending on the mode you select in the Mode field If you select Router in the Mode field select ENET ENCAP IPoA PPPoE or PPPoA If you select Bridge in the Mode field method of encapsulation is no...

Страница 21: ...if the ISP gave them a specific DNS server to use Primary DNS Enter the primary DNS server s address for the Router Secondary DNS Enter the secondary DNS server s address for the Router IPv6 Address O...

Страница 22: ...None in the RIP Direction field Select the RIP version from RIP1 and RIP2 B RIP2 M Multicast The Router supports IGMP v2 only and IGMP v2 IGMP v3 Select None to disable it ATM Qos ATM QoS Type This se...

Страница 23: ...Each host can have a separate account and a public WAN IP address PPPoE pass through is an alternative to NAT for application where NAT is not appropriate Select No to disable PPPoE pass through if yo...

Страница 24: ...it VDSL Ethernet Connection In Network Setting WAN click the Edit icon next to a VDSL Ethernet connection to display the following screen Use this screen to configure a VDSL connection Figure 12 Netwo...

Страница 25: ...ame PPPoE only Type the name of your PPPoE service here IPv6 IPv4 Dual Stack Select IPv4 if you want the Router to run IPv4 only Select IPv4 IPv6 to allow the Router to run IPv4 and IPv6 at the same t...

Страница 26: ...e IP address that does not need to be maintained by a DHCP server DHCP PD This is available only when you select Obtain an IP Address Automatically Select Enable to use DHCP PD Prefix Delegation to al...

Страница 27: ...ailable when you select PPPoE encapsulation In addition to the Router s built in PPPoE client you can select Yes to enable PPPoE pass through to allow up to ten hosts on the LAN to use PPPoE client so...

Страница 28: ...ter connected to the wireless LAN and you change the Router s SSID or security settings you will lose your wireless connection when you press Apply to confirm You must then change the wireless setting...

Страница 29: ...ess clients to only connect to the Internet through the Router Channel Selection Set the channel depending on your particular region Select a channel or use Auto to have the Router automatically deter...

Страница 30: ...annel This is the channel currently being used by your AP Security Mode Select WEP or WPA2 PSK or WPA WPA2 PSK mixed to add security on this wireless network The wireless clients which want to associa...

Страница 31: ...sword automatically Select this option to have the Router automatically generate a password Password The password WEP key is used to encrypt data Both the Router and the wireless stations must use the...

Страница 32: ...de Pre Shared Key Enter a pre shared key more hide more Click more to show more fields in this section Click hide more to hide them Group Key Update Timer This is the rate at which the RADIUS server s...

Страница 33: ...More AP Table 9 Network Setting Wireless 2 4GHz More AP LABEL DESCRIPTION Active This field indicates whether this SSID is active A yellow bulb signifies that this SSID is active A gray bulb signifie...

Страница 34: ...e so a station cannot obtain the SSID through scanning using a site survey tool Client Isolation Select this to keep the wireless clients in this SSID from communicating with each other directly throu...

Страница 35: ...CRIPTION SSID Select the SSID for which you want to configure MAC filter settings MAC Restrict Mode Define the filter action for the list of MAC addresses in the MAC Address table Select Disable to tu...

Страница 36: ...see Section 4 1 on page 28 If you want to use the WPS feature make sure you have set the security mode of SSID1 to WPA2 PSK or WPA PSK WPA2 PSK mixed or no security Click Network Setting Wireless 2 4G...

Страница 37: ...IN of the Router is shown here Enter this PIN in the configuration utility of the device you want to connect to using WPS The PIN is not necessary when you use WPS push button method Click the Generat...

Страница 38: ...GHz WDS Table 13 Network Setting Wireless 2 4GHz WDS LABEL DESCRIPTION WDS Security Select the type of the key used to encrypt data between APs All the wireless APs including the Router must use the s...

Страница 39: ...ing Wireless 2 4GHz WMM Figure 22 Network Setting Wireless 2 4GHz WMM Table 14 Network Setting Wireless 2 4GHz WMM LABEL DESCRIPTION Enable WMM of SSID1 4 This enables the Router to automatically give...

Страница 40: ...ctivate wireless LAN scheduling on your Router Add New Rule Click this to create a new wireless LAN scheduling rule Rule Name This field shows the name configured for the scheduling rule Days This fie...

Страница 41: ...Scheduling Add New Rule Table 16 Wireless 2 4GHz Scheduling Add New Rule LABEL DESCRIPTION From Schedule Rules To create a new scheduling rule based off an existing one select it here Rule Name Speci...

Страница 42: ...devices to associate with the Router Select 802 11b g to allow either IEEE 802 11b or IEEE 802 11g compliant WLAN devices to associate with the Router The transmission rate of your Router might be red...

Страница 43: ...k Network Setting LAN to open the LAN Setup screen Use this screen to set the Local Area Network IP address and subnet mask of your Router and configure the DNS server information that the Router send...

Страница 44: ...rsion 2 leave message on that port DHCP Select Enable to have the Router assign IP addresses an IP default gateway and DNS servers to LAN computers and other devices that are DHCP clients Select DHCP...

Страница 45: ...Time Specify for how long it takes to assign an IP address to a LAN device before making it available for reassignment to other systems DNS Server 1 2 Select Obtained From ISP if your ISP dynamically...

Страница 46: ...on a physical network into different logical networks over the same Ethernet interface The Router supports multiple logical LAN interfaces via its physical Ethernet interface with the Router itself as...

Страница 47: ...hat you assign Unless you are implementing subnetting use the subnet mask computed by the Router 5 4 The UPnP Screen Universal Plug and Play UPnP is a distributed open networking standard that uses TC...

Страница 48: ...nfigurator s login screen without entering the Router s IP address although you must still enter the password to access the web configurator Chapter 5 LAN 48 5 5 The IPv6 LAN Setup Screen Use the IPv6...

Страница 49: ...you selected Manual enter the LAN identifier The LAN identifier should be unique and 64 bits in hexadecimal form IPv6 ULA Address Type A unique local address ULA is a unique IPv6 address for use in p...

Страница 50: ...DHCPv6 Server Select Enable to have the Router act as a DHCPv6 server and pass IPv6 addresses DNS server and domain name information to DHCPv6 clients Pool Start End Specify the first last IPv6 addre...

Страница 51: ...e Router The Router sends this preference in the router advertisements to tell hosts what preference they should use for the Router This helps hosts to choose their default router especially when ther...

Страница 52: ...DESCRIPTION Add New Static Route Click this to set up a new static route on the Router Destination IP This is the IP network address of the final destination Routing is always based on network number...

Страница 53: ...ss of the final destination IP Subnet Mask Enter the IP subnet mask Gateway IP Address Enter the IP address of the next hop gateway which helps forward packets to their destinations Metric Enter the c...

Страница 54: ...emove a static route from the Router 6 2 1 Add Edit IPv6 Static Route Click Add New Static Route in the IPv6 Static Route screen or click the Edit icon next to a rule Use this screen to configure an I...

Страница 55: ...ck this to create a new DNS route Domain Name This is the domain name to which the DNS route applies Subnet Mask This parameter specifies the IP network subnet mask Interface This is the WAN interface...

Страница 56: ...interface through which the matched DNS query is sent You must have the WAN interface s already configured in the WAN screen 6 4 The Current Route Screen Use the Current Route screen to view a table...

Страница 57: ...any large file downloads so that they do not reduce the quality of other applications Traffic priority will be automatically assigned by Select how the Router assigns priorities to various upstream tr...

Страница 58: ...ueue is active A gray bulb signifies that this queue is not active Name This shows the descriptive name of this queue Interface This shows the name of the Router s interface through which traffic in t...

Страница 59: ...ueues have the same priority level the Router divides the bandwidth across the queues according to their weights Queues with larger weights get more bandwidth than queues with smaller weights Rate Lim...

Страница 60: ...ce If the classifier applies to traffic coming in through a specific interface it displays here Classification Criteria This shows criteria specified in this classifier for example the interface from...

Страница 61: ...er 7 Quality of Service QoS 61 7 3 1 Add Edit QoS Class Click Add new Classifier in the Class Setup screen or the Edit icon next to an existing classifier to configure it Figure 43 QoS Class Setup Add...

Страница 62: ...vailable when you set Interface to From WAN You should have configured a queue in the Queue Setup screen already From Interface Select the interface from which the traffic class comes IP Address Selec...

Страница 63: ...HCP option If you select Vendor Class ID DHCP Option 60 enter the Class ID of the matched traffic such as the type of the hardware or firmware If you select User Class ID DHCP Option 77 enter the User...

Страница 64: ...service to re assign the priority level to matched traffic DSCP Mark 0 63 This field is available only when you select IPv4 0x0800 in the Ether Type field If you select Mark enter a DSCP value with wh...

Страница 65: ...o update this screen and click Set Interval Click Stop to stop refreshing statistics Interface Monitor This is the index number of the entry Name This shows the name of the interface on the Router Pas...

Страница 66: ...eck box if you have multiple public WAN IP addresses for your Router Max NAT Firewall Session Per User Use this field to set a common limit to the number of concurrent NAT sessions each client compute...

Страница 67: ...st last external port number that identifies a service Internal Start End Port This is the first last internal port number that identifies a service Server IP Address This is the server s IP address M...

Страница 68: ...traffic for which the Router created the UPnP rule Table 38 Network Setting NAT Port Forwarding continued LABEL DESCRIPTION Table 39 NAT Port Forwarding Add Edit LABEL DESCRIPTION Active Select or cle...

Страница 69: ...n the External Start Port field above Server IP Address Enter the inside IP address of the virtual server here Protocol Select the protocol supported by this virtual server Choices are TCP UDP or TCP...

Страница 70: ...ntinued LABEL DESCRIPTION Figure 49 NAT Address Mapping Edit LABEL DESCRIPTION Type Choose the port mapping type from one of the following One to One maps one local IP address to one global IP address...

Страница 71: ...ver Address Enter the IP address of the default server which receives packets from ports that are not specified in the Port Forwarding screen Note If you do not assign a default server the Router disc...

Страница 72: ...registers with the SIP register server the SIP ALG translates the Router s private IP address inside the SIP data stream to a public IP address You do not need to use STUN or an outbound proxy if you...

Страница 73: ...the Dynamic DNS screen to enable DDNS and configure the DDNS settings on the Router Click Network Setting Dynamic DNS Figure 52 Network Setting Dynamic DNS Table 43 Network Setting Dynamic DNS LABEL...

Страница 74: ...he results of the Router s attempt to authenticate with the Dynamic DNS service provider Last Updated Time This field displays when the Router last updated its WAN IP address to the Dynamic DNS servic...

Страница 75: ...ter 75 CHAPTER 10 Chapter 10 Filter 10 1 The IP MAC Filter Screen Use the IP MAC Filter screen to create and apply IP MAC filters Click Security Filter to show the IP MAC Filter screen Figure 53 Secur...

Страница 76: ...n IP address of the packets you wish to filter Subnet Mask Enter the IP subnet mask for the destination IP address Port Number Enter the destination port of the packets that you wish to filter Protoco...

Страница 77: ...lection Select White List to create a filter rule that allows traffic Select Black List to create a filter rule that blocks traffic IPv6 MAC Filter Rule Index Select the index number of the filter rul...

Страница 78: ...u select MAC in the Rule Type field Enter the MAC address of the packets you wish to filter IPv6 MAC Filter Rule Index Select the index number of the filter set Active This field shows whether the rul...

Страница 79: ...ect this to enable the firewall filter on the Router Off Select this to disable the firewall filter on the Router This setting is not recommended It disables firewall protection for your network and c...

Страница 80: ...his firewall filter Packet Direction Select the direction of traffic which applies to this firewall filter Default Action Select the default action that the firewall is to take on packets that are tra...

Страница 81: ...lds summarize the rules you have created that apply to traffic traveling in the selected packet direction The firewall rules that you configure summarized below take priority over the general firewall...

Страница 82: ...y Click the Edit icon to go to the screen where you can edit the rule Click the Remove icon to delete an existing firewall rule A window displays asking you to confirm that you want to delete the fire...

Страница 83: ...service to which this rule applies to in the drop down list box If you want to manually configure a service that is not in the list choose Custom Service Enter the name of the service and select its p...

Страница 84: ...lick this to save your changes Undo Click this to restore your previously saved settings Advanced Click this to go to a screen to specify maximum thresholds at which the Router will start dropping ses...

Страница 85: ...to start deleting half open sessions When the rate of new connection attempts rises above this number the Router deletes half open sessions as required to accommodate new connection attempts ICMP Ech...

Страница 86: ...ble 52 Security Parental Control LABEL DESCRIPTION Parental Control Select Enable to activate parental control Add new PCP Click this if you want to configure a new parental control rule Status This i...

Страница 87: ...ws whether the website block is configured If not None will be shown Modify Click the Edit icon to go to the screen where you can edit the rule Click the Delete icon to delete an existing rule Table 5...

Страница 88: ...k the users on your network from accessing certain web sites Figure 62 Parental Control Add Edit Table 53 Parental Control Add Edit LABEL DESCRIPTION Active Select the checkbox to activate this parent...

Страница 89: ...cess to all URLs except ones listed below Add new service Click this to show a screen in which you can add a new service rule You can configure the Service Name Protocol and Name of the new rule Activ...

Страница 90: ...ates Local Certificates LABEL DESCRIPTION WebServer Click Choose File to find the certificate file you want to upload Current File This field displays the name used to identify this certificate It is...

Страница 91: ...ate that the certificate expires The text displays in red and includes an Expiring or Expired message if the certificate is about to expire or has already expired Cert Click this button and then Save...

Страница 92: ...ational Unit or department Organization O State ST and Country C It is recommended that each certificate have unique subject information Type This field displays general information about the certific...

Страница 93: ...Figure 65 Certificates Trusted CA Import Table 56 Certificates Trusted CA Import LABEL DESCRIPTION Certificate File Path Click Choose File to look for the file you want to upload 13 4 View Certificate...

Страница 94: ...displays the type of this certificate Subject This field displays the subject of this certificate Certificate This read only text box displays the certificate or certification request in Privacy Enhan...

Страница 95: ...ount and map it to a phone port The SIP account contains information that allows your Router to connect to your VoIP service provider To access the following screen click VoIP SIP SIP Account Figure 6...

Страница 96: ...Chapter 14 VoIP 96 14 1 1 Edit SIP Account You can configure a SIP account To access this screen click the Edit icon next to an account Figure 68 SIP SIP Account Add Edit...

Страница 97: ...that the Router uses for speech that it sends to the peer device Listening Volume Control Select the loudness that the Router uses for speech that it receives from the peer device Active G 168 Echo Ca...

Страница 98: ...you to answer an incoming call before it considers the call is unanswered Hot Line Warm Line Enable Select this to enable the hot line or warm line feature on the Router Warm Line Select this to have...

Страница 99: ...SIP Service Provider Name This shows the name of the SIP service provider SIP Server Address This shows the IP address or domain name of the SIP server REGISTER Server Address This shows the IP addres...

Страница 100: ...rmation QoS for VoIP calls the numbers for certain phone functions and dialing plan for a SIP service provider Click VoIP SIP SIP Service Provider and then click the Edit icon next to a profile of SIP...

Страница 101: ...your VoIP service provider gave you one Otherwise keep the default value REGISTER Server Address Enter the IP address or domain name of the SIP register server if your VoIP service provider gave you...

Страница 102: ...to have the Router support RFC 4028 This makes sure that SIP sessions do not hang and the SIP line can always be available for use RTP Port Range Enter the listening port number s for RTP traffic prov...

Страница 103: ...number of seconds the Router waits before it tries again to register the SIP account if the first try failed or if there is no response Session Expires Enter the number of seconds the Router lets a S...

Страница 104: ...forwarding No Answer Call Forward Enable This code is used to enable call forwarding when there is no answer at a SIP number no one picked up the connected phone that uses the SIP number No Answer Cal...

Страница 105: ...rope Type use supplementary phone services in European mode USA Type use supplementary phone services American mode You might have to subscribe to these services to use them Contact your VoIP service...

Страница 106: ...mber 01 for example on your phone s keypad to call the phone number To access this screen click VoIP Call Rule Figure 73 VoIP Call Rule Table 63 VoIP Call Rule LABEL DESCRIPTION Clear all speed dials...

Страница 107: ...according to the severity level you have selected When you select a severity the Router searches through all logs of that severity or higher Refresh Click this to renew the log screen Clear Logs Clic...

Страница 108: ...fresh Interval Specify how often you want the Router to update this screen and click Set Interval to apply the change Click Stop to halt updating of the screen Connected Interface This shows the name...

Страница 109: ...terface Bytes Sent This indicates the number of bytes transmitted on this interface Bytes Received This indicates the number of bytes received on this interface Interface This shows the LAN or WLAN in...

Страница 110: ...T LABEL DESCRIPTION Refresh Interval Specify how often you want the Router to update this screen and click Set Interval to apply the change Click Stop to halt updating of the screen Device Name This s...

Страница 111: ...Registered The last time the Router tried to register the SIP account with the SIP server the attempt failed The Router automatically tries to register the SIP account when you turn on the Router or w...

Страница 112: ...progress DISC The callee s line is busy the callee hung up or your phone was left off the hook Codec This field displays what voice codec is being used for a current VoIP call through a phone port Pee...

Страница 113: ...Maintenance User Account Table 69 Maintenance User Account LABEL DESCRIPTION User Name This is the name of the user account Old Password Type the default password or the existing password you use to...

Страница 114: ...ance System Table 70 Maintenance System LABEL DESCRIPTION Administrator Inactivity Timer Type how many seconds a management session either via the web configurator can be left idle before the session...

Страница 115: ...me This field displays the date and time of your Router Manual Select this to enter the time and date manually in hh mm ss and yyyy mm dd format Get from Time Server Select this to have the Router get...

Страница 116: ...f normal local time by one hour to give more daytime light in the evening Select this option if you use Daylight Saving Time Start End Date Configure the day and time when Daylight Saving Time starts...

Страница 117: ...pter 19 Log Setting 117 CHAPTER 19 Chapter 19 Log Setting 19 1 The Log Setting Screen To change your Router s log settings click Maintenance Log Setting The screen appears as shown Figure 82 Maintenan...

Страница 118: ...e E mail logs Mail Server Enter the server name or the IP address of the mail server for the e mail addresses specified below If this field is left blank logs and alert messages will not be sent via E...

Страница 119: ...ategory Select the categories of logs that you want to record Log Level Select the severity level of logs that you want to record If you want to record all logs select ALL Table 72 Maintenance Log Set...

Страница 120: ...rmware for your device s specific model Refer to the label on the bottom of your Router Do NOT turn off the Router while firmware upload is in progress Figure 83 Maintenance Firmware Upgrade Table 73...

Страница 121: ...in this time causing a temporary network disconnect In some operating systems you may see the following icon on your desktop Figure 85 Network Temporarily Disconnected After two minutes log in again...

Страница 122: ...tenance Backup Restore Backup Configuration Backup Configuration allows you to back up save the Router s current configuration to a file on your computer Once your Router is configured and functioning...

Страница 123: ...nfiguration file upload is in progress After the Router configuration has been restored successfully the login screen appears Login again to restart the Router The Router automatically restarts in thi...

Страница 124: ...ess Message You can also press the Reset button on the back panel to reset the factory defaults of your Router Refer to Chapter 1 on page 7 for more information on the Reset button 21 2 The Reboot Scr...

Страница 125: ...tocols can access which Router interface if any from which computers Click Maintenance Remote MGMT to display the General screen Select Enable to activate remote management on the Router Figure 91 Mai...

Страница 126: ...vice Note It is recommended if you are allowing WAN access even temporarily to change the default password in Maintenance User Account To allow access from the WAN you will need to configure a WAN to...

Страница 127: ...ccess the Router using this service Note It is recommended if you are allowing WAN access even temporarily to change the default password in Maintenance User Account To allow access from the WAN you w...

Страница 128: ...his displays the service port number for accessing the Router If the number is grayed out it is not editable Server Access Select the interfaces through which a computer may access the Router using th...

Страница 129: ...If the number is grayed out it is not editable Server Access Select the interfaces through which a computer may access the Router using this service SNMPv3 Select Enable to activate the SNMPv3 featur...

Страница 130: ...l requests Set Community Enter the Set community which is the password for incoming Set requests from the management station The default is public and allows all requests Trap Community Type the trap...

Страница 131: ...uter may send DNS queries to the Router Secured Client IP Address A secured client is a trusted computer that is allowed to send DNS queries to the Router Select All to allow any computer to send DNS...

Страница 132: ...ts Secured Client IP Address A secured client is a trusted computer that is allowed to send Ping requests to the Router Select All to allow any computer to send Ping requests to the Router Choose Rang...

Страница 133: ...cess the Router using this service Note It is recommended if you are allowing WAN access even temporarily to change the default password in Maintenance User Account To allow access from the WAN you wi...

Страница 134: ...urn on 1 Make sure the Router is turned on 2 Make sure you are using the power adaptor or cord included with the Router 3 Make sure the power adaptor or cord is connected to the Router and plugged in...

Страница 135: ...r to the label sticker at the device s box for the MAC address 2 If you have changed the password but can t remember it you have to reset the device to its factory defaults See Section 1 2 on page 7 I...

Страница 136: ...s does not work you have to reset the device to its factory defaults See Section 23 2 on page 134 I cannot Telnet to the Router See the troubleshooting suggestions for I cannot see or access the Login...

Страница 137: ...be a lot of traffic on the network Look at the LEDs and check Section 1 3 on page 9 If the Router is sending or receiving a lot of information try closing some programs that use the Internet especial...

Страница 138: ...ome programs that use the Internet especially peer to peer applications If the wireless client is sending or receiving a lot of information it may have too many programs open that use the Internet 23...

Страница 139: ...ake sure that no electrical lines gas or water pipes will be damaged This product is for indoor use only utilisation int rieure exclusivement Your product is marked with this symbol which is known as...

Отзывы: