


14
mvip@mitech-ndt.com
impact direction of that impact device.
The calibration results are stored in the EEPROM of the main unit and the stored calibration
results will not be lost until next calibration or system reset.
4.4 Multi-point calibration
This instrument provides conversion curves into standard hardness scales for a series of materials. For
special solutions it is possible for the user to correct conversion functions if conversions display
systematic deviations.
Multi-point calibration uses a standard conversion function
std
H
(L) and adds a straight line, which is
determined by at least two reference test points using least squares approximation method, so that the
resulting conversion function H(L) coincides all the reference points.
Multi-point calibration is typically used if at least two workpieces with known and significantly distinct
hardness values in the required scale are available. The workpieces to be measured are made from the
same material and are neither significantly harder than the hardest reference piece nor significantly
softer than the reference piece.
Before starting the multi-point calibration process, prepare 2 to 5 reference blocks with known hardness
value calibrated using other test method. The reference blocks should conform to the measuring
conditions of this instrument. Procedure of the multi-point calibration
:
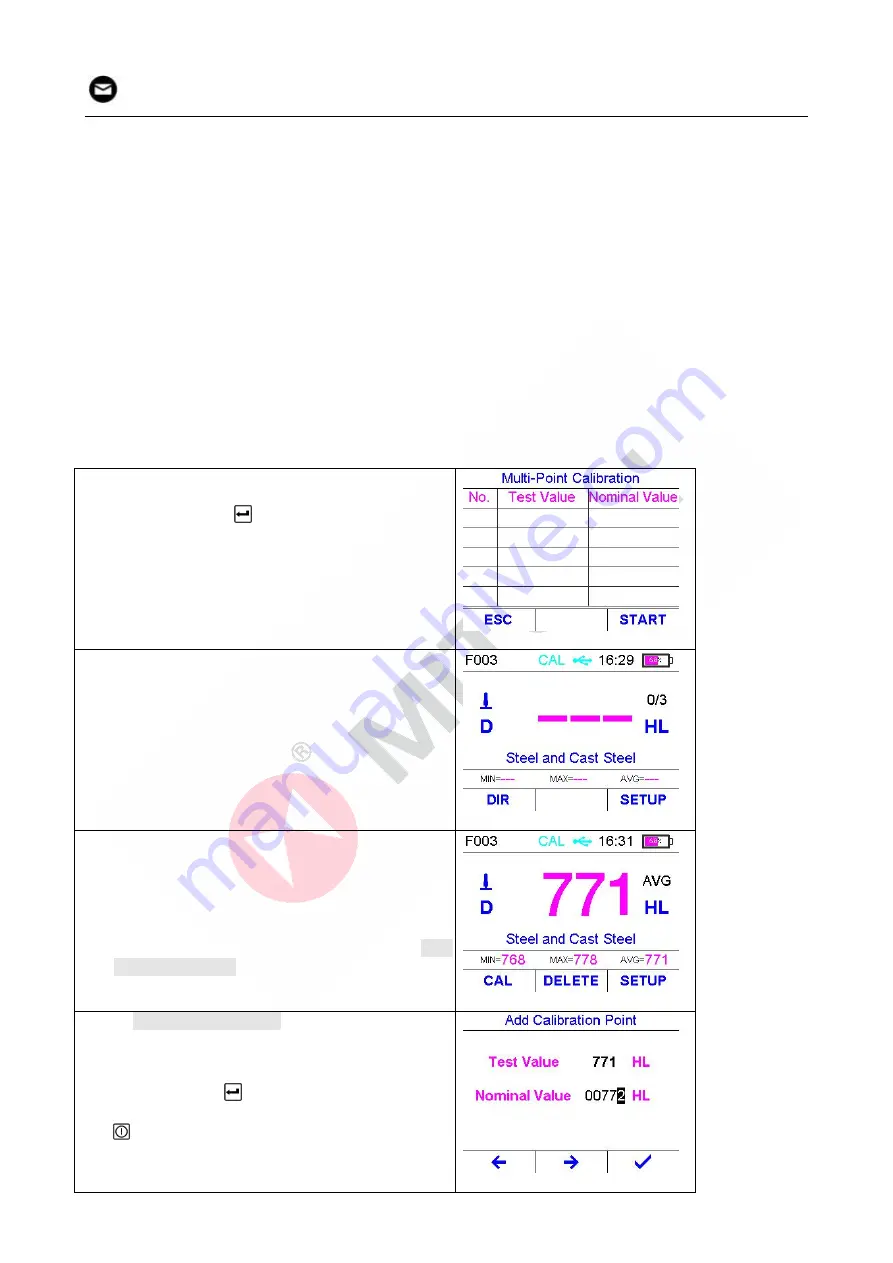
Step 1, open multi-point calibration dialog box.
Step 2, Press
or F3 key to start the
calibration process.
The display will be switched back to the main screen
automatically when the multi-point calibration
process starts.
On the main screen, please note that “CAL”
characters appear on top of the screen indicating
calibration in process.
Step 3, Configure the impact device, material
selection and hardness scale settings.
Step 4, Test the hardness value of the first
reference block.
When the test series closes, “CAL” command will
appear on bottom-left of the main screen. Then
continue:
Step 5, Press F1 key to add a new calibration
point to the calibration points series. The Add
Calibration Point dialog box will be opened
automatically.
On the Add Calibration Point dialog box, the average
test value is displayed.
Step 6, Input the nominal value of this reference
block by pressing F1, F2 and arrow keys.
Step 7, Press
or F3 key to complete the
addition of the new calibration point. Or press
key to discard this new calibration point and
close the dialog box.


