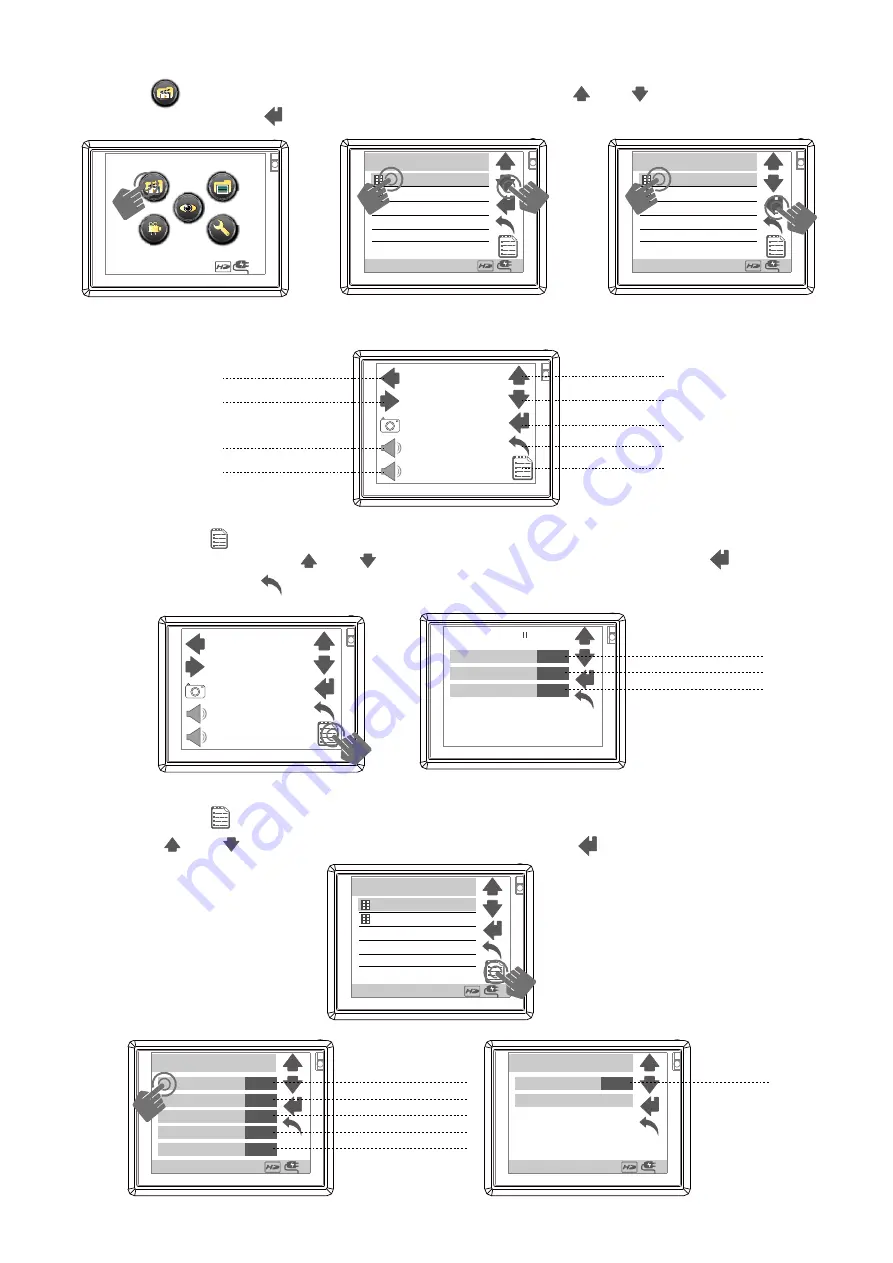
background image

1.VIDEO Files

a. 

press          icon into video files , press item or press       &       to chose item . 

    press item again or        to start preview video. 

16:00

Toshuba Demo2.avi

*Video Files*

Toshuba Demo2.avi

16:00

Toshuba Demo2.avi

*Video Files*

Toshuba Demo2.avi

16:00

b.

 press screen to appear icon

c.

 press screen        icon to into this video editing, here you can change video repeat , 

    screen or display press       &       to chose item ,press item again or        to finish 

    setting ,then press        return to preview video

fast backward

fast forward

pre

page up

menu

next

pause

volume -

+

-

+

-

on or off

Full Screen

Display

Dual

off

Video Repeat

No

00:00:00

Dual

No or Single or All

d. 

press screen        icon to into this video item, here you can delete , copy or remove 

    it. press       &       to chose item ,press item again or        to finish setting

on or off

move

*Video Files*

16:00

video repeat

single

protect

copy

one

one

off

delete

ALL

one or all
one or all

all or single or no

one or all

SD or HD

*Video Files*

16:00

file informaton

Storage

SD

Toshuba Demo2.avi

*Video Files*

Toshuba Demo2.avi

16:00

Содержание MP-600HD

Страница 1: ...MP 600HD USER S MANUAL Mobile DVR 3 5 Touch Screen ...

Страница 2: ...emote Control Adaptor MP 600HD Clean the product by any chemicals such as alcohol is prohibited Warning USB Cable charge AF UU070 AV Cable AF PRRR12 Plug convertor For camera AF 224 10 pin USB Cable AF UD02 Cable for external camera AF PDRR12 01 4 GB SDHC ...

Страница 3: ...lock MP 600HD MAIN DEVICE REMOTE CONTROL REC Snapshot IR Remote Control Receiver Reset A V Ouput SD SDHC Slot MINI USB Power In Esc Return File menu Snapshot REC record Stop REC perview Menu Setup Delect Volume up Volume down up down left right play stop comfirm H ...

Страница 4: ...blue indicator light will be on and start REC D A LED yellow red Power REC Snapshot LED blue A 1 1 2 2 2 User needs to unlock hold key in order for MP 600 to turn on B D C a touch screen a b c d 00 01 30 2 Touch Screen description M A H TFT LCD Off Key Lock Hold TFT LCD On e press button into REC setting f press item or press to choose item e M f Quality QVGA ON ON HD Dual Display Information REC ...

Страница 5: ...on REC Date Time Storage Display ON or OFF ON or OFF HD or SD Dual Overwrite ON HQ Bitrate ON or OFF HQ or Normal a press remote control the button MP 600HD of blue indicator light will be on now it starts to REC press remote control again to stop REC 3 Remote control operate description a press snapshot button blue indicator light will flash one time and take snapshot Snapshot Mode 1 Manual butto...

Страница 6: ... M c press button blue indicator light will flash one time and snapshot a touch screen b press icon button into what you want item Video files photo files setup recording setting 16 00 recording a press button into main menu a M b 2 Touch Screen description 3 Remote control operate description ...

Страница 7: ...r to finish setting then press return to preview video volume fast backward fast forward pre page up menu next pause volume on or off Full Screen Display Dual off Video Repeat No 00 00 00 Dual No or Single or All d press screen icon to into this video item here you can delete copy or remove it press to chose item press item again or to finish setting on or off move Video Files 16 00 video repeat s...

Страница 8: ...o move then press screen icon to return to video files menu 2 move b press screen to appear icon then press screen icon to into this photo editing here you can chane display press to chose item press item again or to finish setting then press icon to return to browse photos Display Dual 00 00 00 Dual 2 PHOTO Files a press icon into photo files press item or press to chose item press item again or ...

Страница 9: ...r all one or all one or all SD or HD Photo Files 16 00 file informaton Storage SD press icon directly or press screen icon to chose item then press or press ok to delete 1 delete delete select file ok cancel 16 00 move select file ok cancel 16 00 press screen icon to return to photo files menu press screen icon to return to photo files menu 2 move Toshuba Demo2 JPG Photo Files Toshuba Demo2 JPG 16...

Страница 10: ...tion Detect Area there are nine zones and it can easy to set motion detect area what you want note the red squares part can be motion detect 1 In Motion detect press screen to appear icon then press icon to into Motion detect editing press to chose item 30 sec or 1min or 3min or 5min or 10min HQ or Normal Video Files 16 00 3min Normal Motion Detect Level Motion Detect rectime Motion Area Setting B...

Страница 11: ...ecord automatically at the set time setup 16 00 audio in line in back light off 3 min sleep setting on schedule presetting time setting off or on a press icon into setup Back light off function is replaced by Hold key b press screen item directly or press to chose item press item again or to finish setting 4 Setup built in or line in no function no or 30min or 60min or 90min setup 16 00 audio in l...

Страница 12: ...up 16 00 audio in line in back light off 3 min sleep setting on schedule presetting time setting press screen icon to return to setup menu d time setting e firmware upgrade insert the memory card which contains updated software into the device and press ok after the system is updated it will reboot automatically if the message update error is shown it means that there are errors during updating it...

Страница 13: ...l video source recording By connecting with an external video sensor it can record the video into video files In mpeg4 format the file format is avi RCA Video in Yellow RCA Audio in White DC 5V Power output for camera Left RW battery Right FF Down Next UP Previous Esc Return Shapshot Delete Record power in ENTER PLAY STOP Motion Detecting Sub Menu 5 icon name M camera optional P P power V Video G ...

Страница 14: ...wn power LED indictor blinks and the meter with no bars displays on the bottom right corner of the screen which indicates that the power of the host exhausts and please recharge it immediately Connect the main device with the power supply and then plug the power supply into the electrical outlet The led light red will always be on precautions A B 1 Charge with adapter 2 Charge with USB The USB con...

Страница 15: ...one Jack 3 USB 10pin USB Charging 4 SD card slot SDHC 5 IR Touch Screen 3 5 TFT LCD 1 rechargeable Li ion battery NP120 1900mAh 2 Built in charging circuit 3 100 240V 50 60Hz AC adaptor DC 5V 2A output power management 4 Battery Status indicator 1 Support SD card Both support SD 1 0 SD 2 0 SDHC 2 Support SD memory up to 32G 3 Support USB 1 1 USB 2 0 to SD HDD 4 optional Built in 160G 1 8 Hard Driv...

Отзывы: