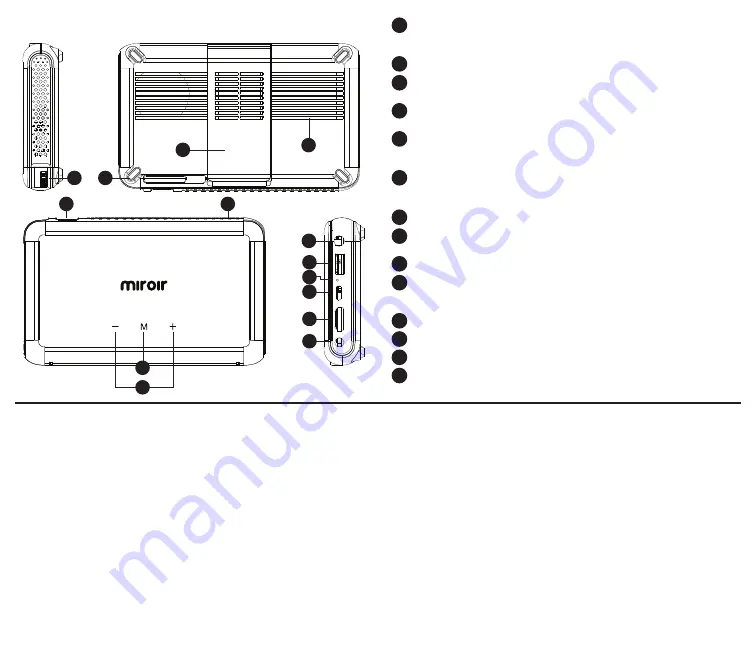
Battery Indicator Lights -
Lights flash in turn as the device charges.
The battery is fully charged when all the lights illuminate and no
longer flash.
Projection Lens -
Turns power on.
Audio Out (3.5mm) -
(Optional) Connect an external speaker or
headphones.
HDMI Video Input -
Connect an HDMI cable to a device that supports
HDMI video output.
USB Power Output -
Connect a USB power cable to provide power to a
HDMI streaming stick or to charge a smartphone battery. Cannot be
used for video input.
USB-C Video/Charge Input -
Connect any compatible USB-C charge/
video cable to a device that supports USB-C video output, or power
adapter that supports charging. (not included)
Reset Button -
Press to reset projector.
Power Port -
Connect included AC Adapter/Charger for power. Fully
charge battery before the first use (approx. 4-5 hours).
Mode Button -
Press mode button to change from HDMI to USB–C video.
Controls -
Increase/decrease the volume output of the projector.
Press +/- together to change from ECO to Normal mode.
Normal mode is maximum brightness but shorter battery life.
Focus Controls -
Turn wheel to adjust focus.
Rubber Foot Pads -
Provides stability and proper airflow to cooling vents.
Cooling Vent -
IMPORTANT: Do not cover or block airflow to the vent.
Kick Stand -
Kick Stand out to elevate front.
B
A
C
D
E
F
G
H
I
J
K
L
M
N
Troubleshooting
The image is blurry
• Adjust the projected image’s focus by rolling the focus wheel forwards or
backwards.
• Check that the surface you are projecting on is smooth and non-reflective.
• Check that the projector’s lens is clean and free of debris.
The image is not square
• Check that the projector’s lens is parallel to your projection surface and
that your projection surface is flat.
No sound
• Check the volume control on your source device to ensure the volume
is turned up.
• Check the volume control on the projector to ensure the volume is
turned up.
• If you are using an adapter, verify that the adapter supports audio.
• Check that the HDMI cable is fully plugged into the HDMI port.
No Signal Message
• Check that you are using the required cable and/or adapter.
• If you are using a digital AV adapter, check that the adapter is an
authentic Apple adapter and is compatible with your model phone
or tablet.
• If you are connecting via USB-C, check that you are using the USB-C
video cable that came with the projector – this cable is labeled “USB-C
Video Connector.” Some USB-C cables do not support video.
• If you are connected to a laptop or computer, check your computer
display settings to ensure a multiple display option is selected (such as
“duplicate these displays”).
• Check that your source device supports HDMI video out or USB-C
video out.
Projector will not power on, or stay powered on
• Check the battery life of the projector by briefly pressing the power
button on the projector. If one or fewer lights illuminate, charge the
battery with the USB-C cable or power adapter.
• Check that you are plugging the USB-C cable into the USB-C power Input port
and not the USB-C Video input port on the projector.
Your Miroir Mini Pro Projector
I
K
L
N
H
E
C
A
B
M
D
F
G
J
Содержание M190 Mini Pro
Страница 1: ...Quick Start Guide M190 Mini Pro Projector ...
Страница 14: ...www miroirusa com MICRO190 07 26 2021 ...


