Miro TD490 Скачать руководство пользователя страница 20

G

ERÄTEMERKMALE

Q

UALITATIV HOCHWERTIGE

F

LÜSSIGKRISTALL

-A

NZEIGEEINHEIT

• Die 19-Zoll-Anzeigeeinheit (0.294mm Pixelabstand) und die Blend-

schutz-Hartbeschichtung gewährleisten geringe Reflexionen,
Antistatik, hohe Auflösung und starken Kontrast mit Echtfarb-Anzeige
(bis zu 16.7 Mio. Farben).

P

LUG

& P

LAY

• Dieses Gerät entspricht der VESA

®

-Norm (Video Electronics Standards

Association) DDC

TM

1/2B (Display Data Channel) gemäß den

Windows

®

Spezifikationen.

D

IGITAL

-M

ULTI

-S

CAN

• Bei einem analogen Signaleingang arbeitet dieses Gerät mit einer 

Horizontalfrequenz von 24 ~ 93 kHz, einer Vertikalfrequenz von 55 ~ 85Hz
und einer maximalen Auflösung von 1280 (H) x 1024 (B) bei 85Hz.

• Bei einem digitalen Signaleingang arbeitet dieses Gerät mit einer

Horizontalfrequenz von 24 ~ 83 kHz, einer Vertikalfrequenz von 55 ~ 85 Hz 
und einer maximalen Auflösung von 1280 (H) x 1024 (B) bei 75Hz.

• Der Monitor ist sowohl mit IBM

®

PC-kompatiblen Geräten als auch

Macintosh

®

-Geräten kompatibel.

F

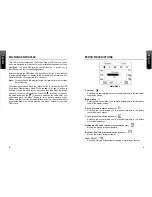
ORMATEINSTELLFUNKTION

• Das Gerät verfügt über eine On-Screen-Display-Kontrolle. Diese

ermöglicht über diverse Einstellungspunkte eine problemlose und
einfache Installation des Monitors. Folgende Einstellmöglichkeiten sind
gegeben: Automatische Anpassung, Helligkeit, Kontrast, 
Wahl der Eingangsquelle, Fokus, Clock, H-Position, V-Position, 
Sprache, Scaling, Farbtemperaturauswahl (6500°K, 7800°K), 
RGB Farbtemperaturauswahl, Zurücksetzen, Exit

S

TROMZUFUHR

• Der Netzadapter besteht aus zwei Teilen: einem kompakten

Adapterblock mit einem Monitor-Anschlusskabel sowie dem
länderspezifischen Netzkabel.

• Der Netzadapter wandelt die jeweilige Netzspannung (100-240V) in die

für den Monitor nötige Gleichspannung. 

• Stromverbrauch des Gerätes:

-   On mode: max. 65 Watt
-   Stand-by mode: max. 3 Watt
-   Off mode: max. 2 Watt

P

RÜFLISTE 

Z

UBEHÖR 

Bevor Sie Ihren Monitor in Betrieb nehmen, überprüfen Sie bitte den Inhalt
der Verpackung auf Vollständigkeit. Folgende Komponenten sollten im
Lieferumfang enthalten sein:

•  TFT Farbflachbildschirm
•  mitgeliefertes Zubehör:

1. Netzadapter und Netzkabel

2. 15-pin D-SUB Signalkabel

3. DVI-D-Digitalsignalkabel

4. USB Kabel

5. Audio Kabel

6. Benutzerhandbuch

2

3

Содержание TD490

Страница 1: ...miro TD490 Manual miro Displays GmbH TRIFORUM Haus A1 Frankfurter Str 233 D 63263 Neu Isenburg Tel 0180 5 22 35 26 0 12 Euro Min Fax 06102 3667 77 e mail kontakt miro de...

Страница 2: ...ipment Checklist 2 Monitor Features 3 GETTING STARTED Installation 4 Installation VESA Wall Mount 6 Control Buttons 7 On Screen Display 8 ON SCREEN CONTROLS Menu Descriptions 9 REFERENCE Power Managem...

Страница 3: ...more of the following measures Reorient or relocate the receiving antenna Increase the separation between the equipment and receiver Connect the equipment into an outlet on a circuit different from t...

Страница 4: ...hyl chloride to clean the panel Doing so may result in permanent damage Water IPA Iso Prophyl Alcohol and Hexane are safe cleaners Do not allow oil or water to penetrate the display as droplets cause...

Страница 5: ...In an emergency disconnect the AC power plug 3 To avoid electrical shock disconnect the power cord from the AC adapter before connecting the signal cable to the computer 4 Keep away from liquids and f...

Страница 6: ...t pitch 0 294mm H x 0 294mm W Analog input scanning frequency 24kHz 93kHz H 55Hz 85Hz V Digital input scanning frequency 24kHz 83kHz H 55Hz 85 Hz V Universal power supply AC 100 240V allowed Power con...

Страница 7: ...the monitor and connect the other end to the computer s DVI port requires a video card with DVI port 4 Connect the audio cable between the monitor s audio input and the PC s audio output 5 Attach the...

Страница 8: ...o the wall 6 7 CONTROL BUTTONS Front Controls Button Description 1 Auto Adjust Exit Before activating the OSD menu this button can be used to automa tically adjust the display to the horizontal vertic...

Страница 9: ...menu These icons are designed to make your monitor display settings easier When highlighted the icons illustrate the control function to assist you in identifying which control needs adjustment Befor...

Страница 10: ...lse No pulse Blanked Amber This monitor meets the Green Monitor standards as set by the Video Electronics Standards Association VESA This feature is designed to conserve electrical energy by reducing...

Страница 11: ...he LCD is a multi frequency display On analog input it operates at horizontal frequencies between 24KHz 93KHz and vertical frequencies between 55Hz 85Hz on digital input it operates at horizontal freq...

Страница 12: ...reen is actually one pixel so to expand resolutions to full screen an interpolation of the resolution must be down When the interpolated resolution is not an exact multiple of the native resolution th...

Страница 13: ...htness and contrast Image is unstable unfocused Use AUTO ADJUST to adjust automatically Check whether the resolution or refresh rate in windows display setting is beyond supported range please refer t...

Страница 14: ...etter L or coloured RED If you have any questions concerning which proper power cord to use please consult with the dealer from whom you have purchased the product APPENDIX Safety Guidelines Warning T...

Страница 15: ...by turning the equipment off and on the user is encouraged to try to correct the interfe rence by one or more of the following measures Reorient or relocate the receiving antenna Increase the separat...

Страница 16: ...llgemeine Informationen 1 Pr fliste Zubeh r 2 Ger temerkmale 3 INSTALLATION Installation des Monitors 5 Installation VESA Wandbefestigung 7 Bedienung 8 OSD Bildschirm Men 9 OSD BILDSCHIRM Men Erl uter...

Страница 17: ...Innere des Monitors gelangen k nnen zu Besch digungen f hren Zudem setzen Sie sich dabei der Gefahr eines elektrischen Stromschlages aus Falls der Monitor besch digt ist vermeiden Sie unbedingt den K...

Страница 18: ...erabdr cke darauf SICHERHEITSRICHTLINIEN Gehen Sie sorgsam mit dem Netzkabel um Speziell beim unachtsamen Gebrauch des Netzkabels besteht die Gefahr eines elektrischen Stromschlages Stellen Sie keine...

Страница 19: ...n jedem Fall Kondensation wird das Ger t aus einer kalten Umgebung in ein w rmeres eventuell feuchtes Umfeld gebracht kondensiert Feuchtigkeit im Inneren Ihres Monitors Wird anschlie end der Monitor e...

Страница 20: ...ATEINSTELLFUNKTION Das Ger t verf gt ber eine On Screen Display Kontrolle Diese erm glicht ber diverse Einstellungspunkte eine problemlose und einfache Installation des Monitors Folgende Einstellm gli...

Страница 21: ...s kann bei Anschluss an einem Computer der der VESA DPMSTM Display Power Management Signaling Norm entspricht reduziert werden 4 5 INSTALLATION DES MONITORS ANBRINGUNG UND ENTFERNUNG DES MONITORFUSSES...

Страница 22: ...r ein anschliessend den Monitor 1 Ext AC Adapter 2 15 pin D Sub Kabel 3 DVI Kabel 4 Audio Kabel 5 Stromkabel 6 Kopfh reranschluss 7 USB Kabel 8 F r einen optimalen Arbeitskomfort kann der Monitor indi...

Страница 23: ...tierung an Ihrem neuen Monitor zu er leichtern Ist eines der Einstellpunkte hervorgehoben werden die aktuellen Einstellungen angezeigt Sie haben die M glichkeit die Einstellungen Ihres Monitors manuel...

Страница 24: ...NG MODE Folgende Optionen k nnen gew hlt werden um das Eingangssignal der Bildschirmgr sse anzupassen Fill All Das Signal der gesamten Bildschirmgr sse anpassen Fill Aspect Ratio Das horizontale Signa...

Страница 25: ...r ein Software Hilfsprogramm oder ber Hardware Dip Schalter mit dem denen Sie die Frequenz ndern k nnen die bei jeder Aufl sung zur Anwendung kommt 12 13 STROMSPARSYSTEM LED INDICATOR POWER MANAGEMENT...

Страница 26: ...0Hz analog digital Hinweis Im Falle dass Sie den Monitor an einen Macintosh anschlie en m chten ben tigen Sie gegebenenfalls einen zus tzlichen Mac Adapter PINBELEGUNG Nachstehend finden Sie die Pinbe...

Страница 27: ...0 C Luftfeuchtigkeit 20 RH bis 85 RH nicht kondensierend Abmessungen B x H x T 432mm x 440mm x 198mm Gewicht Netto 5 9kg 16 17 IM ST RUNGSFALLE Falls sich die St rungen auch nach Durchf hrung der nach...

Страница 28: ...ung sind die Zeichen noch undeutlich Das Bild ist zu dunkel Die Anzeige farbe ist nicht normal Bildschirmgr e und position ndern sich nicht berpr fung Einstellungen Phase berschreitet die Videotaktfre...

Страница 29: ...t Abhilfe Den Windows Schirm umschalten oder die Einstellung manuell durchf hren Bet tigen Sie jeweils nur eine Taste Beachten Sie bitte die folgenden Punkte Copyright bei miro Displays GmbH 2003 Dies...

Страница 30: ...L or coloured RED If you have any questions concerning which proper power cord to use please consult with the dealer from whom you have purchased the product ANHANG Sicherheitsrichtlinien Warnung Dies...

Страница 31: ...ipment off and on the user is encouraged to try to correct the interfe rence by one or more of the following measures Reorient or relocate the receiving antenna Increase the separation between the equ...

Страница 32: ...ales 1 V rification de la livraison de l quipement 2 Caract ristiques du moniteur 3 INSTALLATION Commandes frontales 7 Menu cran 8 MENU CRAN Description des menus 9 R F RENCE Mode conomie d nergie du...

Страница 33: ...l appareil et le r cepteur Branchez l appareil sur une prise de courant faisant partie d un circuit diff rent de celui qui alimente le r cepteur Consultez le concessionnaire ou un technicien qualifi e...

Страница 34: ...r le panneau pour toujours De l eau des produits pour laver les vitres ou des produits TFT sp ciaux sont sans danger Faites attention que de l eau ou des produits huileux ne s infiltrent pas l int rie...

Страница 35: ...secteur 3 Pour viter les d charges lectriques d branchez le cordon d alimentation de l adaptateur d alimentation avant de connecter le c ble des signaux l ordinateur 4 N approchez pas de liquides ni d...

Страница 36: ...points 0 294mm I x 0 294mm L Fr quencedebalayageanalogiqueEntr e24kHz 93kHz H 55Hz 85Hz V Fr quencedebalayagedigitalEntr e 24kHz 83kHz H 55Hz 85 Hz V Alimentation universelle AC 100 240V ac Consommati...

Страница 37: ...compatible VESA au mur Pr paration du moniteur pour le montage mural 1 Retirez les 4 vis de fixation du moniteur au socle et s parez les deux l ments voir la figure 1 fig 1 2 Fixez le syst me de mont...

Страница 38: ...bas pour s lectionner une des commandes Diminution de la valeur de commande 3 D place l ic ne s lectionn e vers le haut pour s lectionner une des commandes Augmentation de la valeur de commande 4 Affi...

Страница 39: ...play pour que vous puissiez r gler plus facilement les param tres du moniteur Lorsqu elles sont en surbrillance les ic nes indiquent la fonction vous permettant d identifier les commandes qui doivent...

Страница 40: ...ou apr s avoir install une carte graphique diff rente sur le PC DESCRIPTION DES MENUS PHASE PHASE S lectionnez cette commande et utilisez les boutons et pour r gler l image l cran jusqu ce qu elle so...

Страница 41: ...un utilitaire logiciel ou d interrupteurs DIP pour que vous puissiez changer la fr quence de chaque r solution R solution Fr quence Horloge Polarity Horizontale Verticale Horizontale Verticale MHz H...

Страница 42: ...ans condensation Dimension 413mm L x 418mm I x 175mm H Poids Net 6 0kg 13 2lbs 14 15 CONNECTEUR VGA D SHELL PRISE DE COURANT 1 Masse 1 2 2 DC 12 V output Affectation des broches CONNECTEUR VGA D SHELL...

Страница 43: ...fiez que le c ble des signaux du moniteur est bien connect au port de la sortie vid o l arri re de l ordinateur R glez la luminosit et le contraste L image est instable et pas mise au point Utilisez l...

Страница 44: ...u standard VESA do monta u na cianie 6 Przyciski kontrolne 7 Wy wietlanie funkcji na ekranie OSD 8 PRZYCISKI FUNKCJI OSD Opis menu OSD 9 OPIS PODSTAWOWYCH W A CIWO CI Funkcje zarz dzania poborem energ...

Страница 45: ...EGO U YTKOWANIA 1 Nie nale y otwiera obudowy monitora Wewn trz nie znajduj si adne elementy regulacyjne dost pne dla u ytkownika 2 W przypadku zagro enia nale y natychmiast od czy przew d zasilaj cy z...

Страница 46: ...ia dla wzroku Monitor LCD miro TD490 posiada dwa wej cia sygna u video wej cie analogowe oraz wej cie cyfrowe DVI Naturalna rozdzielczo ekranu monitora miro TD490 wykonanego w technologii aktywnej mat...

Страница 47: ...matrycy TFT tranzystor w cienkowarstwowych na bazie amorficznego krzemu Rozdzielczo sygna u analogowego a do naturalnej warto ci 1280x1024 85Hz odpowiadaj cej konstrukcji matrycy Rozdzielczo dla sygn...

Страница 48: ...tawu 7 W czy komputer a nast pnie monitor LCD 8 W celu ustawienia k ta patrzenia na ekran monitora LCD nale y delikatnie przytrzyma podstaw monitora i przechyli ekran trzymaj c go drug r k za kraw d o...

Страница 49: ...g o no ci Wy wietlanie funkcji na ekranie OSD Monitor LCD miro TD490 posiada opcj wy wietlania menu funkcji na ekranie OSD Ikony funkcji OSD zosta y zaprojektowane tak aby u atwi u ytkownikowi ustawi...

Страница 50: ...a wybra j zyk menu OSD Scaling Mode Skalowanie Obrazu S u y do dostosowania sygna u do wymaganej wielko ci obrazu Mo liwe s dwie opcje Fill All do dostosowania sygna u do pe nego obrazu Fill Aspect Ra...

Страница 51: ...st jednokierunkowym kana em informacyjnym z monitora do komputera poprzez kt ry s stale przekazywane dane EDID DDC2B jest dwukierunkowym kana em danych bazuj cym na protokole I2 C Komputer mo e za da...

Страница 52: ...TMDS Dane 2 Pin 3 Niebieski Pin 3 TMDS Dane 2 4 ekran Pin 4 Masa Pin 4 TMDS Dane 4 Pin 5 Masa Pin 5 TMDS Dane 4 Pin 6 Masa czerwona Pin 6 DDC Zegar Pin 7 Masa zielona Pin 7 DDC Dane Pin 8 Masa niebies...

Страница 53: ...owo prosimy o zapoznanie si z poni szymi sposobami szybkiego usuwania najcz ciej wyst puj cych usterek Je eli problemu nie mo na usun za pomoc jednego z opisanych sposob w prosimy o skontaktowanie si...

Страница 54: ...ija poziomo Nale y sprawdzi czy wej ciowy sygna video mie ci si w zakresie dopuszczalnych dla 19 monitora LCD warto ci cz stotliwo ci maksymalnie 85Hz dla rozdzielczo ci 1280x1024 Ewentualnie sprawdzi...

Отзывы: