Miro TD271 Скачать руководство пользователя страница 10

T

IMING 

G

UIDE

The LCD is a multi-frequency display. It operates at horizontal frequencies
between 31KHz - 80KHz and vertical frequencies between 60Hz - 75Hz.
Because of its microprocessor-based design, it offers auto-
synchronization and auto-sizing capabilities. This monitor offers 11 pre-
programmed settings that are listed in the timing table on page 12.

These preset modes cover most of the common video modes supported
by popular graphics adapters. However, each adapter’s implementation of
these video modes may vary slightly. If you find it necessary to make
minor display adjustments (for example, horizontal and vertical position).
Please refer to the On Screen Display section of this manual for 
instructions.

If you would like to use one of the preset timing modes, please refer to
your video card manufacturer’s installation guide for instructions on how
to make these changes. The video card controls the refresh rate. Most
video cards provide a software utility or hardware DIP switches that allows
you to change the frequency used for each resolution.

P

OWER 

M

ANAGEMENT

LED I

NDICATOR

(P

OWER

M

ANAGEMENT

A

CITVE

)

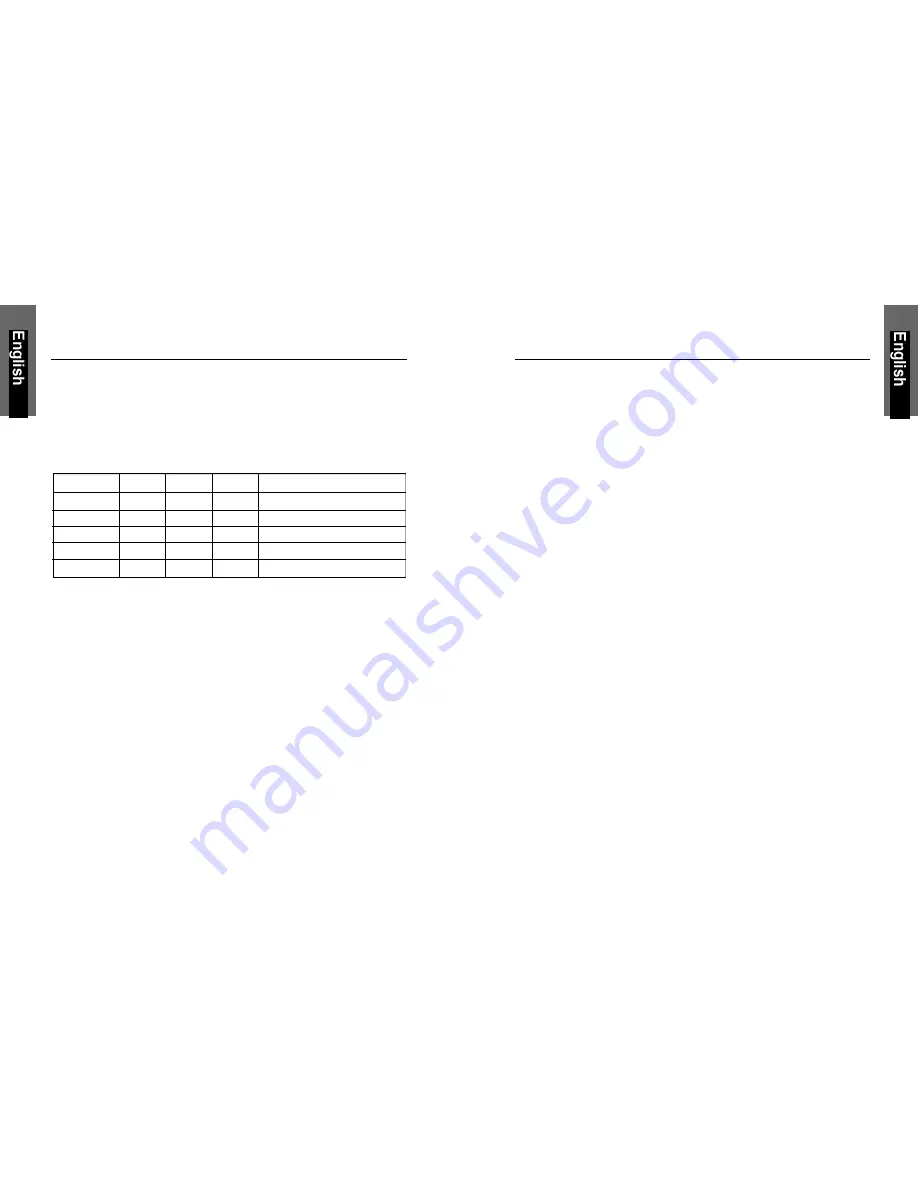
The power management feature of this LCD monitor is comprised of two
stages: On or Out Of Range (Green), OFF (Amber/Green blinking).
In the off mode, all circuitry in the monitor is shut down, except for a low
power detection circuit. This circuit allows the monitor to wake up when
the mouse is moved or a key on the keyboard is pressed.

Power Mode H-Sync

V-Sync

Video

LED Color

Normal

Pulse

Pulse

Active

Green

Out Of Range

Pulse

Pulse

Active

Green

Off

Pulse

No pulse

Blanked

Amber blinked per 1 sec.

Off

No pulse

Pulse

Blanked

Amber blinked per 1 sec.

Off

No pulse

No pulse

Blanked

Amber blinked per 1 sec.

10

11

Содержание TD271

Страница 1: ...miro TD271 Manual miro Displays GmbH TRIFORUM Haus A1 Frankfurter Str 233 D 63263 Neu Isenburg Tel 0180 5 22 35 26 0 12Euro Min Fax 06102 3667 77 e mail kontakt miro de...

Страница 2: ...iii General Information 1 Equipment Checklist 2 Monitor Features 3 GETTING STARTED Installation 4 Control Buttons 5 On Screen Display 6 ON SCREEN CONTROLS Menu Descriptions 7 REFERENCE Power Manageme...

Страница 3: ...ntenna Increase the separation between the equipment and receiver Connect the equipment to an outlet on a circuit different from that to which the receiver is connected Consult the dealer or an experi...

Страница 4: ...nent damage Water IPA Iso Prophyl Alcohol and Hexane are safe cleaners Do not allow oil or water to penetrate the display as droplets cause staining and discoloration with time Keep food particles and...

Страница 5: ...on the monitor No user serviceable parts are inside 2 In an emergency disconnect the AC power plug 3 To avoid electrical shock disconnect the power cord from the AC adapter before connecting the signa...

Страница 6: ...ded VGA super VGA IBM XGA modes super XGA as well as VESA resolution standards Resolution up to 1280 x 1024 Dot pitch 0 264mm H x 0 264mm W Universal power supply AC 90 264V allowed Power consumption...

Страница 7: ...Controls BUTTON DESCRIPTION 1 Menu button To push menu button turns on the menu and it activates the items you highlight 2 Select button To choose which function you need in OSD Menu and to increase...

Страница 8: ...d the icons illustrate the control function to assist you in identifying which control needs adjustment Before activating the OSD menu the Auto button 3 can be used to automatically adjust the display...

Страница 9: ...ccording to VGA setting In the event of the display image needs further adjustment COLOR CONTROL Select this control then use the and select buttons 2 to scroll to the desired color temperature COOL T...

Страница 10: ...g modes please refer to your video card manufacturer s installation guide for instructions on how to make these changes The video card controls the refresh rate Most video cards provide a software uti...

Страница 11: ...ch dot on the screen is actually one pixel so to expand resolutions to full screen an interpolation of the resolution must be down When the interpolated resolution is not an exact multiple of the nati...

Страница 12: ...jack and to a power outlet Power on but no screent image Make sure the video cable attached with this monitor is tightly secured to the video output port on the back of the computer Adjust the bright...

Страница 13: ...ideo cable securely Try the miro Monitor with another power source Control buttons do not work Press only one button at a time The LCD contains over 3 932 160 thin film transistors TFTs A small number...

Страница 14: ...llplatz des Monitors iv Allgemeine Informationen 1 Pr fliste Zubeh r 2 Ger temerkmale 3 INSTALLATION Installation des Monitors 5 Bedienung 6 OSD Bildschirm Men 7 OSD BILDSCHIRM Men Erl uterungen 8 SON...

Страница 15: ...Innere des Monitors gelangen k nnen zu Besch digungen f hren Zudem setzen Sie sich dabei der Gefahr eines elektrischen Stromschlages aus Falls der Monitor besch digt ist vermeiden Sie unbedingt den K...

Страница 16: ...erabdr cke darauf SICHERHEITSRICHTLINIEN Gehen Sie sorgsam mit dem Netzkabel um Speziell beim unachtsamen Gebrauch des Netzkabels besteht die Gefahr eines elektrischen Stromschlages Stellen Sie keine...

Страница 17: ...euchtigkeit ber 90 aus Vermeiden Sie in jedem Fall Kondensation wird das Ger t aus einer kalten Umgebung in ein w rmeres eventuell feuchtes Umfeld gebracht kondensiert Feuchtigkeit im Inneren Ihres Mo...

Страница 18: ...N Das Ger t verf gt ber eine On Screen Display Kontrolle Diese erm glicht ber mehrere Einstellungspunkte eine problemlose und einfache Installation des Monitors Folgende Einstellm glichkeiten sind geg...

Страница 19: ...e die Kabel anschlie en vergewissern Sie sich unbedingt dass sowohl der Monitor als auch Computer nicht in Betrieb und von der Stromzufuhr getrennt sind 2 Das eine Ende des analogen Signalkabels an de...

Страница 20: ...der Auto Taste 3 des LCD Displays automatisiert durchzuf hren Hierbei werden folgende Einstellpunkte automatisch f r den Signaleingang vom Computer durchgef hrt Einstellung der horizontalen Position h...

Страница 21: ...peratur 9 300 K 6 500 K 5 500 K oder User Color wobei hier die Farbeinstellung R G B individuell eingestellt werden kann PHASE Feinoptimierung der Phase wird ben tigt wenn Sie mit dem Ergebnis der aut...

Страница 22: ...seine Mehrfrequenzeigenschaften jedes Signal innerhalb seines Frequenzbereiches von 31 kHz 80 kHz horizontal und 60 Hz 75 Hz vertikal darstellen Wenn Sie gern eine der voreingestellten Einstellm glic...

Страница 23: ...anschlie en m chten ben tigen Sie gegebenenfalls einen zus tzlichen Mac Adapter 12 13 PINBELEGUNG Nachstehend finden Sie die Pinbelegung f r die Verbindungsstecker Dies dient lediglich zu Ihrer Inform...

Страница 24: ...keit und die Hintergrundbeleuchtung richtig ein stellen berpr fen Sie die Steckdose indem Sie testen ob ein anderes elektr Ger t an ihr funktioniert Beachten Sie bitte die folgenden Punkte SPEZIFIKATI...

Страница 25: ...ung sind die Zeichen noch undeutlich Das Bild ist zu dunkel Die Anzeige farbe ist nicht normal Bildschirmgr e und position ndern sich nicht berpr fung Einstellungen Phase berschreitet die Videotaktfre...

Страница 26: ...dann mit neuen Bildschirminhalten berlagert 18 19 Symptom Die Gr ssenauto matik Einstellung funktioniert nicht richtig Die Tasten an der Vorderseite funktionieren nicht berpr fung VGA350 oder DOS Pro...

Страница 27: ...OMIENIE Pod czenie monitora 4 Przyciski kontrolne 5 Wy wietlanie funkcji na ekranie OSD 6 WY WIETLANIE FUNKCJI NA EKRANIE Opis funkcji OSD 7 OPIS PODSTAWOWYCH W A CIWO CI Funkcje zarz dzania poborem e...

Страница 28: ...mo e wyst pi tak e wzajemne oddzia ywane monitora i sprz tu radiowego Je eli Pa stwa monitor spowoduje oddzia ywanie na prac urz dze radiowych lub telewizyjnych u ytkownik jest proszony o zastosowani...

Страница 29: ...rzem 7 Monitor LCD nale y przemieszcza lub przenosi bardzo ostro nie W trakcie przenoszenia jedn r k nale y trzyma podstawk monitora a drug obudow matrycy LCD 8 Nale y zawsze od czy monitor od napi ci...

Страница 30: ...wy system OSD pozwalaj cy na cyfrow regulacj nast puj cych funkcji automatyczne ustawianie parametr w ekranu kontrast jasno po o enie obrazu zar wno w pionie jak i w poziomie wysoko obrazu przesuni ci...

Страница 31: ...onitora Opis przycisk w 1 Przycisk menu Naci ni cie tego przycisku powoduje wy wietlenie menu OSD oraz aktywowanie pod wietlanej funkcji 2 Przyciski wyboru S u do zmiany funkcji OSD Regulator g o no c...

Страница 32: ...tlenie wybranej ikony oraz paska ustawie zmieni kolor z czarnego na niebieski Nast pnie nale y wykorzysta lub przycisk w 2 do ustawienia odpowiedniej warto ci wybranej funkcji OSD Po zako czeniu ustaw...

Страница 33: ...Po o enie OSD w Poziomie Po wybraniu tej funkcji nale y u ywa przycisk w lub w celu przemieszczenia menu OSD w poziomie V Position Po o enie OSD w Pionie Po wybraniu tej funkcji nale y u ywa przycisk...

Страница 34: ...ulsuj cy co 1 sek pomara czowo PARAMETRY OD WIE ANIA EKRANU miro TD271 jest 17 monitorem LCD funkcjonuj cym przy wykorzystaniu wielu tryb w cz stotliwo ci od wie ania ekranu Dzia a on w zakresie cz st...

Страница 35: ...XGA M10 1024 768 60 02kHz 75 0Hz SXGA M11 1280 1024 63 98kHz 60 0Hz Uwaga W przypadku u ywania komputer w Apple Macintosh niezb dne mo e okaza si zastosowanie specjalnej przej ci wki na z cze video ka...

Страница 36: ...serwisem Brak zasilania Nacisn przycisk zasilania ON Powinna zapali si dioda sygnalizacyjna zasilania Sprawdzi czy kabel zasilaj cy jest prawid owo do czony zar wno do gniazdka sieciowego jak i do mo...

Страница 37: ...enie kabla sygna owego z komputerem Pod czy monitor LCD miro TD271 do innego gniazdka sieciowego Nie dzia aj przyciski kontrolne Nie nale y naciska jednocze nie kilku przycisk w kontrolnych Uwagi na t...

Отзывы: