


Polish
Polish
WY
Ś
WIETLANIE FUNKCJI NA EKRANIE (OSD)
Monitor miroTD590 posiada opcj
ę
wy
ś
wietlania menu funkcji na ekranie
(OSD). Ikony funkcji OSD zosta
ł
y zaprojektowane tak, aby u
ł
atwi
ć
u
ż
ytkownikowi ustawianie odpowiednich parametrów obrazu. Gdy dana
ikona jest pod
ś
wietlona, oznacza to,
ż
e odpowiednia funkcja mo
ż
e by
ć
regulowana przez u
ż
ytkownika.
Przed aktywowaniem funkcji OSD, proponujemy automatyczne
ustawienie wielko
ś
ci obrazu oraz jego poziomego i pionowego po
ł
o
ż
enia
za pomoc
ą
przycisku AUTO (przycisk 2). Przycisk nale
ż
y nacisn
ąć
na 2
sekundy.
Menu funkcji OSD wy
ś
wietla si
ę
i aktywuje automatycznie po naci
ś
ni
ę
ciu
przycisku 1 (MENU) na panelu czo
ł
owym monitora. Menu OSD pozostaje
wy
ś
wietlone tak d
ł
ugo, jak jest to konieczne do przeprowadzenia
niezb
ę
dnych ustawie
ń
. Nale
ż
y wykorzystywa
ć
przyciski i
do przemieszczania pod
ś
wietlenia ikon odpowiadaj
ą
cych zmienianym
parametrom obrazu. Naci
ś
ni
ę
cie przycisku AUTO (przycisk 2) powoduje
ukazanie si
ę
podmenu obok menu g
ł
ównego. Nacisn
ąć
przycisk MENU
(przycisk 1) i ponownie zwolni
ć
, aby uaktywni
ć
dostrajany parametr. Aby
ustawi
ć
po
żą
dane nat
ęż
enie wybranego parametru nale
ż
y pos
ł
ugiwa
ć
si
ę
przyciskami WYBIERZ (SELECT)
Po ustawieniu parametrów obrazu nale
ż
y nacisn
ąć
przycisk MENU
(przycisk 1), aby zachowa
ć
ustawienia. Aby powróci
ć
do menu g
ł
ównego
wybra
ć
ikon
ę
WYJ
Ś
CIE (EXIT) i nacisn
ąć
przycisk MENU (przycisk 1).
Jednoczesne naci
ś
ni
ę
cie obu przycisków WYBIERZ (SELECT)
spowoduje przywrócenie domy
ś
lnych ustawie
ń
fabrycznych Kontrastu i
Jasno
ś
ci.
Naci
ś
ni
ę
cie przycisków WYBIERZ (SELECT) gdy funkcja OSD
jest nieaktywna spowoduje pojawienie si
ę
menu Jasno
ść
/Kontrast.
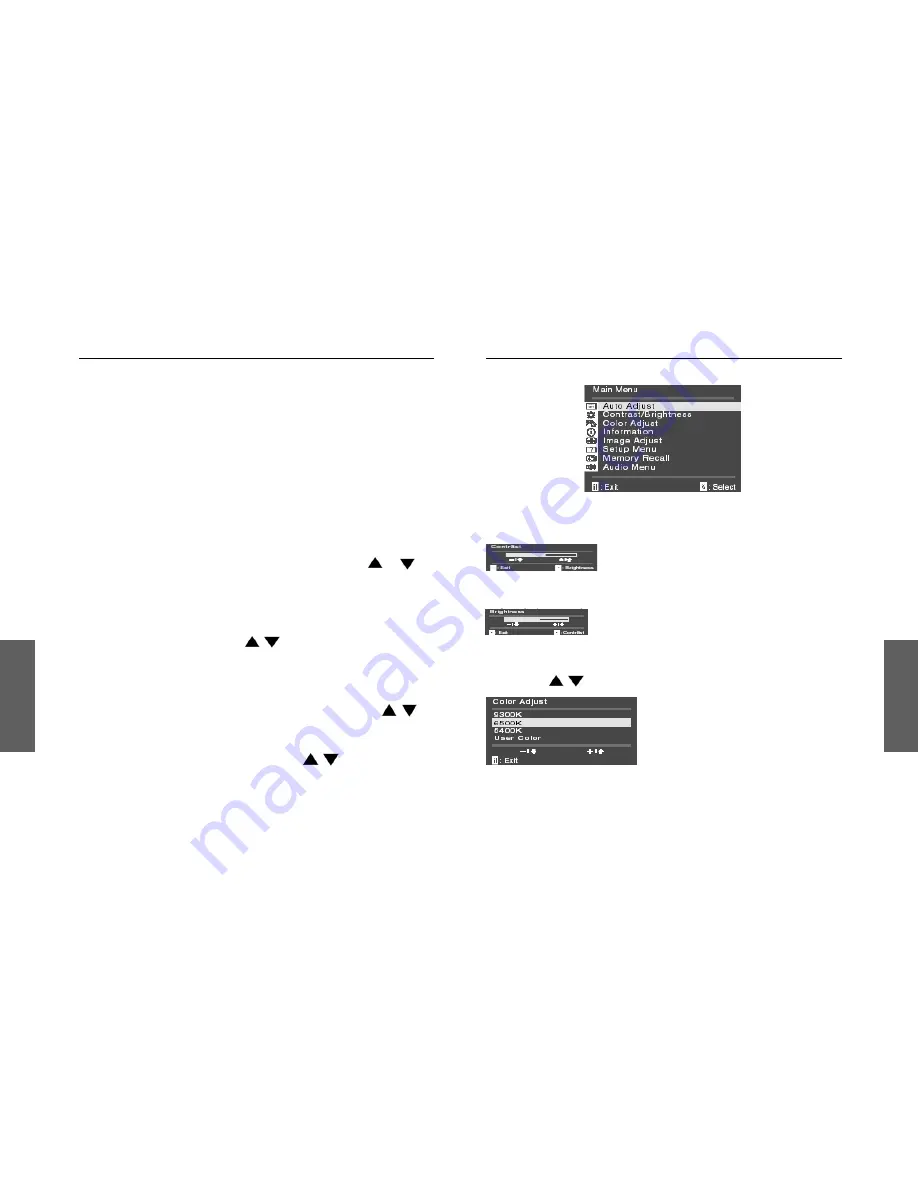
OPIS MENU OSD
menu g
ł
ówne ekranu
Contrast (Kontrast)
Regulacja intensywno
ś
ci obrazu w stosunku do t
ł
a.
Brightness
(
Jasno
ść
)
Regulacja poziomu jasno
ś
ci obrazu wraz z t
ł
em.
Color Adjust (Ustawienia koloru)
Ustawienie po
żą
danej temperatury kolorów (przewijanie za pomoc
ą
przycisków)
6500*K ustawia temperatur
ę
koloru obrazu na 6500*K (x=0.315, y=0.333)
9300*K ustawia temperatur
ę
koloru obrazu na 9300*K (x=0.281, y=0.311)
5400*K ustawia temperatur
ę
koloru obrazu na 5400*K
7
6


