


3
2 Installation
2.1 Unpacking
Make sure the following items have been shipped with your FRS-111i. If any of the
following items are missing, contact your distributor or Miranda Technologies Inc.
•
FRS-111i 4:2:2 Frame Synchronizer
•
FRS-111i rear panel label (2)
•
This manual
2.2 FRS-111i Mechanical Installation
The FRS-111i must be mounted within Quartet, Quartet-R-C, Quartet C, Quartet M,
Symphonie or Solo
imaging
housing frames in order to provide power to the card.
This section describes how to install the FRS-111i in any of these housing frames. It
is not necessary to switch off the power from these housing frames when installing
the FRS-111i .
2.2.1
imaging
Quartet, Quartet C and Quartet M Housing Frames
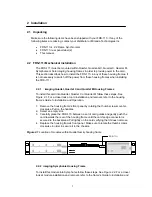
To install this card into Quartet, Quartet C or Quartet M follow these steps. See
Figure 2.1. For a closer look at card installation and removal, refer to the housing
frame's
Guide to Installation and Operation
.
1. Remove the housing frame's front panel by rotating the thumb screws counter-
clockwise. Pull on the handles.
2. Select an empty slot.
3. Carefully place the FRS-111i between a set of card guides and gently push the
card towards the rear of the housing frame until the card's edge connector is
secured to the backplane. Pull lightly on the card verifying that it does not move.
4. Replace the housing frame's front panel. Make sure to rotate the thumb screws
clockwise in order to secure it to the chassis.
Figure 2.1
Location of modules within Quartet-family housing frame
2.2.2
imaging
Symphonie Housing Frame
To install this module into Symphonie follow these steps. See Figure 2.2. For a closer
look at module installation and removal, refer to the frame's
Guide to Installation and
FRS-111i
FRS-111i
Содержание FRS-111i
Страница 21: ...17 ...


