background image

2

Getting to know your dash cam

 ............................................................................ 4

Rear camera.................................................................................................... 4

Using your dash cam in a vehicle ......................................................................... 5

Precautions and notices .................................................................................. 5

Inserting a memory card ....................................................................................... 8

Formatting a card ............................................................................................ 8

Connecting to your computer

 ............................................................................... 8

Turning the dash cam on ...................................................................................... 9

Power button ................................................................................................... 9

Restarting the dash cam ................................................................................. 9

System icons ...................................................................................................... 10

Function keys

 ..................................................................................................... 10

Switching screens ..........................................................................................11

Setting the date and time ....................................................................................11
Recording in driving mode .................................................................................. 12

Continuous recording

 .................................................................................... 12

Event recording

 ............................................................................................. 12

Recording in Parking mode

 ................................................................................ 13

Camera mode

 ..................................................................................................... 14

Playback mode

 ................................................................................................... 14

Safety camera alerts .......................................................................................... 15

Adding a safety camera

.................................................................................

16

Updating safety camera data ........................................................................

16

Table of Contents

Содержание MiVue 750 series

Страница 1: ...TM User Manual Series TM 790 750...

Страница 2: ...C does not warrant this document is error free MiTAC assumes no liability for damage incurred directly or indirectly from errors omissions or discrepancies between the device and the documents Note No...

Страница 3: ...8 Turning the dash cam on 9 Power button 9 Restarting the dash cam 9 System icons 10 Function keys 10 Switching screens 11 Setting the date and time 11 Recording in driving mode 12 Continuous recordin...

Страница 4: ...8 MiVue Manager 23 Installing MiVue Manager 23 Playing the recording files 23 For more information 26 Caring for your device 26 Safety precautions 27 About charging 27 About the charger 27 About the b...

Страница 5: ...ice mount socket 3 Mini USB connector 4 Shutdown button 5 LCD screen 6 Microphone 7 System indicator 8 Event button 9 Memory card slot 10 Parking indicator 11 Speaker 12 Camera lens 13 Function keys R...

Страница 6: ...mera lens and no reflective material is placed near the lens Please keep the lens clean l If the car s windscreen is tinted with a coating it may impact the recording quality l To ensure the highest q...

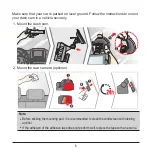
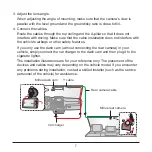
Страница 7: ...your dash cam in a vehicle securely 1 Mount the dash cam 2 Mount the rear camera optional Note l Before sticking the mounting pad it is recommended to clean the windscreen with rubbing alcohol l If th...

Страница 8: ...icle s airbags or other safety features If you only use the dash cam without connecting the rear camera in your vehicle simply connect the car charger to the dash cam and then plug it to the cigarette...

Страница 9: ...ard not supplied before you can start recording The dash cam supports the Class 10 memory cards with 8 GB 128 GB capacity Hold the card MicroSD by the edges and gently insert it into the slot as shown...

Страница 10: ...When the dash cam is turned on press to switch the LCD screen on and off Restarting the dash cam Occasionally you may need to perform a hardware reset when the dash cam stops responding or if it appe...

Страница 11: ...status 5 GPS signal 6 Power status 7 Current GPS car speed 1 2 3 5 6 4 7 Function keys The device provides four function keys to control the corresponding icons displayed on the LCD screen The keys f...

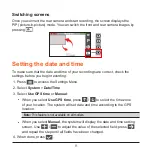
Страница 12: ...begin recording 1 Press to access the Settings Menu 2 Select System Date Time 3 Select Use GPS time or Manual l When you select Use GPS time press to select the time zone of your location The system...

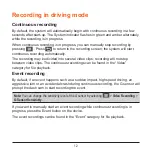
Страница 13: ...video clips recording will not stop between video clips The continuous recordings can be found in the Video category for file playback Event recording By default if an event happens such as a sudden...

Страница 14: ...ion will erase the memory card so save any videos or photos to your computer first When the Parking mode detection is enabled the system will enter Parking mode when you l Disconnect the device s powe...

Страница 15: ...he desired file from the list and then press to start playback 4 During playback you can l While playing videos press to play the previous next video l While viewing photos press to display the previo...

Страница 16: ...n is not available in all countries You can receive alerts to warn you about the locations of safety speed cameras which will enable you to monitor your speed through these areas When a safety camera...

Страница 17: ...o add a custom safety camera in the current location press on the recording screen 2 The next time when you pass by the location you will receive alerts by the dash cam 3 To view the information of th...

Страница 18: ...e This feature is not available on all models The WIFI function allows you to connect the dash cam to your smartphone The WIFI function is disabled by default You can enable WIFI by selecting WIFI On...

Страница 19: ...videos by pressing the Event button System settings Note Not all setting items and options are available for all models To customise the system settings press l File Playback Plays the recorded videos...

Страница 20: ...nsors locations l Learning Mode When new TPMS sensors are installed use this option for the dash cam to detect the new sensors Note For more information on installing and using TPMS see the documentat...

Страница 21: ...olour of the indicator will change red yellow or green depending on your driving status to remind you to drive more efficiently The default setting is Off l FCWS Select Beep or Voice to enable the FCW...

Страница 22: ...Only G sensor Only Motion or Both Motion G sensor l Auto Entry Sets the mode Low Medium High or Manual for the system to enter Parking mode automatically l Motion Detection Sets the sensitivity level...

Страница 23: ...xt information l System Allows you to change the system settings of the device l Satellites Displays the status of the GPS GLONASS signal reception You can press and then select GPS or GLONASS for bet...

Страница 24: ...er Download MiVue Manager from the Support page of Mio website www mio com support and follow the on screen prompts to install it Make sure to download the correct software version Windows or Mac acco...

Страница 25: ...he volume level 6 Plays the video in full screen 7 Displays the playback progress You can click on a point along the track bar to move directly to a different location for the playback 5 During playba...

Страница 26: ...s the Settings Menu The Settings items are described as follows l Change Language Sets the display language of MiVue Manager l Change Skin Sets the colour scheme of MiVue Manager l Check for Update Ch...

Страница 27: ...sation allow the device to dry out completely before use l The screen surface can easily be scratched Avoid touching it with sharp objects Non adhesive generic screen protectors designed specifically...

Страница 28: ...he device or charge the battery Do not cover the charger with paper or other objects that will reduce cooling Do not use the charger while it is inside a carrying case l Connect the charger to a prope...

Страница 29: ...the accuracy of all GPS equipment l GPS satellite signals cannot pass through solid materials except glass When you are inside a tunnel or building GPS positioning is not available Signal reception c...

Страница 30: ...04 and IEC 61000 4 11 2004 EN 301 489 1 V2 2 1 2017 02 EN 301 489 17 V3 1 1 2017 02 EN 301 489 3 V2 2 1 2017 03 ETSI EN 300 328 V2 1 1 EN 300 440 V2 1 1 2017 IEC60950 1 ed 2 am1 am2 ISO7637 2 2004 EN...

Страница 31: ...of as normal household waste in accordance with the EU directive for waste electrical and electronic equipment WEEE 2012 19 EU Instead it should be disposed of by returning it to the point of sale or...

Отзывы: