background image

5

• Tape over lithium battery contacts to avoid short-circuiting during disposal;

always follow local regulations for battery disposal.

• Do not disassemble this product. Electric shock may cause injury if a high

voltage circuit inside the product is touched. Take the product to a Minolta
Service Facility when repairs are required.

• Immediately remove the batteries and discontinue use if the camera is

dropped or subjected to an impact in which the interior, especially the flash
unit, is exposed. The flash has a high voltage circuit which may cause an
electric shock resulting in injury. The continued use of a damaged product or
part may cause injuries. 

• Keep batteries or small parts that could be swallowed away from infants.

Contact a doctor immediately if an object is swallowed.

• Store this product out of reach of children. Be careful when around children,

not to harm them with the product or parts.

Continued on next page.

Содержание Zoom 130C

Страница 1: ...E INSTRUCTION MANUAL...

Страница 2: ...lm 16 BASIC OPERATION Fully Automatic Operation 19 Focus Lock 22 Special Focusing Situations 23 For Closer Subjects 24 Rewinding the Film 26 CONTENTS Thank you for your purchasing this Minolta camera...

Страница 3: ...9 Flash Range 30 Autoflash 31 Fill flash 32 Flash cancel 33 Night Portrait 34 Landscape Night View 35 Self timer 36 For Owners of the Quartz date model 38 Date and Time Imprinting 38 Remote Control Op...

Страница 4: ...s with the polarity reversed Do not use batteries which show wear or damage Do not expose batteries to fire high temperatures water or moisture Do not attempt to recharge short or disassemble batterie...

Страница 5: ...and discontinue use if the camera is dropped or subjected to an impact in which the interior especially the flash unit is exposed The flash has a high voltage circuit which may cause an electric shoc...

Страница 6: ...e product immediately remove the batteries and discontinue use The continued use of a product exposed to liquids may cause damage or inquiry through fire or electric shock Do not use the product near...

Страница 7: ...ries which may result in burns or injuries caused by heat fire explosion or leaking battery fluid If batteries are leaking discontinue use of the product The lens retracts when the camera is turned of...

Страница 8: ...d the user s authority to operate the equipment This equipment has been tested and found to comply with the limits for a Class B digital device pursuant to Part 15 of the FCC Rules These limits are de...

Страница 9: ...the separation between the equipment and the receiver Connect the equipment to an outlet on a circuit different from that to which the receiver is connected Consult the dealer or an experienced radio...

Страница 10: ...ean Refer to the care and storage section at the back of this manual p 51 BODY The quartz date model is illustrated Flash p 28 Self timer Red eye reduction lamp p 29 37 46 Lens Lens barrel Remote cont...

Страница 11: ...Shutter release button p 21 Data panel p 12 Viewfinder p 12 Date button p 38 43 Quartz date model only Flash mode Select button p 28 35 38 43 Main switch p 19 Film window p 16 Battery chamber door p...

Страница 12: ...display p 38 Quartz date model only DATA PANEL All indicators are displayed for clarity Flash mode indicators p 28 Remote control indicator p 45 Quartz date model only VIEWFINDER Glows steadily Focus...

Страница 13: ...Pass the small loop of the strap through the strap eyelet on the camera 2 Pass the the other end of the strap through the small loop and tighten 1 2 BUTTON KEY The button key is included on the strap...

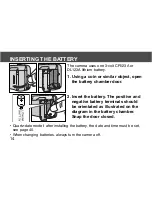
Страница 14: ...n the camera off 14 INSERTING THE BATTERY The camera uses one 3 volt CR123A or DL123A lithium battery 1 Using a coin or similar object open the battery chamber door 2 Insert the battery The positive a...

Страница 15: ...ks and no other indicators are displayed on the data panel The shutter will not release Replace the battery immediately Each time the camera is turned on an indicator will appear on the data panel to...

Страница 16: ...ot currently loaded LOADING THE FILM If the back cover does not open turn the camera off and on to release the film chamber lock Use only DX coded 35mm film rated between ISO 25 and 3200 Do not use Po...

Страница 17: ...GETTING STARTED 2 Place the film cartridge into the film chamber 3 Extend the film leader to the film tip mark The film must lay flat If the film tip extends beyond the index mark push the excess fil...

Страница 18: ...panel frame counter If the film has been loaded improperly 0 will blink on the frame counter and the shutter will not release Open the back cover and repeat the loading procedure Once the film is load...

Страница 19: ...to power off function will turn the camera off eight minutes after the last operation Do not obstruct or hold the lens barrel 2 Hold the camera steadily Do not cover the flash lens AF windows or Meter...

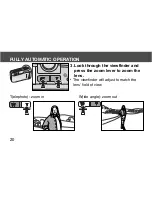
Страница 20: ...20 3 Look through the viewfinder and press the zoom lever to zoom the lens The viewfinder will adjust to match the lens field of view T elephoto zoom in W ide angle zoom out FULLY AUTOMATIC OPERATION...

Страница 21: ...5 When the indicator lamp glows press the shutter release button all the way down to take the picture Press the shutter release button with slow steady pressure The film automatically advances to the...

Страница 22: ...the shutter release button partway down the indicator lamp should glow to indicate focus lock The indicator lamp confirms focus lock If the lamp does not glow repeat steps 1 and 2 3 Without lifting yo...

Страница 23: ...me distance as your subject and then the image can be recomposed to take the picture The autofocus system may not be able to focus on the following Bright light sources such as neon signs Highly refle...

Страница 24: ...may blink slowly and the shutter can be released but the focus may not be accurate When taking pictures with subjects closer than 1 5m 4 9ft the viewfinder image and the actual film image will be dif...

Страница 25: ...dicator lamp will glow to indicate focus lock 2 While pressing the shutter release button partway down recompose the picture so that the top and left edge of the area in the picture is aligned with th...

Страница 26: ...is taken When the cartridge mark blinks on the data panel the film has been rewound Open the back cover and remove the film The film chamber lock is released during rewind Do not open the back cover u...

Страница 27: ...more pictures than specified on the film package may be taken the film processor may only print the number specified on the film cartridge To rewind the film before finishing the roll turn the camera...

Страница 28: ...til the corresponding indicator is displayed on the data panel Each time the flash mode button is pressed the mode cycles as shown When the camera is turned off the mode is reset to autoflash Autoflas...

Страница 29: ...ed partway down the self timer red eye reduction lamp on the front of the camera will automatically glow to reduce the red eye effect in portraits Press the shutter release button part way down for a...

Страница 30: ...angle position as it is at the telephoto position To ensure proper exposure the subject must be within the flash range FLASH RANGE The distances are based on use with color negative film ISO100 Focal...

Страница 31: ...l fire automatically in low light This is the default flash mode The flash charges when the shutter release button is pressed partway down When the indicator lamp glows the flash is charged and ready...

Страница 32: ...ed regardless of lighting Use fill flash to reduce harsh shadows on your subject s face or in back lit situations Press the flash mode button until the fill flash indicator appears on the data panel T...

Страница 33: ...is prohibited the subject is beyond the flash range or to preserve the natural lighting Press the flash mode button until the flash cancel indicator appears on the data panel Take the picture as desc...

Страница 34: ...cene Press the flash mode button until the night portrait indicator appears on the data panel Take the picture as described in the basic operation section Shutter speed may be slow The use of a tripod...

Страница 35: ...jects This mode is especially useful when photographing landscapes through windows Press the flash mode button until the landscape night view indicator appears on the data panel Take the picture as de...

Страница 36: ...the focus frame and press the shutter release button partway down to lock the focus and charge the flash When the indicator lamp glows the focus is locked the picture can be recomposed The self timer...

Страница 37: ...camera will blink slowly during the countdown then rapidly just before the shutter is released The autofocus and exposure is locked when the shutter release button is pressed Do not stand in front of...

Страница 38: ...nd time imprinting and remote control operation DATE AND TIME IMPRINTING The imprinting feature enables the date or time to be printed onto the lower right portion of the picture The date is recorded...

Страница 39: ...will change as follows If the date time display blinks the clock and calendar must be set Only the no imprinting and set mode options are available Since the date is recorded when the film is advanced...

Страница 40: ...set each time the battery is replaced 1 Turn the camera on Press the date button until SEt appears on the data panel 2 Press the select SEL button until the item to be adjusted blinks Each time the se...

Страница 41: ...lever counts down the T side counts up 4 Repeat steps 2 and 3 until all items in the date and time display are correct 5 Press the date button to set the date and time The camera will return to the s...

Страница 42: ...SEt appears on the data panel 2 Press and hold the select SEL button for more than 2 seconds until all items on the date display blink Pressing the select SEL button until the date time display stops...

Страница 43: ...D M Y 4 Press the date button to set the date format The camera will return to the shooting mode automatically after five seconds Pressing the date button again or pressing the shutter release button...

Страница 44: ...e model can be controlled by the IR remote control RC 3 sold separately The remote control allows remote camera operation up to 5 meters 16 5 feet away Focus lock cannot be used with the IR remote con...

Страница 45: ...ERATION TAKING PICTURES USING THE REMOTE CONTROL 1 Place the camera on a tripod Point the camera so that the subject is within in the focus frame 2 Press the drive mode button until the remote control...

Страница 46: ...he delay button 2s is pressed the lamp will blink for two seconds before the picture is taken To save power the camera automatically shuts down if the shutter is not released in approximately 8 minute...

Страница 47: ...uttons does not release the shutter the battery needs to be replaced The supplied battery should be sufficient for approximately ten years of operation 1 Pull out the battery chamber as shown and remo...

Страница 48: ...17 500 mph Mr Glenn visited our Sakai camera factory in Japan on May 24th 1963 to plant a palm tree to celebrate the occasion The palm tree is still in the courtyard of the factory and stands over ei...

Страница 49: ...a panel response time will be slow At higher temperatures the display will temporarily darken but will be restored when the temperature normalizes Never subject the camera to extreme humidity To preve...

Страница 50: ...gain some of their charge when they warm up This camera is not waterproof dust proof or sand proof Care should be taken when using of this camera near water or the beach to protect it from damage caus...

Страница 51: ...ns surface first brush away any dust or sand then if necessary moisten a lens tissue with lens cleaning fluid and gently wipe the lens in a circular motion starting from the center Never place lens fl...

Страница 52: ...alfunction STORAGE When storing the camera for extended periods please follow these guidelines Store the camera in a cool dry well ventilated area away from dust and chemicals For very long periods pl...

Страница 53: ...f the camera does not resume normal operation or the camera malfunctions repeatedly contact an authorized Minolta Service Facility QUESTIONS AND SERVICE If you have questions about your camera contact...

Страница 54: ...nge ISO 25 to 3200 Metering Range Wide Ev 6 16 ISO 100 Tele Ev 6 16 Shutter Speed 4 1 500 sec Flash Range Wide 0 7 5 3 m 2 3 17 4 ft ISO 100 Tele 0 8 1 6 m 2 6 5 2 ft Battery One 3 volt CR123A lithium...

Страница 55: ...e relief 18mm from the viewfinder frame Dimensions 114 x 62 5 x 46 mm 4 5 x 2 5 x 1 8 in Weight 195g 6 9 oz without battery Specifications are based on the latest information available at the time of...

Страница 56: ...nelux B V Zonnebaan 39 P O Box 6000 NL 3600 HA Maarssen The Netherlands Belgian Branch Prins Boudewijnlaan 1 B 2550 Kontich Belgium Minolta Schweiz AG Riedstrasse 6 CH 8953 Dietikon Switzerland Minolt...

Отзывы: