background image

32

33

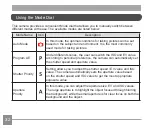
Using the Mode Dial

This camera provides a convenient Mode dial that allows you to manually switch between 
different modes with ease. The available modes are listed below: 

Mode Name

Icon

Description

Auto Mode

In this mode, the optimal conditions for taking pictures will be set 
based on the subject and environment. It is the most commonly 
used mode for taking pictures.

Program AE

Under different scenes, the user can switch the ISO and EV value 
according to personal preference, the camera can automatically set 
the shutter speed and aperture value.

Shutter Priority 

Setting allows you to adjust the shutter speed / EV value and ISO 
value. The camera automatically sets the aperture value based 
on the shutter speed and ISO value to get the most appropriate 
exposure value.

Aperture 
Priority

In this mode, you can adjust the aperture size, EV and ISO values. 
The large aperture is to highlight the object focused through blurring 
the background, while the small aperture is for clear focus on both the 
background and the object.

Содержание ProShot MN67Z

Страница 1: ...User Manual EN To ensure the best performance from your camera please read the Operating Manual before using the camera...

Страница 2: ...mful interference in a residential installation This equipment generates uses and can radiate radio frequency energy and if not installed and used in accordance with the instructions may cause harmful...

Страница 3: ...nction with any other antenna or transmitter Radiation Exposure Statement This product complies with the FCC portable RF exposure limit set forth for an uncontrolled environment and is safe for intend...

Страница 4: ...ed for identification purposes only and are properties of their respective owners and holders This manual provides you with instructions on how to use your new MINOLTA MN67Z Digital Camera Every effor...

Страница 5: ...ouching the lens of the camera Do not expose the camera to direct sunlight for a long period of time To prevent the camera from being damaged by moisture do not use or store the camera in very humid e...

Страница 6: ...and clean the lens Download your photos and remove the memory card when you are going to store the camera for long periods of time If this camera is not in use for a long period of time please keep it...

Страница 7: ...ttery from being damaged do not drop the battery or allow it to hit solid objects or to be scratched by foreign objects Do not let the battery come in contact with metal objects including coins to avo...

Страница 8: ...ot accessible to infants and children In colder environments the performance of the battery could be noticeably reduced When you install the battery align the battery markings according to the positiv...

Страница 9: ...he memory card Copy the data to your computer before you edit files When the camera is stored for long periods of time be sure to download your photos and remove the memory card Store the memory card...

Страница 10: ...may have a few dead or bright pixels These pixels do no effect the quality or performance of the camera photos or video Do not expose the camera s LCD to water In a humid environment only wipe it wit...

Страница 11: ...t Power On 24 Set your Language Date Time 24 Resetting your Language 25 Resetting Date Time 26 MODE OVERVIEW 27 LCD Display 27 Overview of the Screen Icons in Shooting Mode 27 Overview of the Screen I...

Страница 12: ...nction Menu 67 Using the Lens Function Ring 68 Zoom AF Mode 68 Function Ring Smart Mode 69 MF Manual Focus Mode 70 PLAYBACK 71 Viewing Photos and Videos 71 Thumbnail View 72 Using Zoom Playback for st...

Страница 13: ...om Settings 90 Function Ring Smart 91 Playback Menu 92 Menu 92 Display Mode 93 Rotate 93 Color 94 HDR 95 Touch Up 96 Resize 97 Playback Settings 97 Protect 98 Delete 98 DPOF Digital Print Order Format...

Страница 14: ...PICTBRIDGE Compatible Printer 110 Setting the USB Mode 110 Connecting to your Printer 111 Using the PICTBRIDGE Menu 112 Print with Date 112 Print without Date 113 Print Index 114 Print DPOF Images 11...

Страница 15: ...ct your retailer first or our customer service center Based on sales in different countries or regions the shape of the AC adapter will vary Please subject to the actual product will prevail Accessori...

Страница 16: ...15 15 Installing Lens Cap and Neck Strap...

Страница 17: ...2 3 9 8 7 6 5 4 1 Micro HDMI Port 2 Micro USB Port 3 Zoom Lever 4 Shutter Button 5 Strap Eyelet 6 Exposure Compensation Button 7 Continuous Shot Button 8 Power Button 9 AF Assist Beam Self Timer Lamp...

Страница 18: ...Dial 17 Fast Video Recording Button 18 Menu Button 19 Jog Dial AF Button Up Button Delete Button Self Timer Button Down Button Macro Button Left Button Flash Button Right Button 20 Display Button 21...

Страница 19: ...18 18 24 25 26 27 28 24 Vari angle LCD 25 Diopter Adjustment Knob 26 Speaker 27 Lens Function Ring Lever 28 Lens Function Ring 29 30 29 Battery Cover 30 Tripod Socket...

Страница 20: ...battery compartment according to the negative and positive directions as illustrated in the picture Push the battery down until it locks in place 1 Open the battery cover door 2 1 Installing Battery a...

Страница 21: ...higher and has a capacity of 4GB to 32GB The camera is not compatible with Micro SD Ultra Ultra Plus Extreme XC or adapters for any of these other memory cards To remove your memory card open the batt...

Страница 22: ...wer outlet to charge the battery After the battery is stored for long periods of time use the supplied power charger to charge the battery prior to use Charging indicator Steady orange Charging Steady...

Страница 23: ...ng the direction shown by arrow 2 Rotate up to 180 along the direction shown by arrow 3 Rotate up to 90 along the direction shown by arrow 4 Close the LCD along the direction shown by arrow Please don...

Страница 24: ...a On and Off Press the Power button to turn the camera on To turn the camera off press the Power button again Power Button When the power is off press and hold the playback button to power on and ente...

Страница 25: ...n will appear 4 Press the button to select the Date Time to be adjusted Time is displayed in YYYY MM DD HH MM 5 Press the button to adjust the value for the desired Date Time 6 Press the button to con...

Страница 26: ...orld Date LCD B Se Language English Fran ais Resetting your Language After you set your language for the first time follow the instructions below to reset your language 1 Press the button press the bu...

Страница 27: ...and press the button to enter the menu 4 Press the button to select the Date Time to be adjusted Time is displayed in YYYY MM DD HH MM 5 Press the button to press the value for your selected entry Aft...

Страница 28: ...Mode 7 Zoom Display By turning the Zoom Lever 13 No Memory Card 2 Quality 8 Number of Pictures in Static Mode 14 Beautifier 3 Face Detection 9 Ratio of Shooting Pixels 15 Flash Mode 4 Maximum Record T...

Страница 29: ...1 30 29 28 27 26 25 19 ISO Value 24 Exposure Compensation Value 29 AF Area 20 Shutter Speed 25 Shooting Mode 30 Expo Metering 21 Histogram 26 Custom Settings 31 Single Continuous Shot HDR WDR AE Brack...

Страница 30: ...29 Overview of the Screen Icons in Movie Mode 00 00 00 1 4 3 2 00 15 1 Battery Status 2 Number of Videos Captured 3 Continuous Recording Time 4 Movie Mode...

Страница 31: ...atio 3 File Name 11 Index Prompt 4 Shooting Pixel Ratio 12 Touch Up 5 Image Size 13 HDR 6 Battery Status 14 DPOF File Icon 7 Continuous Shot Group Playback 15 File Protection Icon 8 Image Area 0000 00...

Страница 32: ...e lens toward the object you want to take a picture of and then frame it with the LCD 3 Use the Zoom button to select Tele or Wide positions to zoom in or out on your subject 4 Press the shutter butto...

Страница 33: ...ser can switch the ISO and EV value according to personal preference the camera can automatically set the shutter speed and aperture value Shutter Priority Setting allows you to adjust the shutter spe...

Страница 34: ...ng touches and eye brightening capabilities Wi Fi Mode Enable image transmission and remote control by connecting smart device with Wi Fi Scene Mode Choose from 14 different pre set scene types and ef...

Страница 35: ...ect the mode you want 2 Press the button to configure settings 3 Press the button to select an adjustment setting 4 Press the button to adjust the parameters 5 Press the button to confirm the settings...

Страница 36: ...press the button to select 3 Press the button or turn the jog dial to select an option and press the button to confirm and enter the shooting screen Beautifier Effect 1 Skin Soften Effect 1 Skin Soft...

Страница 37: ...hich may cause failure in receiving signals To maintain a connection please keep the camera within 10 meters 32 8 feet without signal shielding interference Please do not use Wi Fi connection function...

Страница 38: ...vice AP Mode In AP mode the camera will act as an access point enabling another Wi Fi device to connect to it Rotate the mode dial to disconnect AP Mode This camera may connect with your smart device...

Страница 39: ...can be enabled on the smart device Station Enable image transmission and remote control by connecting the camera with a Wi Fi access point created by your smart device 1 Enable the Wi Fi access point...

Страница 40: ...the jog dial to select and then press the button to confirm your selection You will enter the completion of WPA2 PSK after the password is saved Type the network security key A a Cancel Enter Passwor...

Страница 41: ...please check Wi Fi device and try again 6 After connecting click the icon of the APP on the smart device Display of Wi Fi Connection Status The Wi Fi has successfully connected but APP is not enabled...

Страница 42: ...e check Back Wi Fi device and try again Back Back to the SSID interface Setting The name of this camera can be changed under Wi Fi settings 1 Select the and then press the button to enter the setting...

Страница 43: ...en 1 18 Letters MINOLTA MN67Z_XXXX D Cancel DSC device Save For the method of input please refer to the introduction on password input on page 39 MAC address Check the wireless MAC address of this cam...

Страница 44: ...ppropriate settings for the best possible photos 1 Rotate the Mode dial to then the LCD will display as below Auto Scene The camera automatically detects the most suitable shooting scene 2 Press the b...

Страница 45: ...e underexposure Party For subjects at night without using a tripod Capture sharp shots without blur Sport For fast moving subjects Capture sharp action shots without blur Night Portrait For portraits...

Страница 46: ...ts the exposure to match the background Backlit Portrait When the sun or any other light source is behind you automatically adjusts the foreground exposure to produce the best pictures possible Macro...

Страница 47: ...eady to take pictures 3 Compose your shot on the LCD and half press the shutter button to focus on the subject After focusing fully press the shutter button down to take the first picture At this time...

Страница 48: ...Press and hold the shutter button to take 6 photos continuously when it will stop automatically To stop shooting release the shutter button in the midway Objects shall be moved only from left to the...

Страница 49: ...elf Timer Macro Sport Continuous Shot Expo Metering Night Portrait HDR Expo Metering Self Timer Portrait Continuous Shot HDR Expo Metering Flash Self Timer Macro Children Continuous Shot Expo Metering...

Страница 50: ...ss the button to select a capture mode that you want to define as and press the button to enter the shooting screen 3 As shown in the figure press the button and choose whether to continue the mode se...

Страница 51: ...u want to remove the parameter setting of Custom Settings please see the reset function on page 107 to operate 5 Press the button select Custom Settings and press the button to enter the menu Off Face...

Страница 52: ...0 or less or farsighted 100 individuals see clearly through the viewfinder EVF BASIC OPERATION Using EVF Electronic View Finder EVF functions as the LCD which can be used to observe the scene and obje...

Страница 53: ...ever of the camera to zoom in or out on the subject while taking pictures Using the Zoom Function Zoom Lever ISO00000 0 0000 F00 0 EV 0 0 x3 0 Zoom Indicator When the Optical Zoom reaches the threshol...

Страница 54: ...e Display 00 00 00 0000 x3 0 ISO00000 0 0000 F00 0 EV 0 0 Display with Grid and Histogram 00 00 00 0000 x3 0 ISO00000 0 0000 F00 0 EV 0 0 No Message Display ISO00000 0 0000 F00 0 EV 0 0 Message Displa...

Страница 55: ...Thumbnail3x3 2019 07 01 2019 07 01 Detailed Message Display 000mm ISO00000 0 0000 F00 0 EV 0 0 000 0000 000 0000 000 0000 2019 07 01 2019 07 01 No Message Display Mode Press the button to display the...

Страница 56: ...atically focuses the subject in a wide area to find the focus point Spot Focus Choose the single point focus position within the scope of focus Object Tracking Smart tracking of the object in motion u...

Страница 57: ...1 Press the button to enter the Macro Menu Macro Off 2 Press the button to select the following 2 modes Macro On Select this option to focus on the object closer to the lens At the W side the shooting...

Страница 58: ...cture is shot 2 seconds after the Shutter button is pressed Self Timer 10 sec A single picture is shot 10 seconds after the shutter button is pressed Self Timer Smile Press the shutter button and a pi...

Страница 59: ...er the flash settings menu Flash Auto 2 Press the button to select the following 6 modes Force Off Flash is turned off When enabling the Smile Detection pressing the shutter or the button can disable...

Страница 60: ...en to reduce red eye effects Slow Sync This allows you to take pictures of people at night that clearly show both your subjects and the night time backdrop The use of a tripod is recommended when shoo...

Страница 61: ...he following 9 modes AWB Daylight Cloudy Fluorescent Fluorescent H Incandescent Manual WB Set WB according to the current light source press the button to set Color Temp 1900K 10000K Press the button...

Отзывы: