Minolta MAGICOLOR 6100 Скачать руководство пользователя страница 6


7

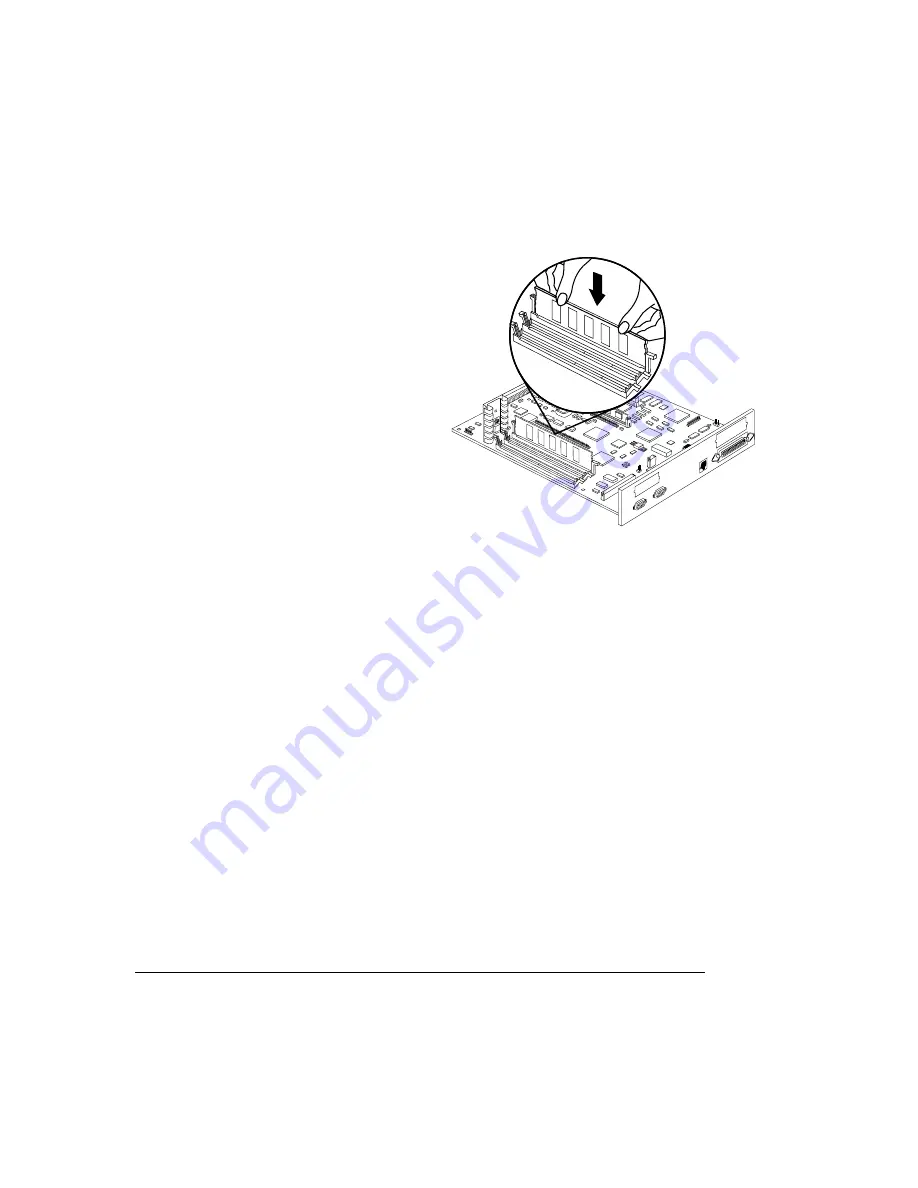
Insert each DIMM straight down 
into the DIMM connector until 
the latches snap into the locked 
position.

When seated, the DIMM stands 
upright, firmly in place. If you can-
not snap the DIMM into place, do 
not force it. Reposition it, making 
sure that the bottom of the DIMM is 
seated completely in the connector.

8

Repeat steps 6–7 for each 
additional DIMM that you install.

9

If you purchased any other 
options, such as an internal hard 
disk or Time-of-Day Clock, install 
them now.

Refer to the appropriate chapter(s) of your 

magicolor 6100 Print System Options


manual for instructions.

10 Reinstall the controller board into the printer.

Gently slide the controller board into the printer until it is fully seated, and then 
tighten the two screws.

11 Reconnect all interface cables.

12 Reconnect the power cord, and turn on the printer.

»

Note: 

In compliance with UL guidelines, “The appliance inlet is considered to be 

the main disconnect device.”

9brdmti.eps

IIIIIIIIIIIIIIIIIIIIIIIIIIIIIIIIIIIIIIIIIIIIIII      IIIIIIIIIIIIIIIIIIIIIIIIIIIIIIIIIII      IIIIIIIII

................................................

      ........................

      ..........

................................................

      ........................

      ..........

................................................

      ........................

      ..........

................................................

      ........................

      ..........

IIIIIIIIIIIIIIIIIIIIIIIIIIIIIIIIIIIIIIIIIIIIIII      IIIIIIIIIIIIIIIIIIIIIIIIIIIIIIIIIII      IIIIIIIII

................................................

      ........................

      ..........

................................................

      ........................

      ..........

................................................

      ........................

      ..........

................................................

      ........................

      ..........

Содержание MAGICOLOR 6100

Страница 1: ......

Страница 2: ...ights Reserved This software may not be reproduced modified displayed transferred or copied in any form or in any manner or on any media in whole or in part without the express written permission of M...

Страница 3: ...f Crown features refer to your magicolor 6100 Print System Reference manual In addition to this guide the upgrade kit contains the following items Make sure that you have all of these items before pro...

Страница 4: ...electrical current present Turn off all power switches first Plastic rubber wood painted metal surfaces and telephones are not acceptable grounding points The printer isn t an acceptable grounding poi...

Страница 5: ...o the controller board lies flat and the I O connector panel is facing you 4 Remove the new controller board from its packaging 5 Carefully remove the RAM DIMMs from the old controller board a Using b...

Страница 6: ...them now Refer to the appropriate chapter s of your magicolor 6100 Print System Options manual for instructions 10 Reinstall the controller board into the printer Gently slide the controller board in...

Страница 7: ...to the one shown below prints The startup page indicates that the printer has successfully been converted from a magicolor 6100 DeskLaser to a magicolor 6100 Crown Print System Verify that the memory...

Страница 8: ...Remove existing labels and apply the magicolor 6100 logo and the dataplate label to the printer as shown in the following diagram...

Страница 9: ...Utilities CD ROM See the Connecting Your MINOLTA QMS Print System manual for instructions on installing the printer driver If you don t have a magicolor 6100 DeskLaser printer connected to you PC or n...

Страница 10: ......

Отзывы: