background image

69

68

P

LAYBACK MODE

File Number (#) Memory

If file number memory is selected, when a new folder is created, the first file stored in the
folder will have a number one greater than the last file saved. If the file # memory is
disabled, the image file name will have a number one greater than the last image saved
in the folder. File number starts from 0001 when all the frames are deleted, an empty card
is inserted, or the folder is changed. File # memory does not affect E-mail copies.

If file number memory is active and the memory card is changed, the first file saved to
the new card will have a number one greater than the last file saved on the previous
card if the new card does not contain an image with a greater file number. If it does, the
file number of the new image will be one greater than the greatest on the card.

To initialize a new memory card with the file numbers starting with “0001,” turn off file
number memory, insert a new card, and turn the camera off and on. The file number
memory can be reactivated.

File number memory will reset it the battery is removed for an extended period. An
internal battery will protect the clock, calender, and camera settings for more than 24
hours if the camera is used for at least 5 minutes before the battery is removed.

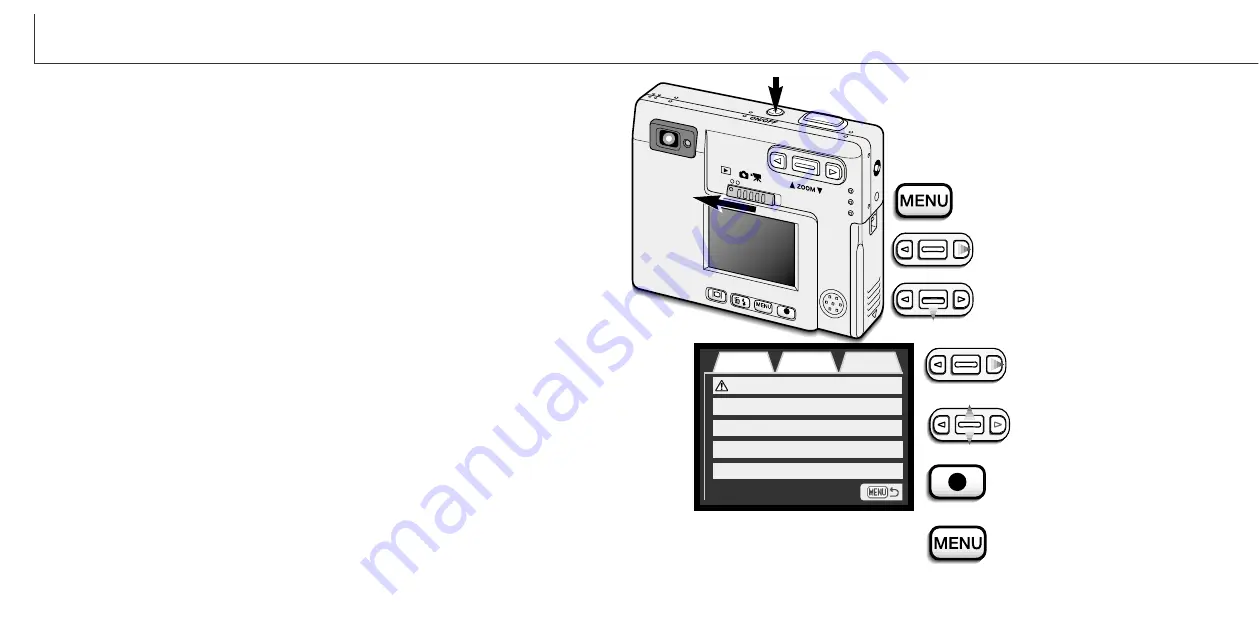
Press the menu button to active the play-
back menu.

Use the right key to highlight the
setup 2 tab at the top of the menu.

Use the zoom lever to highlight the
language menu option.

Press the right key. The lan-
guage settings will appear on
the right side of the menu.

Use the zoom lever to select
the language. 

Press the enter button to set the
selected language. The playback
menu will be displayed.

Press the menu button to close the
playback menu.

The menu language is set on the setup 2 section of
the playback menu. Turn the camera on by pressing
the main switch near the shutter-release button (1).
Slide the mode switch to the playback position (2).

2

1

Setting the menu language

Setup 1

Basic

Folder name

Format

File # memory

Std.form

-

Off

Setup 2

Playback menu: setup 2 section

Video output

Language

NTSC

English

Содержание DiMAGE Xi

Страница 1: ...INSTRUCTION MANUAL E...

Страница 2: ...ame of Windows is Microsoft Windows Operating System Pentium is a registered trademark of the Intel Corporation Power PC is a trademark of the International Business Machines Corporation QuickTime is...

Страница 3: ...It may damage eyesight Do not fire the flash at vehicle operators It may cause a distraction or temporary blindness which may lead to an accident Do not use the monitor while operating a vehicle or wa...

Страница 4: ...is can hinder the unplugging of the units in emergencies Unplug the AC adapter or charger when cleaning or not in use CAUTION TABLE OF CONTENTS Names of parts 10 Getting up and running 12 Charging the...

Страница 5: ...playing back audio recordings 55 Display button playback mode 56 TABLE OF CONTENTS Deleting single images 55 Enlarged playback 57 Navigating the playback mode menu 58 Frame selection screen 60 Audio c...

Страница 6: ...ns Main switch Microphone AV out terminal USB port cover Viewfinder Indicator lamp p 87 Mode switch Left key Right key Zoom lever p 21 LCD monitor Display button p 52 56 Flash mode delete button p 26...

Страница 7: ...the lithium ion battery To remove the battery move the latch towards the back of the camera until the battery is released 5 Pull the battery out of the chamber 6 1 2 3 4 This digital camera uses one N...

Страница 8: ...nected to a computer the auto power off period is set to ten minutes and cannot be changed This camera is equipped with an automatic battery condition indicator displayed on the LCD monitor The icon w...

Страница 9: ...16 17 GETTING UP AND RUNNING Write protect switch Lock position Installing and removing a memory card About memory cards Insert the memory card all the way into the card slot and then release 3 The c...

Страница 10: ...ar must be set When images are recorded the image data is saved with the date and time of recording Depending on the region the menu language may also have to be set To change the language refer to pa...

Страница 11: ...n to the top Take care not to cover the lens with your fingers or the strap Using the zoom lens This camera is equipped with a unique 5 7 17 1mm zoom lens This is equivalent to a 37 to 111mm lens on a...

Страница 12: ...ect in the viewfinder The focus lock function p 24 can be used with off center subjects If the subject is closer than 1m 3ft at the zoom lens wide angle position or 3m 10ft at the telephoto position o...

Страница 13: ...closer than 1m 3ft at the zoom lens wide angle posi tion or 3m 10ft at the telephoto position Focus signals Special focusing situations This digital camera has a quick accurate autofocusing system The...

Страница 14: ...layed The active flash mode is displayed in the top left corner of the LCD monitor When the camera is turned off and auto reset p 40 is active the flash mode is reset to autoflash with red eye reducti...

Страница 15: ...ons and the new setting will be displayed Changes can continue to be made To return to the recording mode press the menu button Use the zoom lever to highlight the new setting If Enter is displayed pr...

Страница 16: ...in flash can be used but the rate of capture is reduced because the flash must recharge between frames Date imprinting p 46 also reduces the rate of capture The frame counter is adjusted after the ser...

Страница 17: ...fter the exposure The audio signal can be turned off in the setup menu The movie recording drive mode is selected in the basic section of the recording mode menu p 28 Movie clips up to approximately t...

Страница 18: ...in images with differing sizes 30 minutes of audio can be recorded without an image The audio recording drive mode is selected in the basic section of the recording mode menu p 28 When the function is...

Страница 19: ...ard and economy images are formatted as JPEG files If the image quality is changed the LCD monitor will display the approximate number of images that can be recorded at that setting on the installed m...

Страница 20: ...ed lighting conditions When the built in flash is used the white balance is set for the color temperature of the flash Preset white balance Fluorescent for fluorescent lighting office ceiling lights C...

Страница 21: ...ner of the monitor To zoom out press the zoom lever down Activate the digital zoom in the custom section of the recording mode menu The digital zoom will remain active until reset on the menu The flas...

Страница 22: ...aptured a screen will appear indicating the audio recording has started A bar graph 1 will display the amount of recording time remaining To stop the recording press the shutter release button or ente...

Страница 23: ...een Use the left and right keys 1 to adjust the brightness level the monitor image will change accordingly To set the level press the enter button 2 the camera will return to the recording or playback...

Страница 24: ...lect the format and enter it by pressing the enter button the new format will be displayed on the menu The date format does not affect date folder names p 67 The date format is set in the setup 1 sect...

Страница 25: ...ING MODE What is an Ev Ev stands for exposure value A change of one Ev will adjust the exposure calculated by the camera by a factor of two Change in Ev Adjustment to exposure 2 0 Ev 1 0 Ev 0 0 Ev 1 0...

Страница 26: ...onfirm the image is in focus Press the shutter release button all the way down to take the picture 3 When the LCD monitor is off the AF sys tem cannot be switched between wide and spot AF the last AF...

Страница 27: ...ightness adjustment screen will appear see page 45 Battery power can be conserved by turning the monitor off and using the viewfinder to take pictures However because of parallax the monitor should be...

Страница 28: ...ck menu settings follow the menu navigation section Mode indicator Time of recording Date of recording Lock indicator p 63 Magnification display p 57 Image size display p 35 Image quality indicator p...

Страница 29: ...he enlarged playback mode The degree of magnification is displayed on the LCD monitor Use the left and right keys and the zoom lever to scroll the image In single frame playback a still image can be e...

Страница 30: ...sor will return to the menu options and the new setting will be displayed Changes can continue to be made To return to the playback mode press the menu button Navigating the playback mode menu Activat...

Страница 31: ...Pressing the zoom lever up selects the frame when selected an icon will appear next to the frame Pressing the zoom lever down deselects the frame removing the icon The menu button cancels the screen a...

Страница 32: ...e memo or audio caption attached both the image and audio file will be deleted Single multiple or all image or audio files on the memory card can be locked A locked file cannot be erased by a playback...

Страница 33: ...out DPOF This camera is supported by DPOF version 1 1 DPOF Digital Print Order Format allows direct printing of still images from digital cameras After the DPOF file is created the memory card is simp...

Страница 34: ...vie clips and audio files cannot be copied and E mail copies cannot be recopied The e mail copy function is selected in the basic section of the playback mode menu E mail copy option has two settings...

Страница 35: ...rd and turn the camera off and on The file number memory can be reactivated File number memory will reset it the battery is removed for an extended period An internal battery will protect the clock ca...

Страница 36: ...is formatted Always format the memory card using the camera never use a computer to format a card When the format option is selected and entered a confirmation screen will appear Choosing Yes will for...

Страница 37: ...a to a computer Windows 98 p 75 OS 8 6 p 78 1 2 3 4 4 Remove the USB port cover Attach the smaller plug of the USB cable to the cam era Make sure the plug is firmly attached The USB port cover is atta...

Страница 38: ...uctions on the screen No special driver software is required for other Windows operating systems Before connecting the camera to the computer place the DiMAGE soft ware CD ROM in the CD ROM drive The...

Страница 39: ...location of the driver Click Next to install the driver in the system One of three drivers may be located MNLVENUM inf USBPDR inf or USBSTRG inf The letter designating the CD ROM drive will vary betwe...

Страница 40: ...or later recommended QuickTime system requirements IBM PC AT Compatible Pentium based computer Windows 95 98 98SE NT Me or 2000 Professional XP 32MB or more of RAM QuickTime 5 is used for viewing mov...

Страница 41: ...conomy image Movie clip The misc folder contains DPOF print files p 60 PICT0002 WAV PICT0002 s voice memo or audio caption file Image files contain exif tag data This data includes the time and date t...

Страница 42: ...hardware window will open Turn off the camera and then discon nect the USB cable Disconnecting the camera from a computer Windows Me 2000 professional and XP Confirm the indicator lamp is not lit Turn...

Страница 43: ...ject Problem Symptom Cause Solution Problem Symptom Cause Solution The camera will not work Nothing dis played on the the monitor The battery is dead The auto power off func tion has shut down the cam...

Страница 44: ...era does not function normally turn it off remove and reinsert the battery or unplug and reconnect the AC adapter Always turn the camera off using the main switch otherwise the memory card may be dama...

Страница 45: ...ect properties from the drop down menu Windows XP from the start menu go to the control panel Click on the performance and maintenance category Click System to open the system properties window 3 Wind...

Страница 46: ...memory card from the camera when not in use for extended periods Do not store the camera in an area with naphthalene or mothballs During long periods of storage operate the camera occasionally When t...

Страница 47: ...ents of the EU European Union concerning interference causing equipment regulations CE stands for Conformit Europ enne European Conformity Digital Camera Tested To Comply With FCC Standards FOR HOME O...

Страница 48: ...D 1 2 7 type interline complementary color CCD with a total of 3 3 million pixels Camera sensitivity ISO Automatic between ISO 50 160 equivalent ISO50 100 200 400 Aspect ratio 4 3 Lens construction 9...

Страница 49: ...es m b H Amalienstrasse 59 61 A 1131 Wien Austria Minolta Camera Benelux B V Zonnebaan 39 P O Box 6000 NL 3600 HA Maarssen The Netherlands Belgian Branch Prins Boudewijnlaan 1 B 2550 Kontich Belgium M...

Отзывы: