background image

Version 1.0 

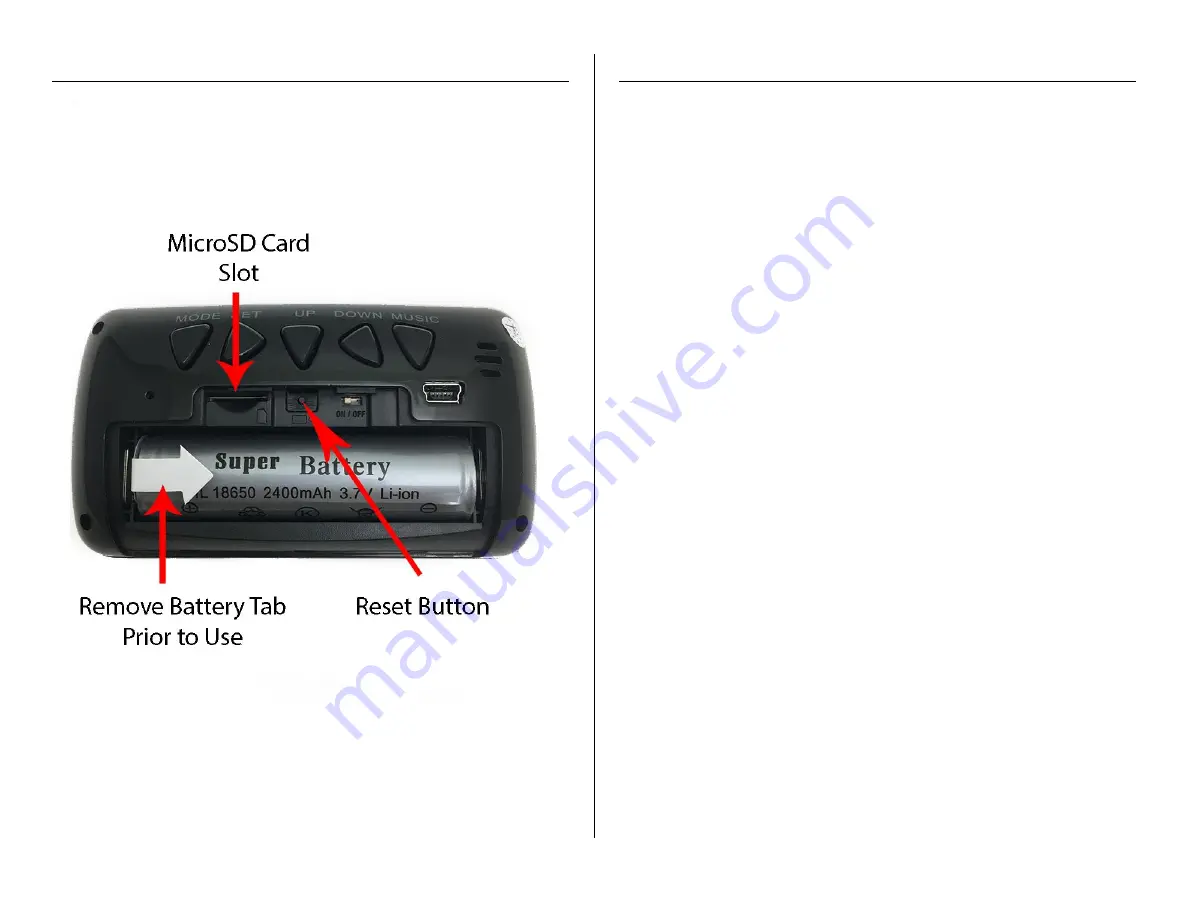
GET FAMILIAR WITH YOUR MCC1080NV 


OPERATING THE MCC1080NV 


HOW TO RECORD VIDEO CONTINUOUSLY 

1.


We recommend charging the camera for around 4 hours 
before use. The batteries receive a partial charge from the 
factory that may allow you to use your unit for a limited time 
before charging however. If you encounter any issues 
recording, please charge the device and try again. 

2.


Open the back battery compartment and remove the battery 
saving tab and insert a MicroSD Card into the device. 

3.


Check for and remove battery tab from the remote if present. 

4.


Point the remote at the front of the clock and press the Power 
button 1 time. A blue light will illuminate to the right of the 
flashing time/date on the clock. This indicates the device is in 
Standby mode. 

5.


To begin recording press the button on the remote that looks 
like a camcorder. The blue light will flash slowly 3 times and 
then turn out. The device is now recording video continuously. 

6.


To stop recording, press the camcorder button 1 more time 
and the blue light will illuminate again indicating that it has 
entered standby mode once more. 

 
HOW TO RECORD VIDEO IN MOTION DETECTION 

1.


Point the remote at the front of the clock and press the Power 
button 1 time. A blue light will illuminate to the right of the 
flashing time/date on the clock. This indicates the device is in 
Standby mode. 

2.


Press the button with a picture of a camcorder and a person 1 
time. 

3.


The blue indicator light will flash 3 times slowly and turn out. 
The device is now in motion detection mode and will record 
only when motion is detected. 


Содержание MCC1080NV

Страница 1: ...th the ability to record while plugged in or with the built in battery you can place this device almost anywhere for a short period or for an extended monitoring session The 10 built in IR emitters provide night vision with a range of 10 15 feet This is also our first miniclockcam that can be operated without the remote The simple button on the back of the unit allows you to enter the recording mo...

Страница 2: ...lashing time date on the clock This indicates the device is in Standby mode 5 To begin recording press the button on the remote that looks like a camcorder The blue light will flash slowly 3 times and then turn out The device is now recording video continuously 6 To stop recording press the camcorder button 1 more time and the blue light will illuminate again indicating that it has entered standby...

Страница 3: ...vice to your computer In the root of the drive should be a text file 2 Open this file and edit the time inside At the end of the date time will be an N Change this to Y before saving and closing the file 3 Do a test recording to make sure time date setting was successful If the above doesn t work or the text file is missing follow the directions below 1 Visit http time mgidownloads com 2 Choose MC...

Страница 4: ...vice and begin a test recording to confirm date time setting succeeded RETRIEVE THE FILES TO YOUR PC 1 Plug the device into your PC using the USB cable 2 Locate Removable Disk inside the My Computer folder AutoPlay Removable Disk Open folder to view files Or Go to Start Computer Removable Disk 3 Open the Removable Disk drive 4 Open the DCIM folder 5 Double click the file you want to view VLC Playe...

Страница 5: ...ECORD Press the reset button on the backside of the device OTHER PROBLEMS Call our technical support at 770 694 6923 SPECIFICATIONS Video Resolution 1920 x 1080 Video Format AVI Frames per Second 30 Motion Detection Yes Water Resistant No Battery Life Up to 9 hours Type of Memory External MicroSD Memory Capacity Up to 32GB Storage Consumption 1GB per 6 Minutes Average USB Interface 2 0 USB Player ...

Отзывы: