background image


10 

Version 1.0 


After Step 8 

13.


Open the text document. 

14.


Enter the date/time in the following 
format: 

a.


Example: 
2016-08-08 15:00:00 Y1 

b.


The “Y” setting at the end 
defines what video recording 
mode to use. You may choose 
from: 

Содержание HCIPHONEDOCK

Страница 1: ...1 Version 1 0 iPhone Dock with Hidden Camera SKU HCIPHONEDOCK ...

Страница 2: ...n 1 0 THANK YOU FOR PURCHASING THE HCIPHONEDOCK Please read this manual before operating the camera and keep it handy Your purchase should include 1 x HCIphoneDock 1 x Manual 1 x Micro USB Cable 1 x AC Adapter ...

Страница 3: ...3 Version 1 0 GET FAMILIAR WITH YOUR HCIPHONEDOCK ...

Страница 4: ...o the unit 3 Once you device is plugged in press the A button on the remote one time The device will beep indicating that it is powered on NOTE When the device powers on it immediately enters into motion detection mode 4 To save any active recordings and return to standby mode press the D button on the remote You will hear 2 short beeps indicating the device has left motion ...

Страница 5: ... activated recording press the D button one time The device will emit one short beep indicating it is now in motion detection mode o To begin a continuous recording press the C button one time The device will emit one short beep indicating it is now in continuous recording mode 2 To stop recording in either mode press the mode button that you are currently recording in again and the device will ...

Страница 6: ...ime to power off the device It will emit 2 longer beeps confirming that it has powered off TAKING PHOTOS 1 Plug the device into a wall outlet 2 Press the power button one time 3 Press the D button one time to leave motion detection and return to standby mode 4 Press the B button one time to take a picture 5 Each time you press the B button a photo will be taken ...

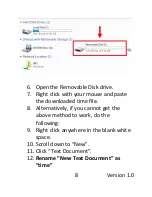
Страница 7: ...phoneDock and your time zone in the dropdowns and click download 3 Plug the Micro SD Card into your computer using a Micro SD card reader not provided 4 Right click and copy the downloaded time file 5 Locate Removable Disk inside the My Computer folder a Go to Start Computer Removable Disk ...

Страница 8: ...ck with your mouse and paste the downloaded time file 8 Alternatively if you cannot get the above method to work do the following 9 Right click anywhere in the blank white space 10 Scroll down to New 11 Click Text Document 12 Rename New Text Document as time ...

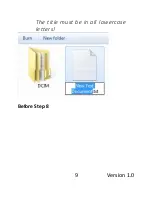
Страница 9: ...9 Version 1 0 The title must be in all lowercase letters Before Step 8 ...

Страница 10: ... 1 0 After Step 8 13 Open the text document 14 Enter the date time in the following format a Example 2016 08 08 15 00 00 Y1 b The Y setting at the end defines what video recording mode to use You may choose from ...

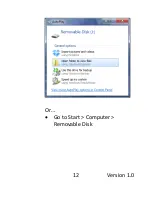
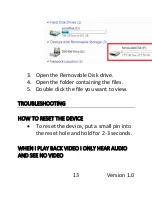
Страница 11: ...d put it back in the device 17 Power on the device and begin a test recording to confirm date time setting succeeded TRANSFER THE FILES TO YOUR PC 1 Remove the Micro SD card and insert it into a Micro SD Card Reader not provided 2 Locate Removable Disk inside the My Computer folder AutoPlay Removable Disk Open folder to view files ...

Страница 12: ...12 Version 1 0 Or Go to Start Computer Removable Disk ...

Страница 13: ...n the folder containing the files 5 Double click the file you want to view TROUBLESHOOTING HOW TO RESET THE DEVICE To reset the device put a small pin into the reset hole and hold for 2 3 seconds WHEN I PLAY BACK VIDEO I ONLY HEAR AUDIO AND SEE NO VIDEO ...

Страница 14: ...14 Version 1 0 Download VLC media player and open the file with VLC OTHER PROBLEMS Call our technical support at 770 694 6921 ...

Страница 15: ... per Second 30FPS Vision Angle 100 Battery Life Powered by AC Loop Recording Yes Type of Memory External MicroSD up to 128GB Recording Usage 1080 30fps 1gb 10m 720 30fps 400mb 10m 720 60fps 1 2gb 10m USB Interface 2 0 USB Player Software VLC recommended Video Compression H 264 ...

Отзывы: