Minelab EQUINOX 700 Скачать руководство пользователя страница 35

35 

CONTENTS

Tone Pitch 

(Advanced Setting) 

(Continued)

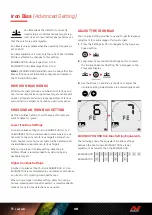
ADJUST TONE PITCH  — ALL TONES

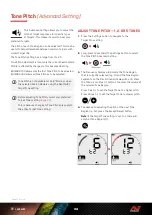
When All Tones (At) is the selected Target Tone setting, the Tone Pitch Advanced Setting behaves similarly to the 2-Tone 
Setting — however instead of all targets in each region playing at the set pitch, this value sets the pitch for the first ID in 
that region� Pitches then increase across the range for the other ID's�


ƒ

The pitch of the ferrous region has a range of 50 Hz�


ƒ

The pitch of the non-ferrous region has a range of 500 Hz�

You can configure the starting points to create a continuous range of pitches from ferrous to non-ferrous targets, or you 
can create a Pitch Gap, in order to better differentiate between ferrous and non-ferrous targets�

The examples show how adding a pitch gap makes it easier to hear a clear difference between ferrous and  
non-ferrous targets�

Default Tone Pitch Gap  
(1, 20)

Ferrous targets will be very 
low-pitched� Non-ferrous 
targets will sound distinctly 
higher-pitched than a 
ferrous target with a similar 
Target ID�

Small Tone Pitch Gap  
(11, 12)

No clear difference in pitch 
between ferrous and non-
ferrous targets� They may 
be indistinguishable from 
audio alone�

Maximum Tone Pitch Gap  
(1, 25)

A greater difference in 
Pitch between ferrous and 
non-ferrous targets gives 
very easy differentiation�

t2: fixed pitch range of 500 Hz

t1: fixed pitch 

range of 50 Hz

5

10

15

Highest Pitch

Lowest Pitch

Full Pitch Range

5

10

15

20

20

25

5

1

15

Содержание EQUINOX 700

Страница 1: ...Instruction Manual...

Страница 2: ...nced Settings 24 Noise Cancel 25 Auto Noise Cancel 25 Manual Noise Cancel 25 Ground Balance 26 Auto Ground Balance 26 Manual Ground Balance 27 Tracking Ground Balance 27 Volume Adjust 28 Adjust the Vo...

Страница 3: ...ing 47 Charger Information and Safety 47 Charging the Battery 47 Battery Level Indication 48 Operating With a Power Bank 48 Battery Maintenance 48 Errors Troubleshooting Error Codes 50 Coil Disconnect...

Страница 4: ...4 CONTENTS Getting Started...

Страница 5: ...age 9 for more information on how to choose the most suitable Search Mode 3 NOISE CANCEL Select Noise Cancel from the Settings Menu then press to initiate an Auto Noise Cancel This will take approxima...

Страница 6: ...ul not to touch the adhesive side 3 Hold the edges of the screen protector align it to the screen and apply gently 4 Wipe any bubbles to the edge with a soft clean cloth 5 Peel off the front layer 1 C...

Страница 7: ...7 Frequency Scroll through the available frequencies kHz 4 5 10 15 20 40 and Multi page 17 8 Accept Reject Accepts or Rejects targets by turning On Off individual Discrimination Segments page 36 Use...

Страница 8: ...n page 45 13 Headphones Indicator Indicates that headphones are connected to the detector either wireless or wired page 46 14 Vibration Indicator Indicates that handle Vibration is On page 21 15 Discr...

Страница 9: ...ed for more difficult conditions Target sensitivity is enhanced but extra noise may also result 1 Press the Search Mode button to navigate to the Profile you want to reset 2 Press and hold the Search...

Страница 10: ...10 CONTENTS Search Modes...

Страница 11: ...wellery Park 2 is ideal for smaller targets in trash infested including ferrous trash locations It will detect a wider range of targets including low conductor or higher frequency targets e g fine jew...

Страница 12: ...ts amongst the iron trash With Frequency set to Multi Field Mode will be the most sensitive to the widest range of targets and more accurately identify objects at the limits of detection depth compare...

Страница 13: ...le 2 Underwater and Surf Beach 2 gives the best results when either wading or shallow diving with the coil and or detector fully submerged In these instances there is a very strong salt signal present...

Страница 14: ...which will increase detection depth However more ground noise in more heavily mineralised grounds may result Tracking Ground Balance is the default setting The audio Threshold Level and Threshold Pitc...

Страница 15: ...15 CONTENTS General Settings...

Страница 16: ...s Reference General Settings Sensitivity Global Backlight Global Flashlight Global Frequency Local Settings Menu When you are adjusting items in the Setting Menu Settings and Advanced Settings the ico...

Страница 17: ...y may have a slight advantage over multi frequency in certain detecting situations For example if you were searching only for larger high conductive targets located at great depth using 4 or 5kHz may...

Страница 18: ...Level 11 15 Level 16 20 Level 21 25 Level 26 28 ADJUST THE SENSITIVITY LEVEL Before reducing the Sensitivity always try to resolve noise by first performing Noise Cancel page 25 followed by Ground Ba...

Страница 19: ...epending on the target type and ground conditions After a target is detected the Depth Gauge will remain on the LCD for 5 seconds or until the next target is detected When there is no detection the De...

Страница 20: ...t Press the Backlight button to cycle through the Backlight settings from highest to lowest The Backlight Indicator appears on the LCD when the Backlight is On The Backlight button The Backlight indic...

Страница 21: ...you to feel ferrous detections instead of hearing frequent repetitive signals when detecting in high trash locations TURNING MASTER VIBRATION ON OFF 1 Navigate to the Volume Adjust setting 2 Press th...

Страница 22: ...the User Profile is active will be saved automatically SAVE A USER PROFILE 1 Adjust the detector to the settings you want to save 2 Make sure you are in the Detect Screen not the Settings Menu 3 Pres...

Страница 23: ...23 CONTENTS Settings Menu...

Страница 24: ...again Press either the Search Mode button or the Pinpoint Detect button from the Settings Menu to return to the Detect Screen The Settings Menu remembers the last accessed setting and will return to...

Страница 25: ...ccept Reject button to initiate the Auto Noise Cancel process Auto Noise Cancel can also be initiated on the EQUINOX 700 by pressing the Minus or Plus buttons 4 The Auto Noise Cancel progress is indic...

Страница 26: ...d noise due to highly mineralised ground or high salt levels then repeat the Auto Ground Balance process by sweeping the coil from side to side rather than the standard up and down motion AUTO GROUND...

Страница 27: ...ground signal is heard The Manual Ground Balance value is shown on the Target ID Display TRACKING GROUND BALANCE When Tracking Ground Balance is active the detector continuously adjusts the Ground Bal...

Страница 28: ...global The Volume Adjust setting has a range from 0 Off muted to 25 with a default setting of 20 ADJUST THE VOLUME 1 Press the Settings button to navigate to the Volume Adjust setting 2 Use the Minus...

Страница 29: ...me select your preferred Target Tones setting page 33 This is because changes to Tone Volume only apply to the active Target Tone setting Note only the ferrous tone t1 can be adjusted on the EQUINOX 7...

Страница 30: ...simplified reference threshold tone Unlike the true threshold tone that is used by the Gold Mode the reference threshold is a simple continuous background tone that blanks when a rejected Target ID is...

Страница 31: ...oo Low If the Threshold Level is too low the slight variation caused by a small or deep target may not be sufficient to hear Adjusting the level to below an audible level will ensure silent operation...

Страница 32: ...shold Pitch is 4 The default Gold Mode Threshold Pitch is 11 ADJUST THE THRESHOLD PITCH 1 Press the Settings button to navigate to the Threshold Level setting 2 Long press 2 seconds the Settings butto...

Страница 33: ...ry Target ID Depth dP Target Responses vary in pitch and volume proportional to the target signal strength All targets increase in volume proportional to the target signal strength therefore large or...

Страница 34: ...ng Tone Pitch select your preferred Target Tones setting page 33 This is because changes to Tone Pitch only apply to the active Target Tone setting ADJUST TONE PITCH 1 2 OR 5 TONES 1 Press the Setting...

Страница 35: ...s or you can create a Pitch Gap in order to better differentiate between ferrous and non ferrous targets The examples show how adding a pitch gap makes it easier to hear a clear difference between fer...

Страница 36: ...gment On then continue to hold the button The selector will automatically move to the next segment and turn it On and so on To stop release the button 5 Continue to navigate around the Discrimination...

Страница 37: ...r when Target Tone is set to 1 Tone ADJUST TONE BREAK Before adjusting Tone Break select your preferred Target Tones setting page 33 This is because changes to Tone Break only apply to the active Targ...

Страница 38: ...the Recovery Speed for the first time lay out some overlapping targets to test how the detector responds with different Recovery Speed settings 1 Press the Settings button to navigate to the Recovery...

Страница 39: ...do not want to miss any non ferrous targets amongst iron trash however more ferrous targets will be detected and misidentified as desirable non ferrous targets When using a lower Iron Bias setting det...

Страница 40: ...40 CONTENTS Target Identification Pinpointing Recovery...

Страница 41: ...Multi IQ simultaneous multi frequency will achieve maximum depth with a very stable target signal In mineralised ground single frequencies will not be able to effectively separate the target signal fr...

Страница 42: ...s located nearer to the outside of the coil Strongest target signal All discrimination segments are On The target is located directly below the centreline of the coil LOCATE A TARGET USING PINPOINT MO...

Страница 43: ...rget by listening for the loudest target signal response 3 Make a mental note of the position or mark a line on the soil with your shoe or a digging tool 4 Move to one side so that you can pass the co...

Страница 44: ...44 CONTENTS Headphones Batteries Charging...

Страница 45: ...automatically the Wireless Audio Indicator on the detector will remain on and the LED on the headphones will flash blue once every 3 seconds If no connection is made within 5 minutes Wireless Audio w...

Страница 46: ...ully submerged to a depth of 5 metres 16 feet Minelab EQUINOX waterproof headphones must be used for underwater detecting as they have a unique connector that forms a waterproof seal when used with yo...

Страница 47: ...harge the detector in ambient temperatures between 0 C and 40 C 32 F and 104 F CAUTION DO NOT use the detector underwater whilst charging or when connected to a power bank NOTICE Minelab Metal detecto...

Страница 48: ...will then shut down automatically See Critically Low Battery Error on page 50 for steps to resolve this error OPERATING WITH A POWER BANK CAUTION The detector must not be used underwater whilst charg...

Страница 49: ...49 CONTENTS Errors Troubleshooting...

Страница 50: ...Er is displayed in the event of a System Error In the event of a System Error follow these steps 1 Restart the detector to determine if the error still remains 2 Confirm the coil is attached correctl...

Страница 51: ...oisture or debris 7 If available try using a different set of headphones No sound ML 85 Headphones 1 Check that the headphones are turned On 2 Check that detector Wireless is turned On and paired with...

Страница 52: ...a faster rate than it is charging This prevents the charge indicator from appearing Try charging with the detector switched off 3 Avoid using a USB extension cable when charging Speaker is squeaky or...

Страница 53: ...53 CONTENTS Safety Care and Maintenance...

Страница 54: ...ng the Shafts Camlocks and Yoke assembly If sand and grit accumulates in these parts they should be rinsed in fresh water then dried thoroughly Prior to going detecting check that the Camlocks are gri...

Страница 55: ...g the internal battery as this will damage the battery seal Coil Maintenance The Skidplate is a sacrificial replaceable part intended to protect the Coil from damage Replace the Skidplate when it beco...

Страница 56: ...56 CONTENTS Specifications Presets Compliance...

Страница 57: ...in Weight 1 27 kg 2 8 lbs Display Monochrome LCD Display and Keypad Backlight Red Off High Low Red Off High Medium Low Flashlight On Off Vibration On Off Supplied Coil EQX11 11 Double D coil with skid...

Страница 58: ...0 Manual 0 Tracking Tone Volume 12 25 25 25 25 12 25 4 25 4 25 4 25 25 25 25 12 Threshold Level 0 0 0 12 Threshold Pitch 4 4 4 11 Target Tone 5 All Tones At 2 All Tones At 5 1 Tone Pitch 1 6 12 18 25...

Страница 59: ...25 4 25 5 Tones 12 25 25 25 25 4 25 25 25 25 4 25 25 25 25 All Tones At 12 25 4 25 4 25 Depth dP 12 25 4 25 4 25 Tone Pitch 1 Tone 11 11 11 2 Tones 1 20 1 20 1 20 5 Tones 1 6 12 18 25 1 6 12 18 25 1 6...

Страница 60: ...and EQX15 are trademarks of Minelab Electronics Pty Ltd COMPLIANCE To view product compliance information navigate to the Noise Cancel setting then press and hold the All Metal button Refer to the in...

Страница 61: ...4 9 0 1 0 4 1 9 2 www minelab com...

Отзывы: