background image

4-20

Chapter 4 Maintenance

Charging ink

If auto charging is not possible, or if you want to check the
content  of  the  IC  chip  before  charging  ink,  perform  the
following operation.

1

Press the 

 (MENU) 

in LOCAL.

2

Press 

 to select “Maintenance” 

and press the 

 key.

3

Press 

 to select “Charge Ink”, and 

press the 

 key.

4

Press 

 to select the ink tank to be 

charged.

5

Press 

 key.

6

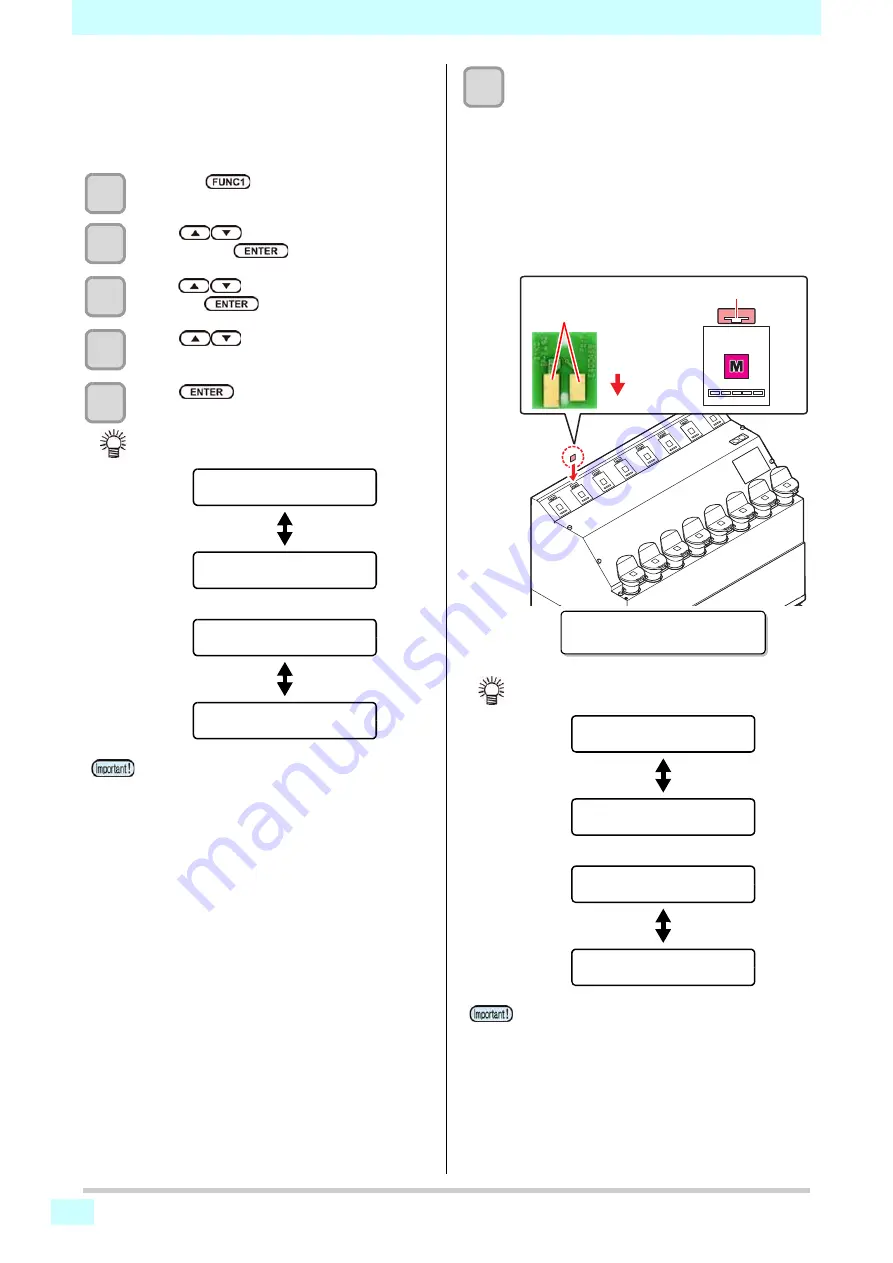
Insert the IC chip included with the 2 liter 
ink bottle.

• When  an  IC  chip  is  inserted  into  the  printer  and

the  information  on  the  IC  chip  is  loaded,  the
display will change as shown on the right.

• Insert  the  IC  chip  with  the  metal  part  facing  rear

side  and  down.  If  you  insert  the  wrong  side  by
accident,  it  causes  faulty  or  damage  of  the  IC
chip.

• Do not touch the metal part of the IC chip. It may

break  the  IC  chip  by  static,  or  may  cause  read
error by stain or flaw.

• If the selected ink tank is near its expiration date, a 

confirmation screen will appear. If OK, press [

].

• The selected tank cannot be charged an either of 

the following situations. (P.3-28)

(1)

The  volume  of  remaining  ink  managed  by
the printer is 100%.

(2)

The  ink  expiration  date  has  passed  by  2
months or more.

Expiration
CHARGEANYWAY?

Displayed alternately

Displayed alternately

Expiration
NO <

> YES

Expiration:1MONTH
CHARGEANYWAY?

Expiration:1MONTH
NO <

> YES

• If the inserted IC chip is near its expiration date, a 

confirmation screen will appear. If OK, press [

].

• If there is a problem with the inserted IC chip and 

you can not charge , the display shows the reason.

• If there are multiple problems, use [

][

] to scroll 

through them.

Down

Metal part facing 

rear side

CHARGEINK:TANK1-M
PLEASEINSERTINKIC

IC chip inserting 

port

Expiration
CHARGEANYWAY?

Displayed alternately

Displayed alternately

Expiration
NO <

> YES

Expiration:1MONTH
CHARGEANYWAY?

Expiration:1MONTH
NO <

> YES

Содержание Tx500P-3200DS

Страница 1: ...MIMAKI ENGINEERING CO LTD URL http mimaki com Original instructions D203118 13 ...

Страница 2: ...ions 1 3 Front Side of the Machine 1 3 Rear Side and Right Side of the Machine 1 4 Operation Panel 1 5 Media sensor 1 7 Carriage 1 7 Nozzle Check Unit NCU 1 7 Indicator 1 7 Capping station 1 8 Pinch rollers and Feed rollers 1 8 Connecting Cables 1 8 Connecting the LAN cable 1 8 Connecting USB2 0 Interface Cable 1 8 Connecting Power Supply Cable 1 9 Fill ink in the ink tank and charging 1 10 Cautio...

Страница 3: ...Resetting the proper temperature 2 29 Other Settings 2 29 Setting the Color Fixation Device from the Printer 2 31 Printing Workflow 2 32 Test Printing 2 33 Test Printing 2 33 Head Cleaning 2 34 About head cleaning 2 34 Perform head cleaning depending on the test printing result 2 34 Setting of Media Correction 2 35 Setting of Media Correction 2 35 Correct the ink drop position for bidirectional pr...

Страница 4: ...twork 3 22 Setting event mail function 3 22 Setting the Setting Lock function 3 26 Setting a LANGUAGE 3 26 Initializing the Settings 3 26 About Information menu 3 27 Information menu table 3 27 Displaying the Information 3 28 Displaying the Information of this machine 3 28 Chapter 4 Maintenance Maintenance 4 2 Precautions for Maintenance 4 2 About Cleaning Solution 4 2 Cleaning the Exterior Surfac...

Страница 5: ...iper 4 24 Replacing the HF filter 4 24 Discard the expired ink 4 25 Replacing the Ink Tank 4 26 Replacing the ink absorber 4 27 Tank Calibration 4 28 Chapter 5 Troubleshooting Troubleshooting 5 2 Power does not turn on 5 2 The machine does not start printing 5 2 The temperature of the heater does not rise to the set value 5 2 Media gets jammed media is soiled 5 3 Image quality is poor 5 3 Nozzle i...

Страница 6: ...ed in accordance with the Operation manual may cause harmful interference to radio communications Operation of this equipment in a residential area is likely to cause harmful interference in which case the user will be required to correct the interference at his own expense In the case where MIMAKI recommended cable is not used for connection of this device limits provided by FCC rules can be exce...

Страница 7: ...ign is different depending on the content of caution Symbols and their meanings are given below Please follow these instructions as you read this manual Examples of symbols Warning for Use Description Failure to observe the instructions given with this symbol can result in death or serious injuries to personnel Be sure to read it carefully and use it properly Failure to observe the instructions gi...

Страница 8: ...side of this machine Grounding work You need to ground this machine to prevent accidental electric shocks Note on maintenance When cleaning the External ink supply unit or the heads make sure to wear the attached gloves WARNING Power specifications for the coloring heater For regions that use a power supply other than 200 to 240V you need to use a step down transformer The customer needs to provid...

Страница 9: ...se leakage of ink Do not touch or stain the contacts of the IC chip This may cause damages on printed circuit boards Waste ink is equivalent to waste oil of industrial waste Request an industrial waste disposal company for disposal of waste ink Handling of media Use the recommended media Use media recommended by MIMAKI to ensure reliable high quality printing Set the temperature of the Print heate...

Страница 10: ... this Machine Safely ix Safety interlock This machine is equipped with interlocks to terminate the operation for your safety when the cover opens during printing etc Red circled sections in the figure below ...

Страница 11: ...e following warning labels are attached to this machine Make sure you understand the content of the warning labels If the warning label becomes too dirty to read or wears off make sure you purchase a new label from your dealer or an office of MIMAKI ...

Страница 12: ...Warning labels xi No Order Number Label 1 M903330 2 M912560 3 M903239 4 TF50 70 5 M901549 6 M903404 7 M912058 8 M908553 ...

Страница 13: ...Warning labels xii 1 2 2 2 2 2 1 No Order Number Label 9 M905982 10 M907833 11 M907935 12 M906115 13 M914192 14 M914189 ...

Страница 14: ...AKI EUROPE B V Stammerdijk 7E 1112 AA Diemen The Netherlands Managing Director Koji Shimizu Directives Machinery Directive 2006 42 EC Low Voltage Directive 2014 35 EU EMC Directive 2014 30 EU RoHS Directive 2011 65 EU The above products have been evaluated for conformity with above directives using the following European standards The technical construction file TCF for this product is retained at...

Страница 15: ...de of the Machine 1 4 Operation Panel 1 5 Media sensor 1 7 Carriage 1 7 Nozzle Check Unit NCU 1 7 Indicator 1 7 Capping station 1 8 Pinch rollers and Feed rollers 1 8 Connecting Cables 1 8 Connecting the LAN cable 1 8 Connecting USB2 0 Interface Cable 1 8 Connecting Power Supply Cable 1 9 Fill ink in the ink tank and charging 1 10 Caution in handling of ink bottles 1 12 Media 1 13 Usable sizes of ...

Страница 16: ...r body is fixed with the leveling feet The printer body may start moving during operation if it is not fixed with the leveling feet Moving This Machine Model Width Depth Height Gross weight Tx500P 3200DS 5620mm 221 3 in 1800mm 1 70 9 in 1 When the tension bar is flat 1820mm 71 7 in 1430kg 3 152 6 lb Color fixation device VT take up device 4300mm 169 3 in 2000mm 78 7 in 1040mm 40 9 in 960kg 2 116 4...

Страница 17: ...release the media Waste ink tank Waste ink gathers in this tank Left maintenance cover Open the cover in maintenance Even when the power button is off keep all covers closed Ink tank Each tank contains an ink of a particular color Take up device Take up the output drawn with a roll medium automatically External ink supply unit Put the ink in the ink tank Operation panel of color fixation device Th...

Страница 18: ... font of this machine Main power switch Turns on off the main power for this machine Leave the main power turned on to prevent ink clogging LAN connector This is Giga Ethernet interface connector Tension bar Brings tension to the media USB 2 0 connector This is USB2 0 interface connector Color fixation device main power switch Turns the color fixation device on or off ...

Страница 19: ...or has occurred Lit steady red Error SYSTEM HALT has occurred Display Displays the following items Printer status Time Display Set media width Heater temperature current tempera ture set temperature Ink status 1 Functions assigned to FUNC1 to FUNC3 2 key Changes over the functions of the function keys FUNC1 FUNC3 key Press this to set various functions or to do test printing The function keys func...

Страница 20: ...hen there are multiple items on the MENU screen or other screens it moves to the next page When there are multiple items on the MENU screen or other screens it moves to the previous page Used for completing confirmation when warning message has been displayed and so on Used for turning functions OFF or canceling them for example when turning heater settings OFF and so on Some kind of setting or fu...

Страница 21: ...a nozzle missing automatically performs a nozzle restoration operation P 3 28 Indicator Functions of the Indicator on the top right of this unit are described here The indicator has a green and a red lamp When setting a medium be sure to cover either of the medium sensors located on the rear of the platen The media cannot be detected unless it is placed over the sensor Media sensor The backside of...

Страница 22: ...he USB device may not be recognized When a Tx500P is connected to the personal computer to which an external HDD is connected via USB the speed of data output to the Tx500P may drop That can cause the head unit to stop temporarily at the right or left end during printing Be sure to wear the attached goggles in cleaning within the capping station to protect your eyes against ink Otherwise you may g...

Страница 23: ... voltage for the color fixation device is three phase AC200V 125A or less You cannot use this machine in the 100V system For the power supply to the main body of the printer electrical work is required as described below Request an electrician to perform electrical work Socket installation onto the circuit breaker Grounding work Ensure that a wall outlet is available near the printer Also ensure t...

Страница 24: ...l of the ink inside the ink supply unit to be discarded Type of Ink Color of ink Expiration date of ink Check both expiration dates of the ink contained in the ink bottle for refilling and the ink tank of this machine Check the label for the expiration date of the ink bottle Press the ENTER key to check the expiration date of the ink remaining in the ink tank of this machine P 3 28 Ink remaining L...

Страница 25: ...10 Rough standard for adding ink 7 Attach the ink tank cap firmly Be sure to charge the IC chip whenever ink is added Otherwise the printer will be unable to manage the ink information Do not remove the IC chip or turn off the printer during charging Doing so will prevent the information on the IC chip from being charged correctly After charging is complete be sure to remove and dispose of the IC ...

Страница 26: ...g EXPIRATION 2M The ink bottle to be charged has expired excluding EXPIRATION 2M If the message is displayed check the ink expiration date then press the MAINTE key browse to the Ink charge Maintenance function P 4 20 and perform the ink charge Caution in handling of ink bottles Press the ENTER key in Local to view the expiration date for the ink in Local Guidance P 3 28 When EXPIRATION 2M is disp...

Страница 27: ... of your finger Be careful about it Do not leave the media with the heater ON for a long time Waviness may occur on the media and it may cause media clogging Use the recommended media Use media recommended by MIMAKI to ensure reliable high quality printing Set the heater temperature to meet the characteristics of the media Automatic temperature setting can be made on the operation panel by setting...

Страница 28: ...orm a test print Check the print results to determine if the media is suitable Item Requirements Notes Uneven width 5 mm or less from one side to the other Curls when spread out No one direction curls Height of wrinkles slack when spread out on a flat surface 1 mm or less Differences in the roll edges 15 mm fabric with a width of 500 mm or less 2 mm Internal roll diameter 3 inches Paper core stren...

Страница 29: ...gency switch and confirm the safety 3 Cancel the emergency stop state Emergency stop state is canceled by turning the emergency stop switch or by pulling in front When the cover such as the front cover is open please close the cover This machine will not return to the local The color fixation device also becomes the error state when pushing the emergency stop switch Cancel the error of the color f...

Страница 30: ...1 16 Chapter 1 Before Use ...

Страница 31: ...nu List 2 23 Setting color fixing temperature 2 23 Flow of color fixation device operation 2 25 Warming Up 2 27 Media Setting 2 27 Adjusting the opening at the aperture plate 2 27 Processing when media is terminated 2 28 Resetting the proper temperature 2 29 Other Settings 2 29 Setting the Color Fixation Device from the Printer 2 31 Printing Workflow 2 32 Test Printing 2 33 Test Printing 2 33 Head...

Страница 32: ...ing to Preparing the Color Fixation Device P 2 19 Test Printing Referring to Test Printing P 2 33 Head Cleaning Referring to Head Cleaning P 2 34 Setting of Media Correction Referring to Setting of Media Correction P 2 35 Correct the ink drop position for bidirectional printing Referring to Correct the ink drop position for bidirectional printing P 2 36 Printing Data Referring to Printing Data P 2...

Страница 33: ...r switch located on the side of the machine To use this machine again press the END POWER key Cautions about Turning the Power OFF Do not turn the main power switch OFF When the main power switch is ON the power periodically turns ON and the nozzle missing prevention function flushing function operate When the main power switch has been turned OFF the auto maintenance functions such as flushing do...

Страница 34: ...rawing data whether the ink does not bleed to the back of the cloth When correcting drop position Use the adjusting spacer Installing and removing the ink receiving spacer and the fabric edge spacer Make sure you install spacers to prevent media being soiled by ink mist when printing and to apply the ink correctly 1 Apply fabric retainers on the left and right 2 Installing the ink receiving spacer...

Страница 35: ...dge of the fabric edge spacer as close as possible to the edge of the media Note that the antistatic fabric does not completely eliminate static electricity The antistatic fabric reduces the influence of static electricity Therefore attaching the antistatic fabric does not completely prevent any decline in print quality caused by static electricity You can also reduce the generation of static elec...

Страница 36: ...edia Take care not to drop the media on your foot when setting the media It may cause an injury due to the media When setting a roll media work by two or more people Otherwise you may hurt your back by the weight of the roll media In the cases below be sure to fix tension bars on both sides of the printer If you leave the tension bars unfixed the bars supported by media may fall down Please be car...

Страница 37: ... take up device and unlock the AMF lock by sliding it 4 Open the covers 5 Remove the roll shaft 2 Remove the roll holders The roll holders are on both for the right and left of the roll holder Remove both with the procedures below 1 Loosen screws 1 each on the right and left with supplied ratchet handle 2 Remove the holders Handle the roll shaft with care since it is very heavy with media To avoid...

Страница 38: ... Paper core Handle left right movable range seal Ratchet handle When you fix the roll holder please do not lift the lever of the fixing screws When the entire fixing screws are raised above screws idle and can not be fixed Please note the orientation of the ratchet handle at the time of fixing If the ratchet handle is turned sideways hit the roll shaft during the unit is in operation and may not b...

Страница 39: ... Lapel bar 7 Lapel bar 8 Carefully set A part so as not to hit near frame Scratches can cause malfunction Put the shaft on gently not roughly A part B part Lever Lever Take care not to drop the media on your foot when setting the media Handle clamp levers carefully Do not push the lever up when tension bar is lifted Be sure to fix the tension bar with the tension bar lock plate and push up down th...

Страница 40: ...et handle 2 Remove the holders 5 Set a media on the roll shaft 1 Put the roll shaft through a paper core Need to adjust the position of the paper core to come in the middle of the roll shaft Set the media so as to align the scale of media set label and the center position of the paper core 2 Push both sides of the roll holders into the paper core and tighten screws with supplied ratchet handle to ...

Страница 41: ...he media through lapel bar 1 10 Feed the media from outside the feeding tension bar to lapel bar 2 11 Feed enough of the media under lapel bar 3 At this point remove any wrinkles from the surface of the media 12 Insert the edge of the media between the grit roller and the pinch roller and slide it to the front of the machine 13 Lower the clamp lever at the rear of this machine The media is held Cl...

Страница 42: ...tation direction switch to the bottom arrow 2 While pulling the pin on the outside of the tension bar lock plate set the left side switch to Manual 3 The tension bar lowers a little Switch back and forth between Manual and Auto until the tension bar is almost parallel to the floor When the tension bar is almost parallel to the floor switch back to Auto 18 Confirm that the opening at the aperture p...

Страница 43: ... jig Guiding fabric jig accessory box 1 1 Insert the jig into the central part of the color fixation device until the auxiliary moving rollers touch the surface 2 Press the jig gently against the pulling roller 3 Move the jig to the right and left and slowly insert the edge of the media into the color fixation device Move the jig gradually and completely insert the media into the opening at the ap...

Страница 44: ...does not accumulate on top of the aperture plate of the color fixation device If the media accumulates on the aperture plate use the jig to adjust any accumulated or loose media 23 Press to loosen the media Loosen the media until it reaches to the floor 24 Feed the media to the base of lapel bar 4 Use to loosen the media as much as necessary 25 Feed the media to the top of lapel bar 5 and label ba...

Страница 45: ...en while holding the tension bar unlock it and then lower it 33 Press to lift the tension bar up and to stretch the loosened media Turn the switch to AUTO Tension bar lifts taking up the media and automatically stops at the proper position Surface waviness or ruck may affect the quality of currently printed image When fixing media with tape align the media along the direction indicated with an arr...

Страница 46: ...en is not displayed P 3 20 2 Press to enter the media width 3 Press key 4 Display the screen for entering media remaining amount When you set Setting the Display of Media Remain of the machine setting to OFF this screen is not displayed P 3 19 5 Press to enter the media remaining amount 6 Press key When the tension bar of media take up device locates at a high position the following message is dis...

Страница 47: ...e of the tension bar to the carabiner at the top and attach weights to the machine s carabiner Adjust the number of weights according to your needs Media condition Solution Ruck is generated in the media feeding direction The tension applied on the media is too strong According to your media reduce the weight of the tension bar The media skews at printing The media sags and the machine cannot take...

Страница 48: ...n can be changed 1 In Local Press It enters into the origin setting mode 2 Press to set the temperature of heater Select the carriage and media moving the point with When you press FUNC2 CUT here you can perform media cutting 3 After determining the origin press the key The printing origin is changed Changing the printing origin When media is automatically detected the printing start point origin ...

Страница 49: ...r When turning on the main power supply please do not block the filter part and the punching part Heater ON OFF switch Turn on off heater on local control LED blinking Heater is waiting WAITING Turn the switch to the right to turn on the heater LED lit Heater is ON Turn the switch to the left to turn off the heater Main power switch Turn ON OFF the main power supply of color fixation device Emerge...

Страница 50: ...atus indication The following eight types of status are displayed OFF WAITING Waiting READY Reached Coloring temperature STAND BY Standby temperature HEATING Heating COOLING Cooling ERROR Error occurring MAINTE Turning on the power during maintenance Interlock control display The following two interlocking control modes are displayed LOCAL REMOTE Tap to switch However it can not be used when the E...

Страница 51: ...OWER2 Lights up if the blower stops when the command for its operation is active TEMPERATUBE Lights up when a control temperature error occurs PRINTER_EMR Lights up when the emergency button is pressed on the printer side HEATER_EMR Lights up when the emergency button is pressed on the color fixation device side THERMOSTAT Lights up when an error in the internal temperature of the furnace occurs T...

Страница 52: ...s available only with the printer command Timer Setting Automatic Heater Off Timer Displays the time required for the status to change from Ready to OFF The timer is disabled during printing Filter Cleaning Timer Displays the time elapsed after the filter is cleaned CLR Clears the time elapsed after the filter is cleaned Filter Replace Timer Displays the time elapsed after the filter is replaced C...

Страница 53: ...me setting 1 5 60 min Yes Local Set the time to turn off the heater after transition to Ready 2 Remote Set the time from the end of printing to turning OFF Time after filter cleaning 300 H Set the time until the alert is issued after cleaning the filter 3 Time after filter replacement 2000 H Time until alert comes out after filter exchange 3 External input setting ON External input setting Set whe...

Страница 54: ...F2 Screen transition 2 Changes in the set temperature and current temperature are displayed in the temperature chart Displays changes in temperature for the last 60 minutes Returns you to the TOP screen when you tap Set off timer Set the time until the heater turns off automatically Depending on the mode the operation of the off timer varies Standby temperature is the holding temperature for short...

Страница 55: ... from HEATING to READY and printing starts automatically If you have not adjusted the opening at the aperture plate P 2 27 follow the procedure described in When you do not control the color fixation device from the printer P 2 26 The automatic printing function is available when all of the three conditions below are fulfilled You have adjusted the opening at the aperture plate P 2 27 You have not...

Страница 56: ...emperature the status changes from HEATING to READY 1 Adjust the opening at the aperture plate P 2 27 2 Send print data from computer to printer Printing will start 5 Turn OFF heater 1 When printing is completed touch the button The operation screen is displayed 2 Touch the of the HEATER The heater turns off and the status changes from READY to COOLING You can go back to the previous screen by pre...

Страница 57: ...es about 40 minutes from when turning on the heater until coloring becomes possible You can warm the coloring machine by turning on the heater in local mode in advance You can change to control from the printer by changing from local to remote in the middle Media Setting Set media according to the procedure of Chapter 2 P 2 4 Setting a Media Adjusting the opening at the aperture plate This adjustm...

Страница 58: ...c jig to the right and left to adjust the opening size all aperture plates Use the thick part under the auxiliary moving rollers of the guiding fabric jig to adjust the opening size Do not slant the jig when you move it If the jig hits the screws or some other parts do not push the jig inside by force but rather pull it out first move it and then try to reinsert it Processing when media is termina...

Страница 59: ...proper temperature Estimation of temperature setting The color fixing temperature is based on 180 C and should be adjusted according to the nature of the media to be used Other Settings Reset timer for filter cleaning filter change Filter cleaning alerts are displayed every 300 H filter exchange alerts are displayed every 2000 H Clean the filter or replace the filter then reset the timer with the ...

Страница 60: ...rature of the heater and coloring temperature Celsius Displays the temperature of the heater in degrees Celsius Fehrenheit Displays the temperature of the heater in degrees Fahrenheit Configure external input output Set ON OFF of external input output Please set it when using external stop switch function no voltage contact output Function External output No voltage contact output is performed in ...

Страница 61: ...nter You can turn the color fixation device on off as well as set the temperature and the timer from the printer s Setup menu Setting the color fixation device 1 Press the MENU key in Local 2 Press to select SETUP 1 to 4 and press the key 3 Press to select Color fixation device and press the key Set the Color fixation device to ON to display a variety of settings Color fix temp Set the temperature...

Страница 62: ...en generated You can set the temperature when fixing the color in FUNC2 HEATER Setting range 150 to 200 Setting unit Increments of 1 Local Setup 1 12 00 Media Select Roll Leaf 179 C 180 C CONSTANT REMOTE MENU TEST PRINT CLEANING Local Setup 1 12 00 Media Select Roll Leaf OFF REMOTE MENU TEST PRINT CLEANING Local Remote Heater ON Heater ON Screen display HEATING Waiting to reach coloring heater tem...

Страница 63: ... Screen display READY Start printing Heater OFF Screen display COOLING Printer Color fixation device Send print data Printing stops Heater OFF Error occurs Error display Error occurs Error display The operations are the same when a printer error or a color fixation device error occurs When a color fixation device error occurs the heater is turned off immediately Local Remote Heater ON Heater ON Screen...

Страница 64: ... test printing result There are three types of head cleaning Use one by checking the test pattern 1 Press TEST PRINT CLEANING in LOCAL 2 Press to select Cleaning and press the key CLEANING menu appears 3 Press to select the cleaning type Soft When lines are bent when any line is missing Normal When any line is missing when colors are mixed Hard When poor image quality cannot be improved even by No...

Страница 65: ... changed value is registered When you press the ENTER key instead of the END POWER key the value entered here will be invalid 4 Press key several times to end the setting Be sure to perform feed correction each time before printing The media feed amount may vary depending on the remaining amount of the roll media If use by setting the media to Narrow roll holder rewind the roll media by hand and s...

Страница 66: ...enter the correction value for pattern 1 and press the key Corrected feeding rate 40 to 40 Check the test patterns The position where an outward feeding line and a return feeding line become one straight line is the correction value When the correction value in not between 40 and 40 adjust the height of the printing heads and then perform the operations in Step 2 and later 6 In the same way as ste...

Страница 67: ... a difference in resolution Stopping a Printing Operation Perform the following operation when stopping a printing operation halfway 1 Press the LOCAL during printing The printing operation stops Interrupt data sending at the PC side during the data is sent from the PC Printing restarts from the interrupted data by repressing the REMOTE key Deleting Received Data Data Clear When you want to stop p...

Страница 68: ...lor to the printed surface with the color fixation device Perform the feeding operation until the back edge of print ing passes the drying heater When you press the END POWER key the operation is terminated When the machine has been received next data continu ously it will operate after the last data is received Screen display during fixing feeding Fixing Please Wait ...

Страница 69: ...tting Head Gap 3 15 About Machine Setup menu 3 16 Machine Setup menu table 3 17 Setting a AUTO Power off 3 18 Setting Feeding unit 3 18 Setting Take up unit 3 19 Setting the Display of Media Remain 3 19 Setting Time 3 19 Setting Unit Temperature Length 3 19 Setting a Key Buzzer 3 20 Selecting the head line to use 3 20 Setting the Media Detect Width 3 20 Setting a Drying Feed 3 20 Setting the Confi...

Страница 70: ...ozzle Maint OFF Interval Wiping Setup 1 3 4 Head Gap 2 0mm Setup Reset Setup 1 4 4 Feed Comp DropPos Correct Host Heater Host Logical Seek Overprint Setup 1 1 4 Drying Time Margin L 0mm Margin R 0mm Host OFF Refresh Refresh Left Setup 1 2 4 Drying Fan Standard Feed Speed MAPS4 Auto Nozzle Maint OFF Interval Wiping Setup 1 3 4 Feed Comp DropPos Correct Host Heater Host Logical Seek Overprint Setup ...

Страница 71: ...0 Used to adjust the dot position in go and return printing Color fixation device P 3 8 EXTERNAL HEATER ON OFF Sets ON OFF of the external heater Logical Seek P 3 8 Host ON OFF Sets the scan movable area during printing Overprint P 3 9 Host 1 to 9 1 Sets the number of layers in which ink is to be applied Drying Time P 3 9 Scan Host 0 0 9 9 sec 0 sec Sets the drying time of ink per scan Margin L P ...

Страница 72: ...al Hard Auto Sets the type of cleaning to be performed when any nozzle missing error is detected If Auto is selected the machine performs an optimum cleaning according to the nozzle recovery state RETRY COUNT 0 to 3 Performs recovery operations for missing nozzles by the set number of times Auto Nozzle Recovery ON OFF Set it to ON to perform nozzle recovery automatically Judgement Condition 1 to 1...

Страница 73: ...ng the part of registration contents of Setup 1 to 4 Select copy from the Setup Reset menu of Temporary and specify the copy source Setup 1 to 4 1 Press the MENU key in Local 2 Press to select Temporary and press the key Setup menu will be displayed 3 Press the 4 Press to select Setup Reset and press the key Selection screen of the copy source will be displayed 5 Press to select Copy and press the...

Страница 74: ...etup menu will be displayed 4 Press to select Feed Comp and press the key 5 Press the key to print the correction pattern Be sure to perform feed correction each time before printing The media feed amount may vary depending on the remaining amount of the roll media If use by setting the media to Narrow roll holder rewind the roll media by hand and set without slack There may not be accurate to cor...

Страница 75: ... operation to correct the ink drop position for bidirectional Bi printing and obtain the proper printing result Example of a Printed Pattern 1 Setting a Media P 2 4 In order to print a pattern a media that is 500 mm wide at least is necessary 2 Press the MENU key in Local 3 Press to select SETUP 1 to 4 and press key Setup menu will be displayed 4 Press to select DropPos Correct and press the key 5...

Страница 76: ... before the heater turns on automatically Setting range OFF 1 to 12H 6 Press to select setting item and press the key 7 Press to select a set value and press the key 8 Press key several times to end the setting Setting of Logical Seek The head s operation varies depending on the Logical Seek settings as shown in the figure below 1 Press the MENU key in Local 2 Press to select SETUP 1 to 4 and pres...

Страница 77: ...e left and right edges of the media The offset value against the standard margin 15mm is set hereupon 1 Press the MENU key in Local 2 Press to select SETUP 1 to 4 and press key Setup menu will be displayed 3 Press the 4 Press to select Margin L or Margin R and press the key 5 Press to select the setting value and press the key Set value Host 10 to 85 mm 6 Press key several times to end the setting...

Страница 78: ... Setup menu will be displayed 3 Press the twice 4 Press to select Drying Fan and press the key 5 Press to select the setting value and press the key Setting value Host 10 to 200 in increments of 10 6 Press key several times to end the setting Setting of Feed Speed Changes the media feeding speed in printing 1 Press the MENU key in Local 2 Press to select SETUP 1 to 4 and press key Setup menu will ...

Страница 79: ...nge the smoothing level and press the key Set Value 0 to 100 set in units of 5 The MAPS4 effect become strong as the set value increase and become weak as the set value decrease 10 Press key several times to end the setting Changing the MAPS4 settings may change the color tone Check the effects before use MAPS may not be effective depending on image to be printed Check the effects before use Condi...

Страница 80: ...ozzle Maint and press key 5 Press to select Auto Cleaning and press key 6 Select ON and press key 7 Press key and press to select the type of auto cleaning There are PAGE LENGTH and TIME for auto cleaning File When the set number of files has been completed the machine performs head cleaning automatically Length When the set length has passed the machine performs head cleaning automatically Time W...

Страница 81: ... Recovery operation Nozzle Check Judgment 4 Retry Judgment Printing Check Judgment Detects missing nozzles If more missing nozzles than Judgement Condition are detected after the nozzle check cleaning is performed and nozzle check is conducted again 5 Nozzle Missing judgment If more missing nozzles than A are eventually detected continued printing will be deemed impossible and printing will stop I...

Страница 82: ...ing to the setting selected in Step 5 Length 0 1 to 100 0m in 0 1m increment File 1 to 1000 in 1 file increment Time 10 to 120min in 10min increment 9 Press key 10 Press to select the cleaning type and press the key Setting value Soft Normal Hard Auto When Auto is selected the most suitable cleaning is performed automatically depending on the condition of the nozzles 11 Press to select Retry Count...

Страница 83: ...hen selecting 3 255 min execute the feed setting When turning it ON it feeds the media until the media passes Color fixation device When OFF is set periodical wiping is not executed 6 Press key 7 Press key several times to end the setting Setting Head Gap Set the head gap height from the media to the nozzle plane of the heads 1 Press the MENU key in Local 2 Press to select SETUP 1 to 4 and press k...

Страница 84: ...ANGUAGE Reset 4 4 Machine Setup Auto Power off 30min Feeding Unit Take up Unit ON ON OFF Media Remain Time Set 1 4 Machine Setup Unit Temp C Unit Length Key Buzzer mm ON ALL Head Select AUTO MediaDetect Width 2 4 Machine Setup Drying Feed OFF View Feed Space Btwn PP OFF OFF INTER Space Feed Mode Network Mail 3 4 Machine Setup Auto Power off 30min Feeding Unit Take up Unit ON ON OFF Media Remain Ti...

Страница 85: ... etc or not Space Btwn PP P 3 21 None 10 to 500mm None Sets the amount of blank space between printed lines Space Feed Mode P 3 21 INTERMITTENT CONTINUOUS INTERMIT TENT Change the feed mode of the margin included in the image data Network Mail Network P 3 22 Set the network Check IP Address The IP address currently used by this machine is displayed Check MAC Address The MAC address currently used ...

Страница 86: ...TP Set the SMTP server authentication method SMTP authentication SMTP Auth OFF USER NAME 2 Set the user name used for the authentication PASS WORD 2 Set the password used for the authentication POP3 ADDRESS 3 Set the POP server APOP 3 Set ON OFF of APOP Transmit Test Send the test e mail Setting Lock P 3 26 Lock Password is not set 0000 to 9999 0000 You can freely specify a four digit password so ...

Страница 87: ...eys 6 Press key several times to end the setting Setting Unit Temperature Length Units used by this machine are set 1 Press the MENU in Local 2 Press to select machine setup and press the key 3 Press the 4 Press to select Unit Temp or Unit Length and press the key 5 Press to select the setting value and press the key Set value of temperature C F Set value of length mm inch 6 Press key several time...

Страница 88: ...etting media and there is a problem with the media width sensor use MANUAL to set the width 1 Press the MENU in Local 2 Press to select machine setup and press the key 3 Press the 4 Press to select Media Detect Width and press the key 5 Press select Auto or Manual and press the key 6 Press key several times to end the setting Setting a Drying Feed To dry evenly up to the back edge of the printing ...

Страница 89: ...es to end the setting Setting the feed mode of the space of no data to be printed Change the feed mode of the margin included in the image data the space of no data to be printed If print data with much margin set to Continuous then the print time can be shorten 1 Press the MENU in Local 2 Press to select machine setup and press the key 3 Press the twice 4 Press to select Space Feed Mode and press...

Страница 90: ...g Setting event mail function Set the function to send e mails to the set e mail address when events such as cutting start end and stop due to an error You can also perform network setting with Network Configurator the tool to perform network setting of Mimaki s product To download the Network Configurator check Driver Utility on the download page at Mimaki Engineering http mimaki com download Ena...

Страница 91: ... set mail address and press the key Set the e mail address to which you send the event mail Set it with alphanumeric characters and symbols within 96 characters 8 Press key several times to end the setting Set the subject 1 Press the MENU in Local 2 Press to select machine setup and press the key 3 Press the twice 4 Press to select Network Mail and press the key 5 Press to select Event Mail and pr...

Страница 92: ...on method SMTP authentication When you select OFF proceed to the Step 15 If you select SMTP Authentication after the operation of the steps 15 18 go to step 23 When you select OFF proceed to the Step 23 15 Press to select USER NAME and press the key 16 Press to set the user name and press the key Press to set the user name to use for the authentication Set it with alphanumeric characters and symbo...

Страница 93: ...l address Enter the correct e mail address 11003 11004 The POP server cannot be found Or cannot access DNS server Check the POP server address Check that the machine is in the environment where DNS is available 11021 Cannot connect with the POP server Check the POP server setting Check the firewall setting 12010 An error returns from the POP server Check the POP server setting 13000 The POP authen...

Страница 94: ...s displayed When releasing fails The message Release failure is displayed 7 Press key several times to end the setting Setting a LANGUAGE Displayed language is changed 1 Press the MENU in Local 2 Press to select machine setup and press the key 3 Press the 4 Press to select Language and press the key 5 Press to select language and press the key Set Value 日本語 English Deutsch Français Español Italian...

Страница 95: ...s ink history of this machine Error History This displays the history of errors and warnings to date When you press the date of occurrence year month day hour minute and the error warning information are displayed alternately in the order of occurrence 4 times Information Usage Version List Ink Repl Report Errot History Information Usage Version List Ink Repl Report Errot History Information Usage...

Страница 96: ...ng if you want to clear the use count of the wiper 3 Press the key to clear the counter The use count of the wiper is cleared Displaying the Information of this machine 1 Press the key in Local 2 The information is displayed sequentially with the key The information shown on the below appear 3 Press the key to return to Local Ink information Error Warning Only at the time of occurrence Machine inf...

Страница 97: ...aintenance Menu 4 8 Maintenance menus at a glance 4 9 Maintaining the Capping Station 4 10 Cleaning the Wiper and Cap 4 10 Washing the Ink Discharge Passage 4 12 When the Machine Is Not Used for a Long Time Custody Wash 4 12 Cleaning the Ink Head and the Area around It 4 14 When nozzle missing Cannot Be Solved 4 15 Washing the Head Nozzle 4 15 Nozzle Recovery Function 4 16 Automatic Maintenance Fu...

Страница 98: ...esult in electric shock hazards or damage to the machine Before maintenance be sure to turn off the power button and main power switch and unplug the power cable otherwise an unexpected accident may occur Prevent moisture from entering the machine Moisture inside the machine can cause electric shock hazards or damage to the machine To ensure stable ink jetting it is necessary for the machine to ej...

Страница 99: ...y water collected in the tank according to your local rules and regulations 7 Attach the fabric retainer Cleaning the Lapel Bar Take up Side From the front of the machine wipe away any dirt such as ink attached to the lapel bar used during media take up Soak a soft cloth in water or diluted mild detergent wring it out thoroughly and then wipe away any dirt Cleaning the Tension Roller From the fron...

Страница 100: ...an any dirt such as ink stains on the fabric retainer remove the retainer to clean it Maintaining the Grit Roller Use a resin brush to periodically remove any preprocessing solution or lint that is attached to the grit roller 1 Turn off the machine Set the main power switch of this machine to the O side 2 Open the front cover and raise the clamp lever Ink landing plate Make sure you clean the grit...

Страница 101: ... is operating correctly 1 Press the key in Local mode 2 Press and select Carriage Out 3 Press the key The carriage moves onto the platen 4 Open the front cover 5 Push the carriage with your hand to move it to the left edge and then check that the carriage and the pinch roller do not obstruct each other If the carriage and the pinch roller obstruct each other re install the pinch roller and then ch...

Страница 102: ...Cleaning the Flushing BOX Sensor Please clean flushing BOX sensor regularly about once a week 1 Remove the lower part of the left side front cover 1 Remove the screws for two positions of the lower part of the left side front cover 2 Pull the lower part of the left side front cover in front lift it above and remove the lower part of the left side front cover Remove the screws use the supplied scre...

Страница 103: ...ve the screws 4 locations of flushing cover and remove the cover 2 Remove the ink receiving sponge holding and take out the ink receiving sponge 3 Soak the ink receiving sponge in tap water and lightly rubbing wash Please ask the industrial waste treatment company for the waste liquid treatment of the waste that washed the sponge 4 Return the flushing unit to its original state Install the flushin...

Страница 104: ...Maint Sub Tank Charge Ink 1 2 Maintenance Replace Ink Tank Tank Calibration Waste Expored ink 2 2 Maintenance Station Nozzle Recovery Auto Maint Sub Tank Charge Ink 1 2 Maintenance Replace Ink Tank Tank Calibration Waste Expored ink 2 2 Maintenance Station Nozzle Recovery Auto Maint Sub Tank Charge Ink 1 2 Maintenance Replace Ink Tank Tank Calibration Waste Expored ink 2 2 Maintenance Station Nozz...

Страница 105: ...recovery from nozzle missing etc Print Used to print a pattern and to check and or register clogged nozzles Entry Registers the faulty nozzle identified by Print Check Checks recoverable printable conditions Reset Resets a registered faulty nozzle Auto Maint P 4 19 For having the various maintenance functions executed automatically Set the execution interval for each maintenance function Refresh O...

Страница 106: ...r for two positions 2 Hold the upper of the lower part of the right side front cover and pull it to the front Open the lower part of the right side front cover with the supplied screwdriver Tools required for Maintenance Cleaning Liquid 03 MAINTENANCE KIT ML003 Z K1 Clean stick SPC 0527 Gloves Goggles Be sure to wear the supplied goggles and gloves when maintaining the capping station Otherwise yo...

Страница 107: ... towards the waste route 8 Set the wiper at the original position Insert the wiper by holding both ends of the wiper 9 Clean the cap rubber and cap rubber cover Wipe off the ink sticking to the cap rubber and cap rubber cover with a clean stick dipped in cleaning solution for maintenance Wipe off so that cleaning solution for maintenance will not remain 10 Close the lower part of the right side fr...

Страница 108: ...de front cover and press the key After running a dry suction for a certain period of time the screen returns to step1 When the Machine Is Not Used for a Long Time Custody Wash When the machine is not going to be used for a week or more use the cleaning function for custody to clean the head nozzles and ink discharge passage After this keep the machine in custody 1 Press the key and press MAINT in ...

Страница 109: ...ap rubber cover Wipe off the ink sticking to the cap rubber and cap rubber cover with a clean stick dipped in cleaning solution for maintenance Wipe off so that cleaning solution for maintenance will not remain At this time the discharge passage is cleaned automatically 6 Press key 7 Fill up the cap with cleaning solution for maintenance using a dropper Fill the cap with the cleaning solution just...

Страница 110: ...ress MAINT in LOCAL The Maintenance menu appears 2 Press select Carriage Out and press the key 3 Press to select Head Maint and press the key The carriage will move to the left end of this machine 4 Remove the lower part of the left side front cover 1 Remove the screws for two positions of the lower part of the left side front cover 2 Pull the lower part of the left side front cover in front lift ...

Страница 111: ...ozzles in the heads to prevent them being clogged with coagulated ink 1 Press the key and press MAINT in LOCAL The Maintenance menu appears 2 Press to select Nozzle Wash and press the key The carriage moves onto the platen 3 Open the lower part of the right side front cover 1 Remove the screws of the right side front cover for two positions 2 Hold the upper of the lower part of the right side fron...

Страница 112: ...ll the cap with the cleaning solution just before the solution overflows from the cap 7 Close the lower part of the right side front cover and press the key 8 Press to set the resting time and press the key When the resting time has passed the machine absorbs the cleaning solution filled in the cap and performs cleaning Then the machine returns to the display in step 1 Nozzle Recovery Function Noz...

Страница 113: ...1 130 141 150 161 170 181 190 201 210 221 230 241 250 261 270 281 290 301 310 1 10 21 30 41 50 61 70 81 90 101 110 121 130 141 150 161 170 181 190 201 210 221 230 241 250 261 270 281 290 301 310 Overhead view L1 1AB Set a media of more than 210mm put horizontally If a media with narrow width is set printing will only be conducted to midway Nozzle pattern L1 1CD L1 2AB L1 2CD Line 1 Line 2 Line 3 S...

Страница 114: ...nd press the key Maintenance menu appears 3 Press to select Nozzle Recovery and press the key 4 Press to select Setup Reset and press the key 5 Press to select desired head s Head Line 1 to 3 and press the key 6 Press and to select the Nozzle line that needs to be reset and press the key A reset confirmation message appears 7 Press key 8 Press key several times to end the setting Up to 10 nozzles ...

Страница 115: ...ting the Cleaning level Sets the head cleaning level 1 Press the MENU in Local 2 Press to select Maintenance and press the key Maintenance menu appears 3 Press to select Auto Maint and press the key 4 Press to select Cleaning and press the key 5 Press to select Cleaning level and press the key Set value OFF Lv 1 Lv 2 Lv 3 When you select OFF proceed to the Step 7 6 Press to select the cleaning typ...

Страница 116: ...ic or may cause read error by stain or flaw If the selected ink tank is near its expiration date a confirmation screen will appear If OK press The selected tank cannot be charged an either of the following situations P 3 28 1 The volume of remaining ink managed by the printer is 100 2 The ink expiration date has passed by 2 months or more Expiration CHARGEANYWAY Displayed alternately Displayed alt...

Страница 117: ...lacement of the waste ink tank Confirmation Message in LOCAL 1 The confirmation message is displayed The following message will be displayed Waste ink near full Waste ink full Waste ink tank none 2 Check the state of the waste ink tank Replace the waste ink tank on the right side of the machine In the waste ink tank of the right side of the machine the ink and cleaning solution discharged around t...

Страница 118: ...waste ink tank removed 4 Replace the waste ink tank 1 Prepare a waste ink tank SPC 0197 Prepare a new tank or use the same waste ink tank after you have disposed of the waste ink inside 2 Hold the handle of the waste ink tank and insert it along the rail 3 Raise the waste ink tank 5 Close the waste ink tank cover When the machine recognizes the new waste ink tank the warning message is released St...

Страница 119: ...herwise you may get ink in your eyes If you get the ink on your skin or in your eyes wash it away with plenty of water immediately When pulling out the tube ink may drop from the tip of the tube Wipe the tube with waste cloth and cover the tip before starting work Request the treatment of waste ink you moved to a polyethylene tank for an industrial waste disposal contractor A part of the ingredien...

Страница 120: ...either side facing forward 6 Close the lower part of the right side front cover and press the key After its initial operation the machine returns to Local Replacing the HF filter Replace it once a month 1 Press the key and press MAINT in LOCAL The Maintenance menu appears 2 Press select Carriage Out and press the key twice The carriage moves onto the platen 3 Remove the HF filter cover at the left...

Страница 121: ... discard the expired ink Also ink type and date month and year will display 6 If there is no problem on the confirmation screen press the key This resets the ink charge information embedded in this machine 7 Discard the ink in the ink tank selected in step 4 When disposing of ink call for service from our company or our distributor 8 Refer to Fill ink in the ink tank and charging on P 1 10 and ref...

Страница 122: ... Refer to P 4 28 and perform Correct by the correction method Normal If you get ink in your eyes immediately wash your eyes with a lot of clean running water for at least 15 minutes In doing so also wash the eyes to rinse ink away completely Then consult a doctor as soon as possible Use genuine ink tanks for this machine This machine functions by recognizing the genuine ink tanks In case of troubl...

Страница 123: ...genuine ink tanks for this machine This machine functions by recognizing the genuine ink tanks In case of troubles caused by modified ink tanks or the like it shall be out of the warranty even within the warranty period If the ink bottle is moved from a cold place to a warm place leave it in the room temperature for three hours or more before using it Make sure to store ink bottles in a cool and d...

Страница 124: ...occurred please perform the following tasks Method for correcting the weight balance There are two types of correction method for the weight balance Correct by the correction method Normal 1 Press the MENU in LOCAL 2 Press to select Maintenance and press the key 3 Press the 4 Press to select Tank Calibration and press the key 5 Press to select Normal and press the key 6 Press to select an ink tank...

Страница 125: ...lot and press the key Perform the correction processing without the weight on the balance 8 When the correction processing is finished successfully set the ink tank that was removed in step 7 and press the key Please put the weight in the center of the dish of the balance If you put weight on the edge of the dish it will cause to increase the error of the remaining amount detection During the corr...

Страница 126: ...4 30 Chapter 4 Maintenance ...

Страница 127: ...does not start printing 5 2 The temperature of the heater does not rise to the set value 5 2 Media gets jammed media is soiled 5 3 Image quality is poor 5 3 Nozzle is clogged 5 3 Ink tank warning appears 5 4 In case of ink leakage 5 4 If an error related to the Sub Tank occurs Error 618 to 61b 5 4 When media heaves up at feeding 5 4 Warning Error Messages 5 5 Warning messages 5 5 Error messages 5 ...

Страница 128: ...f the heater does not rise to the set value Has the power cable been connected between the machine and a power plug socket Securely connect the power cable Is the main switch ON Turn on the main switch P 2 3 Is the power button located on the front of machine ON Turn on the power button on the front of the machine P 2 3 Is the correct interface cable used Use the cable exclusive for the device Is ...

Страница 129: ...height of the head proper Adjust the distance between the media and the head will be 1 5 mm to 2 mm P 2 6 Yes Is the media hanging down along the platen Use a take up device P 2 7 or re load the media on the machine P 2 9 Open the front cover and raise the clamp lever Remove the clogged media Close the front cover Phenomenon Measures White lines blur dark stripes in the direc tion of travel of the...

Страница 130: ...ct Maintenance and press the key Maintenance menu appears 3 Press to select Sub Tank and press the key 4 Press key Discharge the ink in the sub tank and charge ink into the tank When media heaves up at feeding We call the status of heaving media at feeding cockling When media cockling occurs check the following items Once ink tank trouble is displayed do not leave the ink bottle without replacing ...

Страница 131: ... an abnormality of the informa tion of the IC chip The expiration date for the ink has passed The charged ink level is nearly full so ink cannot be charged The expiration date for the ink tank has passed Please run the ink charge P 1 10 again If you still cannot charge please check the cause that cannot be charged with P 3 28 Displaying the Information of this machine Message Cause Measures Close ...

Страница 132: ...ecov ery operations begin When the machine cannot recover or the cover is already closed and the message is still displayed turn off the main power to the machine and turn it on after a while If the same error message appears contact our service desk or your local distributor to call for service Message Cause Measures INK IC Expiration CHARGE ANYWAY NO YES The expiration date for the inserted IC c...

Страница 133: ...ontinue to use the ink Expiration 1MONTH CHARGE ANYWAY NO YES The expiration date for the ink has passed 1 month from the expiration date Expiration 2MONTH INVALID INK CHARGE The expiration date for the ink has passed 2 month from the expiration date It cannot be used as it is P 4 25After discarding the ink in the tank in Discard the expired ink please charge ink P 1 10 FULL CHARGE INK INVALID INK...

Страница 134: ... take up device Close the cover Take UP WRONG An abnormality occurred in the take up sta tus of the media take up machine Check if the media setting is set to ROLL when the take up device is not used Check if the taking up direction switch and the taking up manual switch are set correctly P 2 15 Check that the media is set on the media take up machine correctly Turn ON and OFF the manual switch an...

Страница 135: ...ozzle check OFF NCU SN ADJST Nozzle check OFF NCU NZK CHK HW Nozzle check OFF NCU NZK CHK MARK Nozzle check OFF NCU CONNECT The NCU unit is not connected The nozzle check function cannot be used Turn off the main power to the machine and turn it on after a while If the same error message appears con tact our service desk or your local distrib utor to call for service REPLACE NCU The NCU sensor sen...

Страница 136: ...Use cooling equipment to lower the room temperature to a specified range Wait until the machine cools down If the same error message remains after the machine is left at a specified room temperature for an enough time contact our service desk or your local distributor to call for service Flushing BOX Power Z Failed to detect the origin for the flushing BOX Turn off the main power to the machine an...

Страница 137: ...nth has passed after the expira tion date However you can use it until the end of this month The ink bottle lamp blinks in red If you want to replace it with a new ink please perform the Discard the expired ink P 4 25 Expiration 2 MONTH The expiration date for the ink has passed 2 month from the expiration date Two months have passed after the expi ration date If you want to replace it with a new ...

Страница 138: ...ROR 128 HDC FIFO UNDER ERROR 128 BATTERY EXCHANGE The battery life end of the internal clock is detected Contact your local distributor to call for service ERROR 12a HDC SPEED 123 Ink discharge control error Turn off the power button to the machine and turn it on after a while If the same error message appears again contact your local distributor to call for service ERROR 12a HEAD ROM WR Head cont...

Страница 139: ...heck the USB cable LAN cable connec tion Use a USB cable LAN cable con forming to the standard Check output conditions ERROR 304 USB INIT ERR USB device error Turn off the power button to the machine and turn it on after a while If the same error message appears again contact your local distributor to call for service ERROR 305 USB TIME OUT ERROR 306 USB GET DESC ERROR 401 MOTOR X An excessive loa...

Страница 140: ...R 427 Take UP Cover OPEN The cover open of take up device was detected Close the cover ERROR 428 Feeding Cover OPEN The cover open of feeding device was detected ERROR 429 Take UP LimitDETECT The control limit sensor of the media take up machine was detected Check if the media can be fed correctly in the jog operation Lower the position of the tension bar at the take up side ERROR 42A Feeding Limi...

Страница 141: ...it on after a while If the same error message appears again contact your local distributor to call for service ERROR 516 MEDIA SET POSITION R The media is set outside the proper area Check the media set position ERROR 516 MEDIA SET POSITION L ERROR 531 INK TNK SENS 12345678 Abnormality has occurred in the balance of the ink supply unit Please make sure that the weight is set correctly to the ink t...

Страница 142: ...r to call for service ERROR 647 WRONG CHARGE DATA 12345 Abnormality occurs in the data of the ink information being charged Cannot print Contact your local distributor to call for service ERROR 64b Nozzle Missing The automatic nozzle check judged noz zles No good Check the nozzle condition If there is plenty of deflection and or nozzle miss ing clean and restore the affected noz zles P 2 34 If the...

Страница 143: ...urred in the color fixation device If the same error message appears again contact your local distributor to call for service ERROR 732 E HEATER CONNECT Cannot confirm that the color fixation device is connected Disconnect and then reconnect the cables between the printer and the color fixation device If the same error message appears again contact your local distributor to call for service ERROR ...

Страница 144: ...PERATUBE It lights in red with the temperature error Check if the media got loose in the heater furnace or it works correctly Press down the RES key to cancel the error after a while and turn the heater on PRINTER_EMR When the emergency switch on the printer side is pressed It turns red on when the heater emergency switch is pressed in MAINTE Release the emergency switch after avoiding a danger an...

Страница 145: ...he same error message appears again contact your local distributor to call for service VERSION ERR It lights in red when a version of touch panel is incongruous with the main body PLC BATT ERR It lights in red with the abnormality of the PLC backup battery TEMP CTRL1 2 ERR It lights in red with the abnormality of the temperature adjuster Message Cause Measures Earth leakage Use a tester to measure...

Страница 146: ...CURRENT Overcurrent detected in heater2 733 HT E113 HT3_OVERCURRENT Overcurrent detected in heater3 733 HT E114 HT4_OVERCURRENT Overcurrent detected in heater4 733 HT E115 HT5_OVERCURRENT Overcurrent detected in heater5 733 HT E116 HT6_OVERCURRENT Overcurrent detected in heater6 733 HT E117 HT7_OVERCURRENT Overcurrent detected in heater7 733 HT E118 HT8_OVERCURRENT Overcurrent detected in heater8 ...

Страница 147: ... 2 Check the operation of the external exhaust blower 737 TMP E162 TEMP_ABNL The temperature inside the furnace or the temperature on the media surface rose abnormally 220 C or higher There is a large disparity between the thermocouple and non contact thermom eter 100 C or more 1 Make sure that the connector of the sen sor is properly attached 2 Make sure that the sensor is not dirty or damaged 3 ...

Страница 148: ...5 22 Chapter 5 Troubleshooting ...

Страница 149: ...hapter contains the lists of the specifications and functions of this machine Specifications 6 2 Machine specifications 6 2 Ink specifications 6 3 Supply item list 6 4 Sheet for inquiry 6 5 Chapter 6 Appendix ...

Страница 150: ...Roll end treatment The roll end is gently fixed to the core with weak adhesive tape or weak glue for easy removal Leaf media size Maximum 3290 mm 129 5 in Minimum 297 mm 11 7 in Margin Leaf media Left end and right end 15 0 mm Default Front 150 mm Rear 400 mm 4 5 6 Left end and right end 0 59 in Default Front 5 9 in Rear 15 7 in 4 5 6 Roll media Left end and right end 15 0 mm Default Front 150 mm ...

Страница 151: ...5 Left and right margins can be changed 6 Error of 2 mm 7 The expansion and or contraction of media is excluded 8 Only if all the following conditions are met The media is set in the center of the machine When roll holders are used printing is started on a roll having no deflection The take up device is used Roll media is used One roll media is used except for twin rolls 9 Involuted for the media ...

Страница 152: ...0190 Mist airflow fan filter replacement kit SPA 0193 Wiper kit SPA 0196 Ink supply filter replacement kit SPA 0197 Waste ink tank SL Package ML003 Z K1 Cleaning Liquid 03 MAINTENANCE KIT SPC 0813 Flushing box absorber replacement kit SPC 0814 NCU ink absorber replacement kit SPC 0284 3L ink tank cap SPC 0285 3L ink tank ...

Страница 153: ...ll in the following necessary items and fax the sheet to our sales office Company name Person in charge Telephone number machine model Operating OS Machine information 1 1 Refer to Confirming Machine information of About Information menu then fill in necessary information P 3 27 Error message Contents of inquiry ...

Страница 154: ...Chapter 6 Appendix 6 6 ...

Страница 155: ...Tx500P 3200DS Operation Manual May 2017 MIMAKI ENGINEERING CO LTD 2182 3 Shigeno otsu Tomi shi Nagano 389 0512 JAPAN D203118 13 11052017 ...

Страница 156: ... 2016 MIMAKI ENGINEERING CO LTD MM FW 2 00 ...

Отзывы: