Thank you very much for your purchasing our sublimation option for TS34.
When you use the exhaust fan in the rear, it is required to perform setting of the machine.
Referring to the Chapter 3 “Machine Settings - Setting the DRYING FAN” in the Operation Manual, perform setting.
To maintain the printing quality, replace the filter of exhaust fan in the rear and duct tray periodically.
Rough standard for replacement of Exhaust fan in the rear
:
Per 1000m
2
-printing (equivalent of five roll media of Width: 1,800mm x Length: 210m)
Rough standard for replacement of Duct tray
:
Per 1000m
2
-printing (equivalent of five roll media of Width: 1,800mm x Length: 210m)
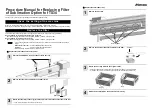
Replace the filter of Exhaust fan in the rear
1
Pull out the filter ASSY from the exhaust fan in the rear.
2
Remove the filter press and replace the filter inside.
3
Return the filter Assy to the original status and insert it into the exhaust fan in the rear.
• Then, replace the filter of the duct tray continuously.
Check the setting of the machine
Replace the filter
• For purchasing the filter, contact a distributor in your district or our office. (The filter is sold sepa-
rately.)
Exhaust fan in the rear
:
A101437/BEMCOT M-3 (100 pieces)
Duct tray
:
SPC-0734/Duct tray filter (50 pieces)
• Before replacing the filter, turn OFF the main power.
Procedure Manual for Replacing Filter
of Sublimation Option for TS34
Filter ASSY
Filter press
Replace the filter of Duct tray
1
Remove the duct tray.
2
Remove the absorber and filter and replace the filter.
3
Return the duct tray ASSY to the original status.
• Attach the absorber and new filter, and return the duct tray ASSY to the original status.
• At this time, be careful not to make the gap between the filter and the duct tray hole.
4
Attach the duct tray ASSY to the machine main body.
Duct tray ASSY
Absorber
No gap
Gap


