background image


- 1 - 


2019/06/20 

Ver1.10 

Installation Conditions 


Please install the main unit according to the following conditions: 


Operation Environment Temperature

16°C ~ 29°C  


Operation Environment Humidity

20~70%Rh (with no condensation) 


Place on a flat surface in an area with ample ventilation 


In an area leaving at least 10cm in the rear with no obstacles  


Away from direct sunlight and dust 


Out of direct range of air-condition and heating air flow 

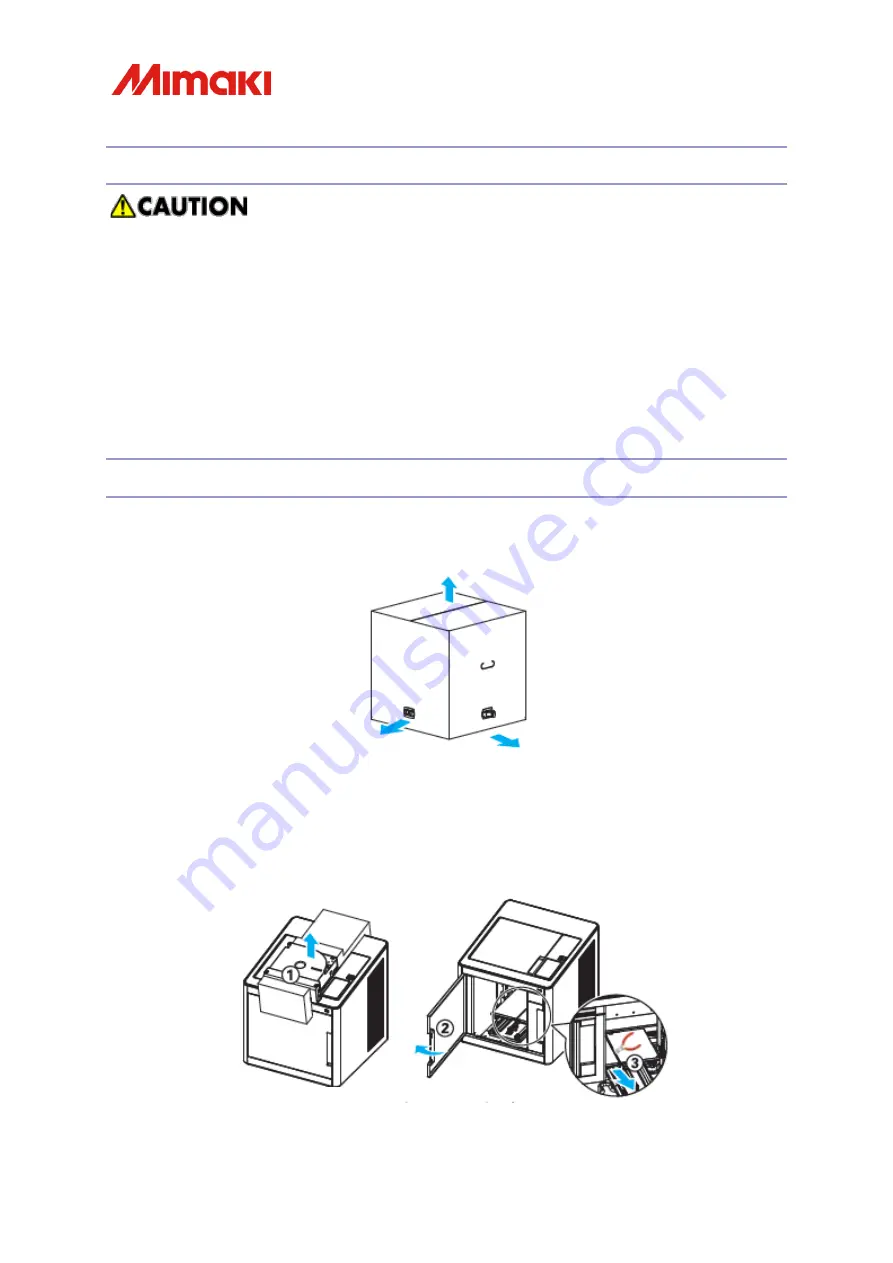
Unpacking and confirming contents 

1.


Pull out the 4 handles (

) located at the base of the box and lift upwards (

). 


2.


Remove the upper packing (

). After removing the tape, open the front 

door(

)and remove the tie wrap from the bed (

) using nippers. Finally, 

remove the electrical cable located in the cartridge space. 


Содержание Sindoh 3DFF-222

Страница 1: ...INSTALLATION MANUAL INSTALLATION MANUAL Please read the installation manual before installing this product Please follow the installation instructions during setup...

Страница 2: ......

Страница 3: ...ventilation In an area leaving at least 10cm in the rear with no obstacles Away from direct sunlight and dust Out of direct range of air condition and heating air flow Unpacking and confirming content...

Страница 4: ...h the 3DFF 222 are as follows 3Dprinter Cartridge With White PLA Filament Installed Electrical Cable 4 USB Cable Ferrite Core Scraper USB memory Stick Easy Installation Guide Tube for Nozzle Cleaning...

Страница 5: ...t 2 Grip the printer by the handles located on the lower left and right sides and move to desired location 3 With the power off connect the power cable 1 and if using connect the network cable a or US...

Страница 6: ...Insert the included USB memory into your computer and run the program contained on the USB This program can also be downloaded from the Sindoh homepage 3dprinter sindoh com 2 Open 3DWOX Desktop exe t...

Страница 7: ...5 2019 06 20 Ver1 10 3 When installation is complete the following window will be displayed Click next 4 Specify the installation destination and click next...

Страница 8: ...6 2019 06 20 Ver1 10 5 Click install to start the installation process 6 Once installation is complete the 3DWOX shortcut should appear on your desktop...

Страница 9: ...wer switch on the top of the unit to begin 2 When the printer is turned on for the first time the screen below will be displayed and bed leveling will be checked Click the OK button on the notificatio...

Страница 10: ...8 2019 06 20 Ver1 10 3 Select the SETTINGS button on the home screen 4 Select the BED LEVELING button and proceed to step 5 If the nozzle is hot it will first need to cool before leveling can begin...

Страница 11: ...if there is anything on the bed 6 Bed leveling is measured at 3 points the center rear front left and front right If the bed is already leveled there will be no operations to perform If the bed is no...

Страница 12: ...2019 06 20 Ver1 10 7 After turning the dials touch OK The bed will be remeasured and corrections will be displayed if necessary 8 When bed leveling is complete the following screen will appear Touch...

Страница 13: ...20 Ver1 10 Loading the Filament 1 Load the cartridge into the printer according to the following diagram The cartridge is loaded with one spool of white PLA filament 2 When the Auto LOAD screen appear...

Страница 14: ...e temperature will raise and the filament will be inserted into the nozzle Once the Filament Loaded screen is displayed it will return to the home screen If you selected No on the Cartridge LOAD scree...

Страница 15: ...lower left screen will appear Do not select OK until you have loaded the filament 3 Once the filament reaches the nozzle the temperature will raise and the filament will be inserted into the nozzle O...

Страница 16: ...r Start SINDOH 3DWOX1 2 Select LOAD from the left side of the screen and open the file you want to print The selected model will be placed in the center of the print bed as seen below 3 Select SETTING...

Страница 17: ...ng parameters printer speed filament type presence or absence of support material and support structure 5 Confirm that the 3D model is on the bed and click the Layer Viewer button converting the model...

Страница 18: ...r1 10 Using a USB Memory Stick for Printing 1 Insert USB stick into your computer 2 After slicing the model in the layer viewer select File Save G code in the menu bar 3 Save the G code file onto the...

Страница 19: ...INT on the touch panel home screen to display the files saved on the USB Note if PRINT is pressed before inserting your media you will receive an error message please insert USB Memory After inserting...

Страница 20: ...ta of the selected file will appear on the printer s screen 7 Press the start button check that there are no obstructions on the printing bed and press OK Printing will start once the nozzle has risen...

Страница 21: ...the pause button to pause work in progress Press the start button to continue the printing process after nozzle temperature has reset 9 Pressing the stop button will display the message Are you sure y...

Страница 22: ...essage will be displayed on the lower right side of the screen Remove the bed from the printer and remove your model from the bed Press the Bed Lock button and replace the bed Finally when the OK butt...

Страница 23: ...06 20 Ver1 10 Z Offset Please refer to the following to set the Z offset during installation 1 From the home screen select SETTINGS 2 From the SETTINGS menu select Z OFFSET and follow the onscreen ins...

Страница 24: ...spacing between the nozzle and the bed The initial value is 0 25mm but can be adjusted Press the button to increase the distance and the button to narrow the distance Narrowing the gap between the be...

Страница 25: ...23 2019 06 20 Ver1 10 MEMO...

Страница 26: ...24 2019 06 20 Ver1 10...

Страница 27: ...25 2019 06 20 Ver1 10 16 C 29 C 20 70 Rh 10cm 1 4 2...

Страница 28: ...26 2019 06 20 Ver1 10 3 3DFF 222 3D PLA 4 USB USB...

Страница 29: ...27 2019 06 20 Ver1 10 1 2 3 USB...

Страница 30: ...28 2019 06 20 Ver1 10 1 USB USB Sindoh 3dprinter sindoh com 2 3DWOX Desktop exe...

Страница 31: ...29 2019 06 20 Ver1 10 3 4...

Страница 32: ...30 2019 06 20 Ver1 10 5 6 3DWOX Desktop...

Страница 33: ...31 2019 06 20 Ver1 10 1 2 cancel...

Страница 34: ...32 2019 06 20 Ver1 10 3 SETTING 4 Next 2 LANGUAGE...

Страница 35: ...33 2019 06 20 Ver1 10 5 OK 6 1...

Страница 36: ...34 2019 06 20 Ver1 10 2 3 3 45...

Страница 37: ...35 2019 06 20 Ver1 10 4 5...

Страница 38: ...36 2019 06 20 Ver1 10 1 PLA 2...

Страница 39: ...37 2019 06 20 Ver1 10 3 1...

Страница 40: ...38 2019 06 20 Ver1 10 2 3...

Страница 41: ...39 2019 06 20 Ver1 10 1 3DWOX Desktop Windows SINDOH 3DWOX1 2 LOAD 3 3 3DFF 222...

Страница 42: ...40 2019 06 20 Ver1 10 SETTINGS PLA 4 3...

Страница 43: ...41 2019 06 20 Ver1 10 USB 1 USB 2 G code 3 USB G code...

Страница 44: ...42 2019 06 20 Ver1 10 4 3DFF 222 USB USB USB USB USB USB USB 5 USB...

Страница 45: ...43 2019 06 20 Ver1 10 6 7...

Страница 46: ...44 2019 06 20 Ver1 10 8 9...

Страница 47: ...45 2019 06 20 Ver1 10 10...

Страница 48: ...46 2019 06 20 Ver1 10 Z Z 1 2 Z Z Z 0 25mm...

Страница 49: ...47 2019 06 20 Ver1 10 MEMO...

Страница 50: ......

Страница 51: ......

Страница 52: ......

Отзывы: