MIMAKI OPT-J0400 Скачать руководство пользователя страница 9

9

Setting a Media

Print a media check pattern

Print a media check pattern, and make sure there is no ink
landing deviation caused by the media stretch. 

1

Press the [FUNC2](TEST PRINT/CLEANING) 
in Local.

2

Press [

][

] to select “

Media Check

”, 

and press the [ENTER] key.

3

Press [

][

] to select “

Print

”, and 

press the [ENTER] key.

• Execution screen will be displayed.

4

Press the [ENTER] key to start the print

5

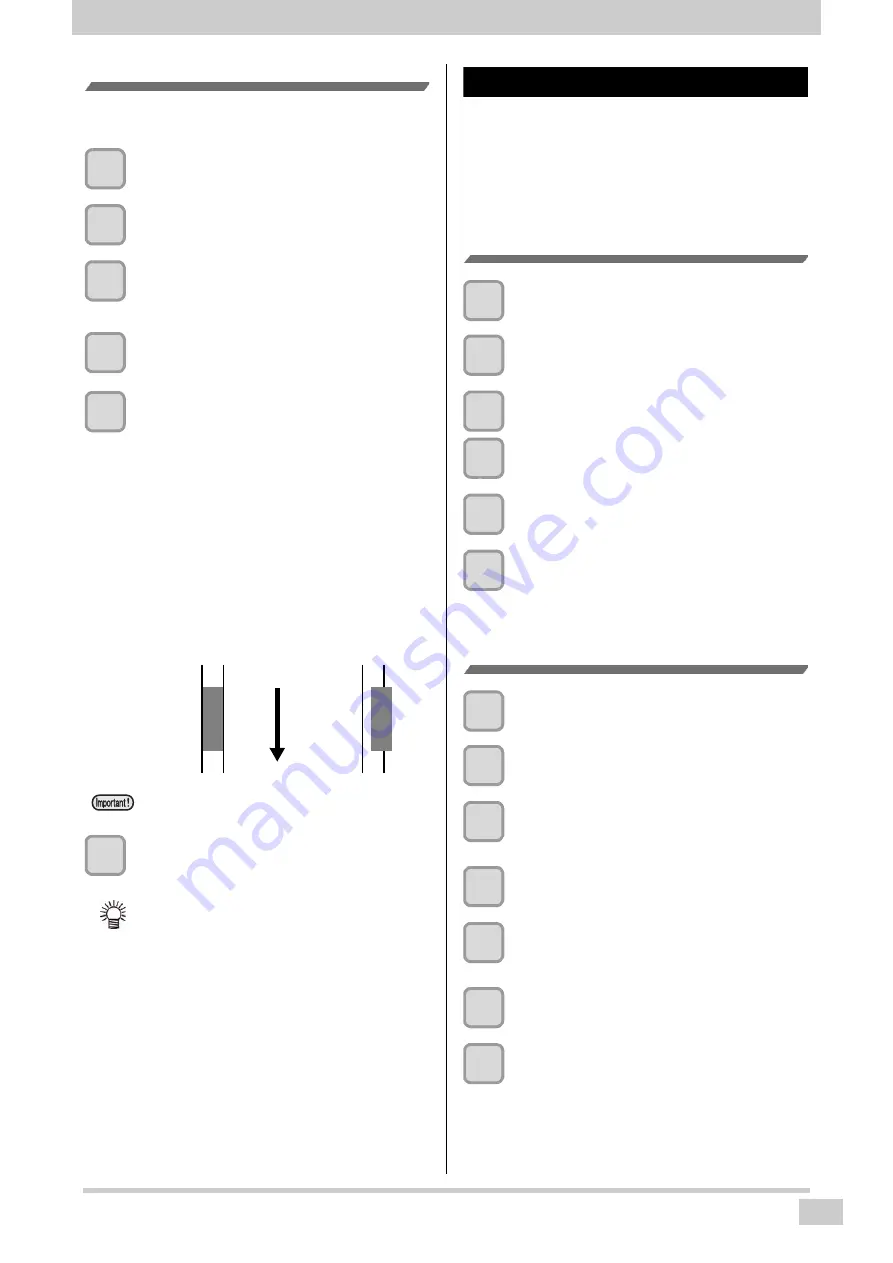
Verify the printed patterns

• The following pattern is printed.

If the dot placement shift does not occur :

Magenta will fall between the two of cyan line. It is
considered that there is no deterioration of image
quality due to the media stretch.

If there is a risk of impact of the dot placement
shift :

Magenta will not fall between the two of cyan line.
It is considered that the media is stretched due to
too heavy tension bar.
Since  it  becomes  a  cause  of  deterioration  in
image  quality,  please  make  adjustments  of  the
counterweight.

6

Press the [END/POWER] key several times 
to end the setting.

When using small take-up device

When using small take-up device, please do the following
tasks in order to stabilize the image quality.

• Set the "Tension rollers”, " feeding unit ", " take-up unit

"of the machine settings to OFF

• Set  the  torque  limiter  of  small  take-up  device  to

"LMAX..”

Set the Tension roller to OFF.

1

Press the [FUNC1](MENU) in Local.

2

Press [

][

] to select

 “Machine setup”.

3

Preess the [FUNC1](<<) in Local.

4

Press [

][

] to se

lect “Tension Roller”, 

and p

ress the [ENTER] key.

5

Press [

][

] to se

lect “OFF”, and p

ress 

the [ENTER] key.

6

Press the [END/POWER] key several times 
to end the setting.

Set the Feeding unit and Take-up unit to 
OFF.

1

Press the [FUNC1](MENU) in Local.

2

Press [

][

] to select

 “Machine setup”.

3

Press [p][q] to select “Feeding Unit”, and 
p

ress the [ENTER] key

4

Press [

][

] to se

lect “OFF”, and p

ress 

the [ENTER] key.

5

Press 

[

][

to select “Take-up Unit”, 

and p

ress the [ENTER] key

6

Press [

][

] to se

lect “OFF”, and p

ress 

the [ENTER] key.

7

Press the [END/POWER] key several times 
to end the setting.

• Please perform the entire media for the 

confirmation of pattern, 

• Setting of the tension roller can be set on the 

screen after the media detection.

If the dot placement 

shift

If there is a risk of 
the dot placement 

Media

 feeding 

dir

ection

Содержание OPT-J0400

Страница 1: ...in handling of medias 5 Setting a Media 6 Adjusting the Head Height 6 Setting a roll media 6 Please check the work after setting the media 8 When using small take up device 9 Maintenance 11 Precautio...

Страница 2: ...perations and maintenance of Soft Media Feeding Kit called as this machine hereafter Read this Operation manual carefully and understand them thoroughly to use It is also necessary to keep this Operat...

Страница 3: ...media for the Mimaki inkjet printer Listing in the following table the space required when mounting this unit to the Mimaki printer Please set up taking into account the size of the unit attached to t...

Страница 4: ...Front Side of the Machine Rear Side and Right Side of the Machine Here the soft media feeding kit is described with the figures of the kit mounted on the SIJ 320UV Mimaki UV inkjet printer Tension rol...

Страница 5: ...may be stained due to fingerprints or oil of your finger Be careful about it Do not use the heater Waviness may occur on the media and it may cause media clogging Use media recommended by MIMAKI to e...

Страница 6: ...Soft Media Feeding Kit For more information about the basic media setting procedure refer to the operation manual that came with your printer Lever position Vinyl Standard Distance between platen and...

Страница 7: ...f the tension roller Set to ON the take up unit and feeding unit In the case of tarpaulin media Turn OFF the setting of the tension roller Set up the take up unit and the feeding unit to ON In the cas...

Страница 8: ...Media Check and press the ENTER key 3 Press to select Feed and press the ENTER key Execution screen will be displayed 4 Press the ENTER key to start the feed When wrinkle occurs please add a counterw...

Страница 9: ...hen using small take up device When using small take up device please do the following tasks in order to stabilize the image quality Set the Tension rollers feeding unit take up unit of the machine se...

Страница 10: ...10 Setting a Media Set the torque limiter of the small take up device to MAX Put out about 1mm...

Страница 11: ...cable otherwise an unexpected accident may occur Prevent moisture from entering the machine Moisture inside the machine can cause electric shock hazards or damage to the machine To ensure stable ink j...

Страница 12: ...t fits your media P 8 Is the media not curled or bent ends Avoid using any media with curls or bent ends In addition when the tip is bent it will be the cause of the wound wrinkles Yes Is the height o...

Страница 13: ...edia press and perform feed back feed Heighten the head 1 Please raise the height of the head correct the dot position then print Note checking items Measures Check the media tension 1 Please apply hi...

Отзывы: